GrowFX Custom Foliage Creation by Studio xoio
Lasse, from studio xoio is sharing their experience working with Exlevels GrowFX plugin for 3ds Max as a tool for creating custom 3d Foliage models. This article will offer you an introduction of GrowFX so that you can better understand the concept of using it and set you on the right path for creating your own growth 3d models.
 Author: Lasse Rode / Studio xoio
The Berlin based studio xoio has been established in 2006 by Peter Stulz and Lasse Rode. It is specialized in high-quality emotive architecture and product visualization. The team at xoio consists of people who have an architecture and design background. That provides a strong understanding of creative processes and the ability to give support in questions of design.
Introduction
Let me first point out how much we really dig this piece of software in our studio. Unlike other tools we used to grow foliage GrowFX is not too “biological” in its approach, but that makes it more flexible to adjust your growing objects the way YOU want them to behave.
Furthermore, GrowFX can handle a LOT of geometry inside of 3ds Max, which is indispensible for the creation of realistic trees. An important thing to note is it is actively developed these days so you can expect more to come from the friendly developers which is important for any architectural visualization studio.
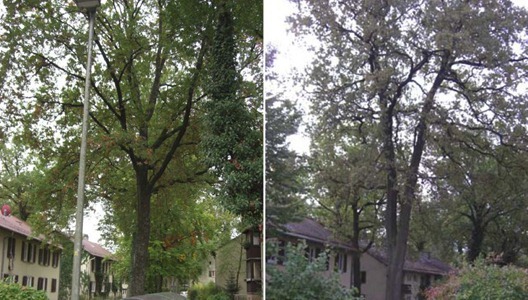
Before we get started in 3ds Max it is indispensible to do some research first, to have image references of trees you can always come back to. Otherwise, your trees will turn out generic and probably not very realistic. In this tutorial we want to cover the building of a tree for a specific project. We had several site photos featuring the trees needed to be part of the new building scheme.
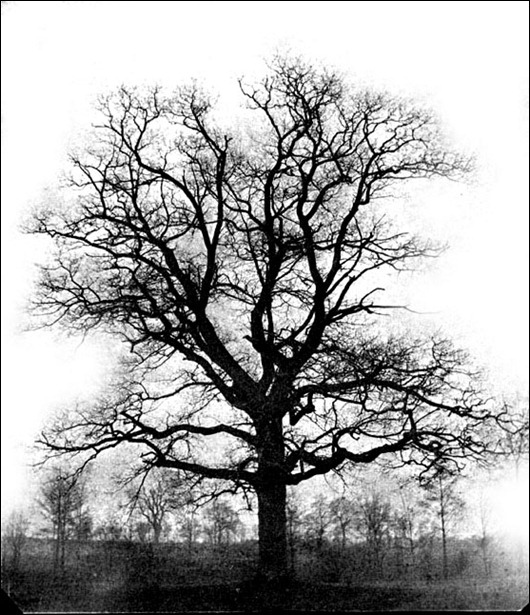
A good tip is to look for some winter images of the same trees to get a better impression of the branching without all the leaves blocking the view.
First let me quickly explain the basic setup of any GrowFX Object. Any growth object is consisted of one or more Elements. Each element has three basic categories:
- The Root (Distributor Window)
- The Path (Modify Window)
- The Mesh (Mesh Parameters Window)
- The Root defines where the element starts and in which general direction it takes off.
- The Path defines well… the path on which the element is growing, how long it will be and how it evolve over the distance.
- The Mesh defines the visible representation… the real render-able geometry. Usually this will be a branch but it can also be other things like leaves, fruits, or any other thing you can think about (dont limit yourself to just the usual organic lifelike foliage).
That is the order in which you should work your way up as you build your GrowFX object.
Each one of these categories, I mentioned above, has a separate window you can open, which makes it quite easy to treat them separately.
1. Generate your GrowFX object
Let’s start with the trunk. Before you generate anything it is a good advice to check your units. Otherwise you will spend hours tweaking your plants with the wrong scale and re-scaling is always prone to errors. We generate the GrowFX object, preferably in a separate scene. The calculation load can get quite extreme as you progress so I woldnt recommend editing the GrowFX object inside the main scene file. It is also best to start it at the scene origin 0,0,0.
2. Generate the first element The Path
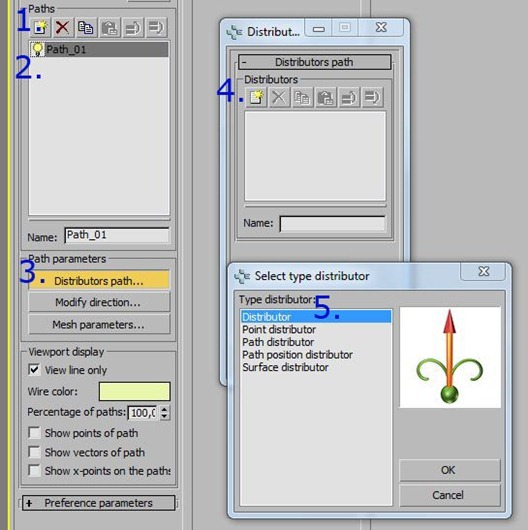
Next thing we create is our first path (1). It is a good idea to rename our first element to Trunk (2). It is important to get organized quickly, since we will jump back and forth a lot. Then we open the Root window (called distributor path) (3). There are no distributors yet defined, so we create one (4). Here is one great thing about GrowFX – You have no limitations on how many distributors you define, which gives you great flexibility on how you can place things (5). Finally, we take a simple Distributor which lets our trunk start straight in the icon center.
3. Generate modifiers
To influence our paths we open the modify window (1). In the next step you would adjust the total length of the path (2). In this case the length of the trunk. Now we should see an unmodified straight path in the viewport. To influence our path we create our first modifier (3). Choose a modifier you would like to use (4).
Here we get to a point where you can make great use of the help documentation that ships with GrowFX. The graphical symbols are pretty explanatory and the descriptions give you a good idea what each of the modifiers are doing.
The choice of modifiers seems overwhelming at first glance, but in fact it is well-chosen and gives you great control. There is actually no way around testing each one of them by yourself and seeing what they do. One great thing about GrowFX is that you can stack modifiers easily and a turn them on and off (by hitting the light bulb), so you can test them separately.
You really need to test the settings yourself and get familiar with each one of them to fine-tune the object growth. The three most important modifiers are random, noise and vector.
- Random Changes the path direction according to a fractal pattern
- Noise keeps the general direction but varies the path underneath
- Vector bends your path according to a given direction. This is used mostly for gravitational influences.
For the trunk I used a simple setup consisting of one random modifier and one Noise modifier. You probably need to adjust some scale and strength values to get some reasonable results.
One downside about the user interface at this point is, that you can change values of modifiers that are switched off. You will find yourself fiddling around with some values, seeing no changes and probably messing up a modifier that is switched off. Keep that in mind.
4. Creating first meshes
Now we get to create a render-able representation for our path (1). Open the mesh editor (2). Turn line display off so you can see what you are doing (3). Create a mesh (4). Choose the mesh type.
For all kinds of branch structures it is advisable to start with a simple cylindrical mesh. The meta mesh, does basically the same, but welds branch structures when they intersect. That is quite revolutionary in our opinion, but also takes a lot of time to build, so we normally save this step for last. The other meshes are,m well other meshes, all things other than branches.
5. Adjusting Meshes
Now you should see a simple cylindrical shell, which is probably highly tessellated. To adjust the density to a reasonable level you can adjust the shape sub steps in the direction window (1). And the circular density in the minimum faces spinner in the mesh window (2). To influence the radius in a more natural way we open a curve window by clicking the little curve icon besides the radius spinner (3). GrowFX uses a lot the internal curve editors, always adjusting Value over Distance. In this case Radius over Growth Length of the Trunk (4).
6. Adjusting UVW Maps
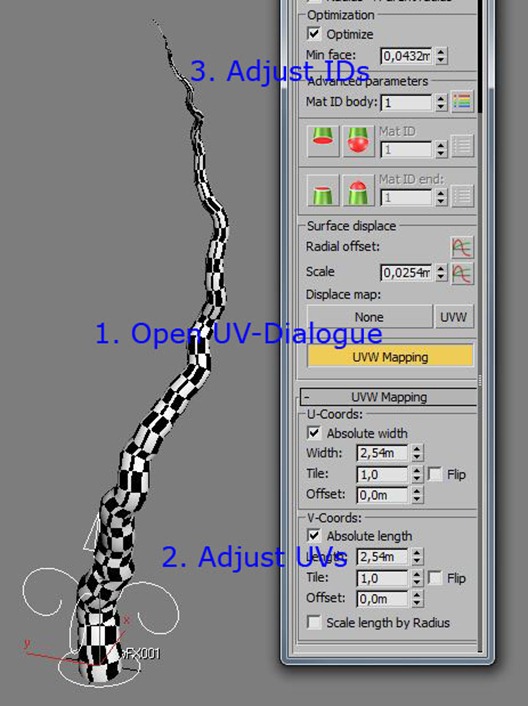
GrowFX has a very functional but efficient way of texture mapping. Scroll down on the mesh editor and hit the broad UVW Mapping button (1). This should open up a new submenu. I created a quick checker map material, assigned it and tested some absolute values (2). Later you should replace the map with some bark of your choice.
It is generally a good idea to have a slightly larger structure on the main trunk gradually getting smaller moving up.
For later use with a multi map you can quickly assign the material ID above (3).
7. Adding elements
Based on our trunk we now start adding additional elements. We create a new path (1). Rename it to Branches (2). We create a new distributor (3). And choose a path distributor. This modifier lets us root our branches on other paths. We add a root path and choose our trunk (4). If you switch to line display (5), you should now see the newly generated paths.
8. Using Affectors
An important feature in GrowFX are Affectors. These basically represent one value affecting another value in the same hierarchy or deeper. In this case we want, the relational position of the branches to influence the length of itself. In other words, the further up the branches are, the shorter they get.
Make sure your branch element is selected. Open the Affector control (1), based on the branch position. Add a new Affector (2), and pick the branch length you want to control. Add a curve representation (3), and edit the curve to your liking (4). See the first results in the viewport representation.
9. Move on by yourself
From here on you know all the parameters needed to generate tree structures. Honestly, it would take 50 extra pages to get all the fine-tuning detailed here, so I will not go any deeper into the process. Furthermore you really must try this solo to understand it fully and in a way you can repeat it and elaborate on it.
Be sure to double-check your references a lot, to make sure you stay on track. Sometimes it is better to switch back to your root elements and turn all other elements off again. The nice thing about GrowFX is, you can easily test settings and compare them by turning things on and off.
Here you see the full branching, consisting of 4 elements. To the very right you can see, that we tested various configurations and kept some turned off.
You have lots of control how your branching works. We kept the start value in general relatively high, to get a tree that is light in the inside and has fluffy balls of leaves towards the edges.
10. Custom Leaves
GrowFX offers various leave meshes which are ok. But since we want loads of leaves they will definitely make the biggest part of the mesh load generated. So we rather generate our own optimized mesh, which uses the least amount of polygons to get the result we are after.
Since xoio studio mostly relies on V-Ray, and occasionally on Mental Ray, alpha maps are an issue. We always try to keep render times as low as possible and alpha maps can be a killer in both engines. Therefore we build the depicted custom leave which includes the stem and forms a nice round leave-shape with 7 triangles / 3.5 quads. It is slightly bent to give nice reflections.
One important modifier for the use with leaves is the vector orient modifier which guarantees that your leaves all face upwards. May be you need to turn your base instance mesh on a sub-object level, if they all look sideways instead.
11. General Workflow Tips
Meta Meshes
In the upper image you can see the metamesh (trunk) versus the standard cylinder (bough). While the metamesh nicely connects the elements, the cylindrical elements stick into each other.
Since metamesh construction can take a lot of time, we keep always two mesh constructors in the stack, one cylindrical and one meta constructor. This way, you can easily switch between both for speed purposes. For the smaller branches metameshes are generally not necessary or even visible.
Test Branches
It can become quite tiresome if you need to judge the branching in a later stage and rebuilding starts to take ages. So to speed up the workflow, we inserted a new distributor, which generates only one branch. Turning the other branches off, rebuilding gets way faster. So you can judge all your branching settings quickly and always switch back to get the full tree.
Mesh Load
Do not be afraid of a LOT of geometry. Of course things tend to get really slow in the end, but if you really want some realistic tree, you will end up with several hundred thousand triangles. The tree above has 1.3 Million polygons. You can always get less geometry by using alpha maps for the trees. But from our experience with alpha maps, that incur long render times, it is better to use higher poly-count and it will render faster.
Export
When you are finally done with your tree, you probably want to make a backup copy of your GrowFX object before processing. Then you need to check the Convert to Mesh Button. Only then can you turn it into a regular mesh object. Convert it into an Editable Mesh. You will probably want to turn it quickly into a V-Ray or Mental Ray Proxy to improve the memory load.
Well we hope you can use some of these techniques in your future work and thank you for reading.
Peter + Lasse from xoio
You are welcome to comment on this article and ask questions using the comment box below!


 Author:









Wow seems like GrowFX realy is a handy tool! Maybe time to invest and make some nice trees!
Thank you very much for making this tutorial!
Grtz. Jodes
Looks very powerful ! Sad it’s only on 3dsmax …
I had this tutorial… and I’m happy to see the site… Ronen I like GrowFX, but many people say that it is difficult and that makes me frustrated. I think it’s more than hour of EXVEL launch new videos .. what they have is very little.
Great tutorial ! i would love to see a tutorial on your lighting techniques for this scene! thanks
Very nice tut! Thanks! I think you can convert a cylinder mesh into meta mesh right-clicking on it. no need to carry both.
very nice to see GrowFX getting promoted. an intimidating but very powerful piece of software. i’d just mention two quick things. first about using opacity mapped leaves in vray. they render just as fast as geometry leaves but only if you disable the filter in the transparency bitmap dialogue. secondly, i wouldnt necessarily use instanced geometry for the leaves. growfx has a built-in leaf modeller that can allow you to do everything from detailed geometry leaves down to flat planes for alpha mapping. otherwise very interesting and the resulting tree looks great!
Hi Bertrand,
Interesting comment about the alpha. We will do some comparison tests soon. It always struck me that game engines can handle alphas in realtime and vray has issues. Is it just for BW or are greyscale values unproblematic too?
We will check this out. Cheers, P
Very nice tip bbb3! I will give it a try!
Nice overview guys, thank you! Not exactly a tutorial perhaps, but still a very helpful article.
Little question: does GrowFX comes with some sort of presets or library to start with?
Thanks again.
Very helpful! Thank you for explaining the workflow to us!!!!
Yes, GrowFX has some trees – about 4-5 demo-scenes. But we going to release new libraries for GrowFX in July 2011.
I have only checked the alpha trick with B&W maps. Not sure about shades of grey…
Great tips, I am now strongly considering purchasing GrowFX when I will need some custom plants and trees!
Just testing a post to twitter.
Just testing a post without twitter.
Now testing a post with twitter again,
Posting again to twitter.
great work man
test comment, will delete
test comment, will delete
test comment , will delete
test comment, will deelte
I’m curious on how much time you need to invest while you create a complex tree as in your example. It will go probably faster if you get used to it – but just to get an idea for production use.
@JensGehrcken It depends how far do you want to go – being accurate with the tree in correlation to real life. Doing a generic tree by feel or general look could be rather quick once you get the basics of the UI
I managed to get a good looking tree after 1-2 hours of play time, without prior knowledge.
@ronenbekerman tried it.. amazing .. if you get used to it – an the tutorial is really helpfull – it will some good results in that 1-2hrs you mentioned
@JensGehrcken Great… Show us what you got if you like too 😉
hi.thank you so much my friend.it is nice and use full for me.
thanks a lot for this tutorial !
I was wondering if you had an idea on how I could fix this welded part issue I’m having with my nornal map ?
Thank you !
Thanks to xoio for the article – I know that writing these things take loads of time (which you don’t generally have much of), so as a proud new owner of GrowFX I would like to say that I am grateful for the tips! It’s true it’s not the most intuative plugin I’ve seen, but I’m looking forward to playing around with all the settings and discovering the power behind it.
I agree that it would be great if Exlevel could develop some more in depth, explanatory tuts – not just “click this then click that”. Itoo are really ahead of the game in that department, and I believe a great example for other developing companies.
Thanks again xoio!