People in Motion
People in motion add a unique and vivid atmosphere to any 3d rendered animation. However, one must get the hang of it before doing so and pulling it off nicely! Even tough we can easily get realistic high poly scanned 3D people on the market, who look pretty realistic when standing still, making them move is a tricky business. We’re so used to natural human movements that our eyes detect the slightest misplaced move in an instant. Follow Dorka Somlói from ZOA as she describes their method for this. Enjoy!
To go round this problem, in our studio, ZOA, we usually choose one of two options:
- Speed up time, so we only see fractions of movements that don’t give away the slightly robotic mocap data.
- Use AXYZ Design’s Anima, placing people only at distant parts of the scene.
For the second option, there are tutorials on the web already, and here on Ronen’s blog as well, so I’ll go on explaining the first one. This has the great advantage that one can create beautiful scenes using the Timelapse method, which we are pretty fond of at ZOA.
TIMELAPSE PEOPLE IN ANIMATIONS
For these experiments we used Populate for walking people, a very simple tool, that is built-in in 3ds Max.
Here’s a list of things I’ll walk you through to explain our method of scenes with time-lapse people:
- Path of people
- Density of people
- Speed of Movement
- Render Method
Path of People
When composing a scene with time-lapse people the first thing that one must think through is the path for them. With Populate it’s a pretty quick and straightforward task. However, there are two important things to keep in mind.
First of all, Populate cannot understand the geometry of stairs. However, you can create ramps with it.
Secondly, Populate circulates the people on different paths, so make sure to draw them long enough even if not visible to your camera to avoid one character from reappearing noticeably often.
Density of People
This part is pretty self-explanatory. Set Populate to a high-density to create a crowded scene and set it low if you only need a few people in the scene.
Easy-peasy!
Speed of Movement
For achieving the time-lapse effect we saw two options: either we speed up everything and render every frame, or we play with rendering only every Nth frame. We usually choose the latter, to keep things simpler and easier to modify. We checked lots of time-lapse videos and figured that the ones that were impressive yet easy to follow (not too quick causing dizziness) had 1-3 second difference between each frame:
Since we do animations in 25 FPS, for us that meant, that we had to set the render Every Nth Frame value somewhere between 25 and 75. So if you have a scene, where you’d like to insert timelapse people, what you need to do is take the camera and stretch its keys to 25-75 times longer, depending on what frame rate you choose, populate it, set the right frame range, and you’re ready to render. Almost. But before I get into the details, let’s check a few examples of a very simple scene with every 25th, 50th and 75th frame rendered, so that you can see the difference in speed.
SPEED : one frame/sec = every 25th frame (please click on the images below to start animations).
SPEED: one frame/2sec = every 50th frame
SPEED: one frame/3sec = every 75th frame
Render Methoed
Now that we covered the speed of the people let’s move on to a bit more complicated part of the process.
Check out this project video!
The rendering settings, considering that for the best results, the people should be rendered entirely separately from the main beauty pass so we can easily edit them in post-production, most importantly we can add motion blur and reduce opacity. Sounds easy, render people with include/exclude list and ta-da it’s done. However, if you start to test it, you’ll notice a few crucial things very quickly. Namely, that people would appear as floating due to missing reflections and shadows.
We thought about it a lot in various projects, whether we should render the people together with the scene, to get shadows, and reflections, but not be able to edit them later. After weighing the pros and cons, we got to the conclusion that we must find a way to render them entirely separately from the scene, generating the shadows and reflections for them later. Even though this complicates the process.
Especially since that means we can start to render our scenes while we’re working on people, which can be a big time saver.
So the next step was to find out how we can create separate channels for every element we need. The solution we found is called corona shadow catcher material. It requires a bit of compositing, some extra masks, render elements, even renders without objects casting shadows, but in the end, it’s worth it because if you go all through that, you’ll be able to edit everything separately in post-production. Shadows, reflections, people. Let me show you some examples:
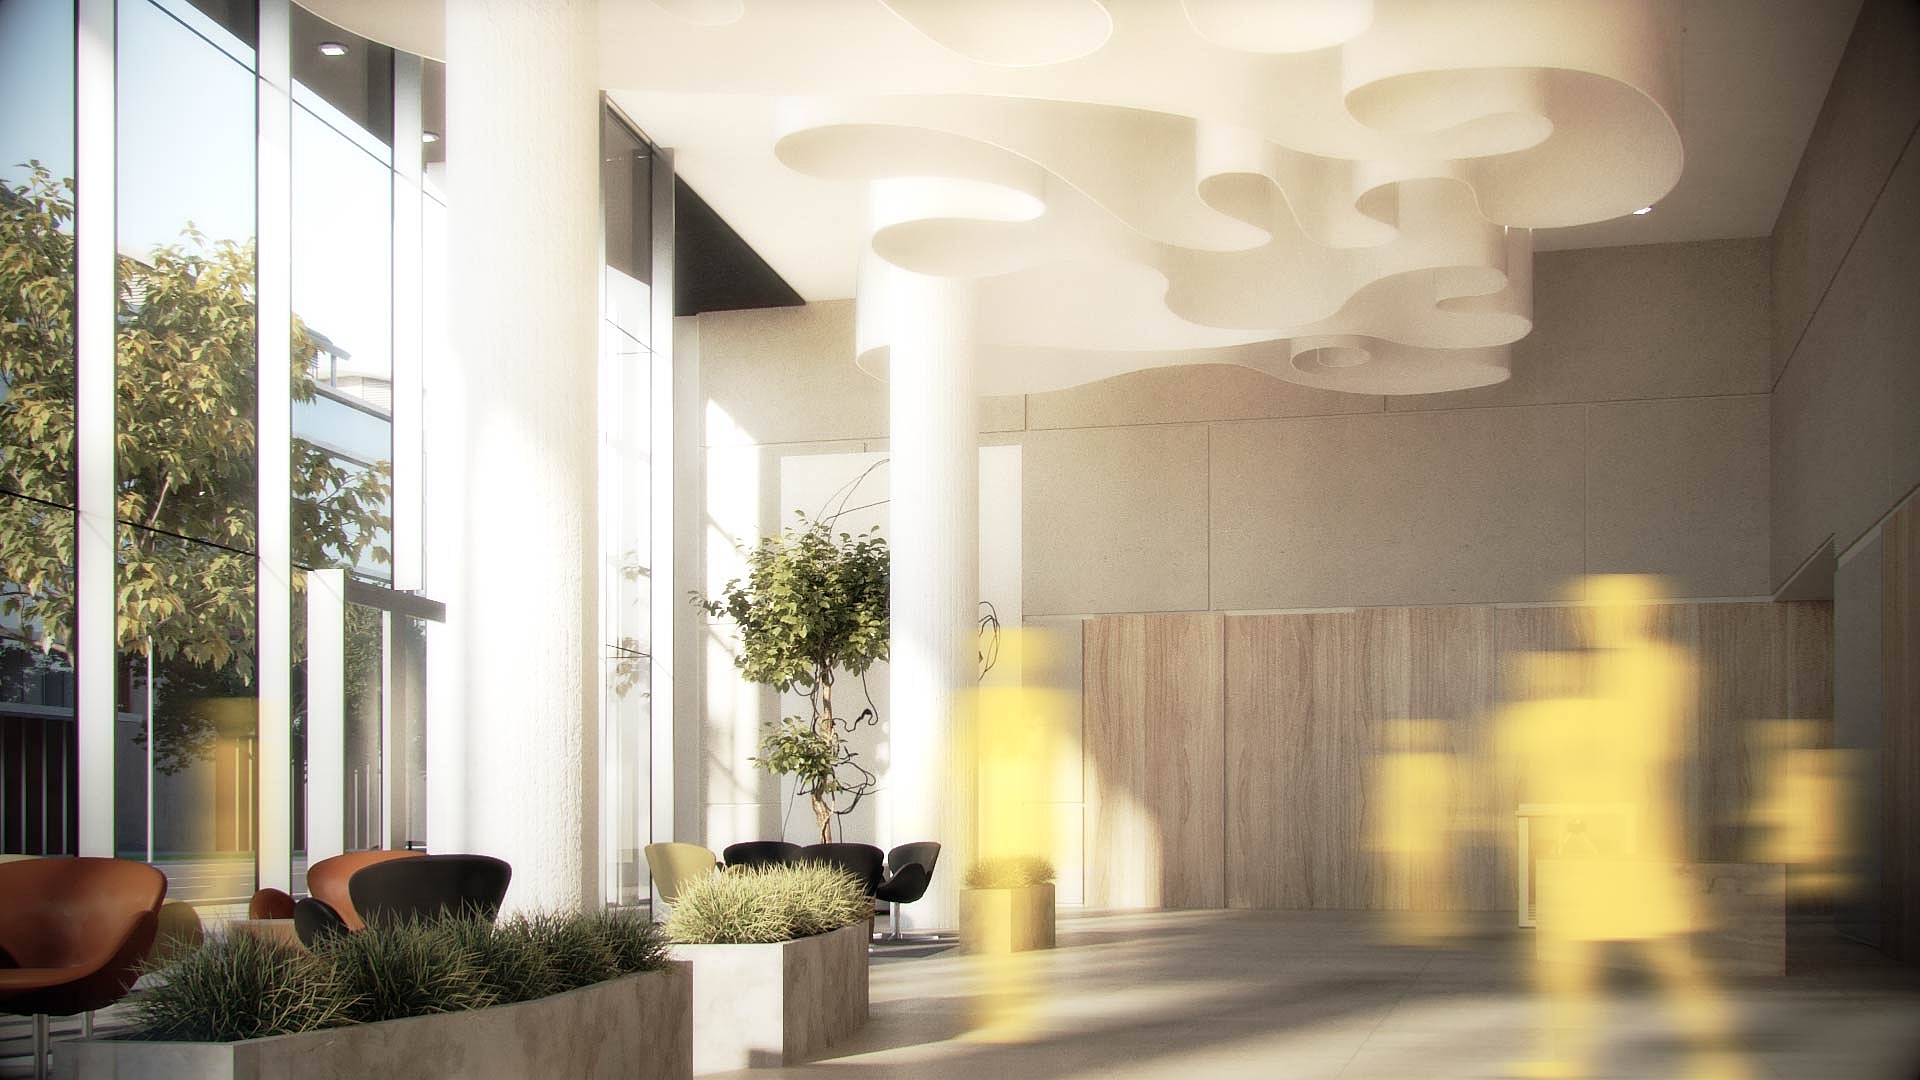
RENDER METHOD : everything rendered together
RENDER METHOD : people rendered separately
RENDER METHOD : people rendered separately, shadows added by shadow catcher
RENDER METHOD : people rendered separately, shadows and reflections added by shadow catcher
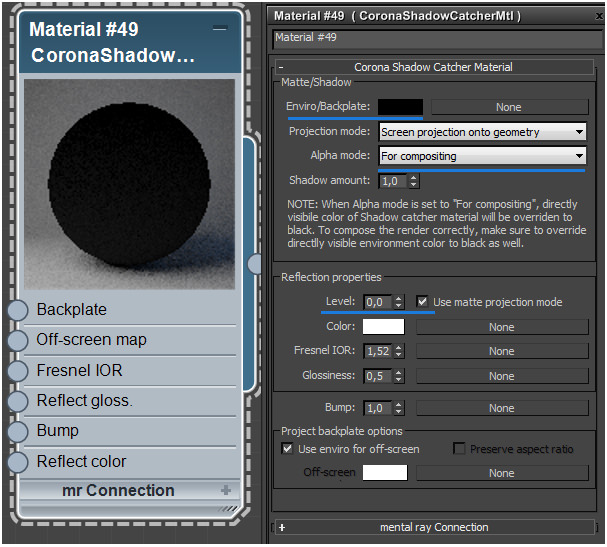
When rendering only shadows, make sure, to set the Alpha mode for compositing, the environment/backplate to black, and Reflection level to 0,0.
Then enable Mtl Override at the render setting panel excluding the objects that you would like to get the shadow of, in our case, all the people. Your beauty pass will give you the color of the shadows, and the alpha channel will indicate where and how strong they appear.
When rendering only reflections, you would also have to set the environment/backplate to black, and the alpha mode for compositing. This time set the reflection and glossiness value same as your original material had. Then enable Mtl Override the same way as for the shadows. Disable shadow casting of all people in object properties, and add Reflection render element.
Use both Beauty pass and Reflection render element in postproduction to get all reflections correctly with the help of the alpha channel.
What we learned from all of this is that one must think it through how and where to insert 3D people. In some cases, it can be simple, e.g. if the floor is not reflective, and there’s no glass surface nearby, and you place all the people in the shadows. In some cases, it’s quite the opposite, and I’m sure we will still run into other problems, but for now it looks like, we got it quite figured out.
So now if you ever feel like creating an animation with a vibrant atmosphere, changing lights, and quick movements, I hope you’ll know the important things to pay attention to and will be able to compose a gorgeous scene with lots of people.
Dorka Somlói, CG Artist @ZOA / Facebook / Instagram





https://uploads.disquscdn.com/images/bcc4cf40b4f2dda702e966c4d7b1f090d8db122e1a01b32f8ce2ae9b02374af0.jpg
I was wondering if anyone has experience using Anima over backburner. We’ve just installed the stand alone version + few render nodes but can’t make it work. People are flickering, textures are messed up and support practically not existent. There’s no forum on AXYZ website or help line, no email to contact. Just a form to fill. All they reply is just to follow a video tutorial which doesn’t help. Any suggestion?
Hello Giacomo,
Good morning.
We have a ticket system and all of your messages have been replied in less than 24 hours.
To better understand the problem, we took a deep look into our license server and we noticed that none of your render node serials have been activated.
People disappearing and with wrong textures means that they are working with the demo mode limits. We are about to release ANIMA 2.5 and in order to be more clear communicating this licensing issue we are showing messages in the rendering like: NO LICENSE or ASSET NOT FOUND so understanding the problem will be easier in the future.
We have just send you a new reply to your last ticket listing all the node licenses that you need to activate before sending to the renderfarm.
Regards,
AXYZ design support Team
A big Thank you to Diego from AXYZ, that in a couple of hours helped us fixing the licensing issue and get Anima running over our network.
Great support! 5 star.
Thanks also to Ronen, for his reactive response and helpful blog.
Very happy things worked out fast for you. Show us some great work now 😉
You are welcome Giacomo!
We are working hard on a new release that will simplify a lot the licensing process. Your feedback is fundamental for us so please keep in touch!
You are welcome! We are working hard on a new release that will simplify a lot the licensing process. Your feedback is fundamental for us so please keep in touch!
Hi @disqus_DSqHK2JAYz:disqus did it get solved for you by now?
Hi Ronen,
Thanks for your reply.
AXYZ promptly got in touch to help.
The problem is not solved yet but we’re working together to sort it out today.
Great to hear @disqus_DSqHK2JAYz:disqus
I’m pretty sure you will be up and running fast!
I have to thank you for helping me to solve this problem which has plagued me for a long time