Making of Garden Loft
Best of Week 27/2016 by Time Machine was about self learning of both architecture design and new 3d visualization techniques. Victoria and Gaston took Allegorithmic’s Substance Designer and Painter for a spin along with ZBrush as well. Looking ahead we all should explore these tools more. Besides these, they also used 3dsmax, corona renderer and maxtree foliage. Dive into this detailed making of their Garden Loft. Enjoy!
Introduction
First thing first, I’m very happy and honored to have the chance to write an article for this prestigious blog, which I’ve been reading from the very beginning. For me it is a great source of knowledge and inspiration. Being able to give backf is an awesome opportunity.
The Garden Loft
Garden Loft is an in-house project that my partner Victoria and I started some time ago and was intended as a sandbox, to learn new techniques and workflows, but mainly to learn and introduce to our pipeline the Allegorithmic suite – Substance Designer and Substance Painter.
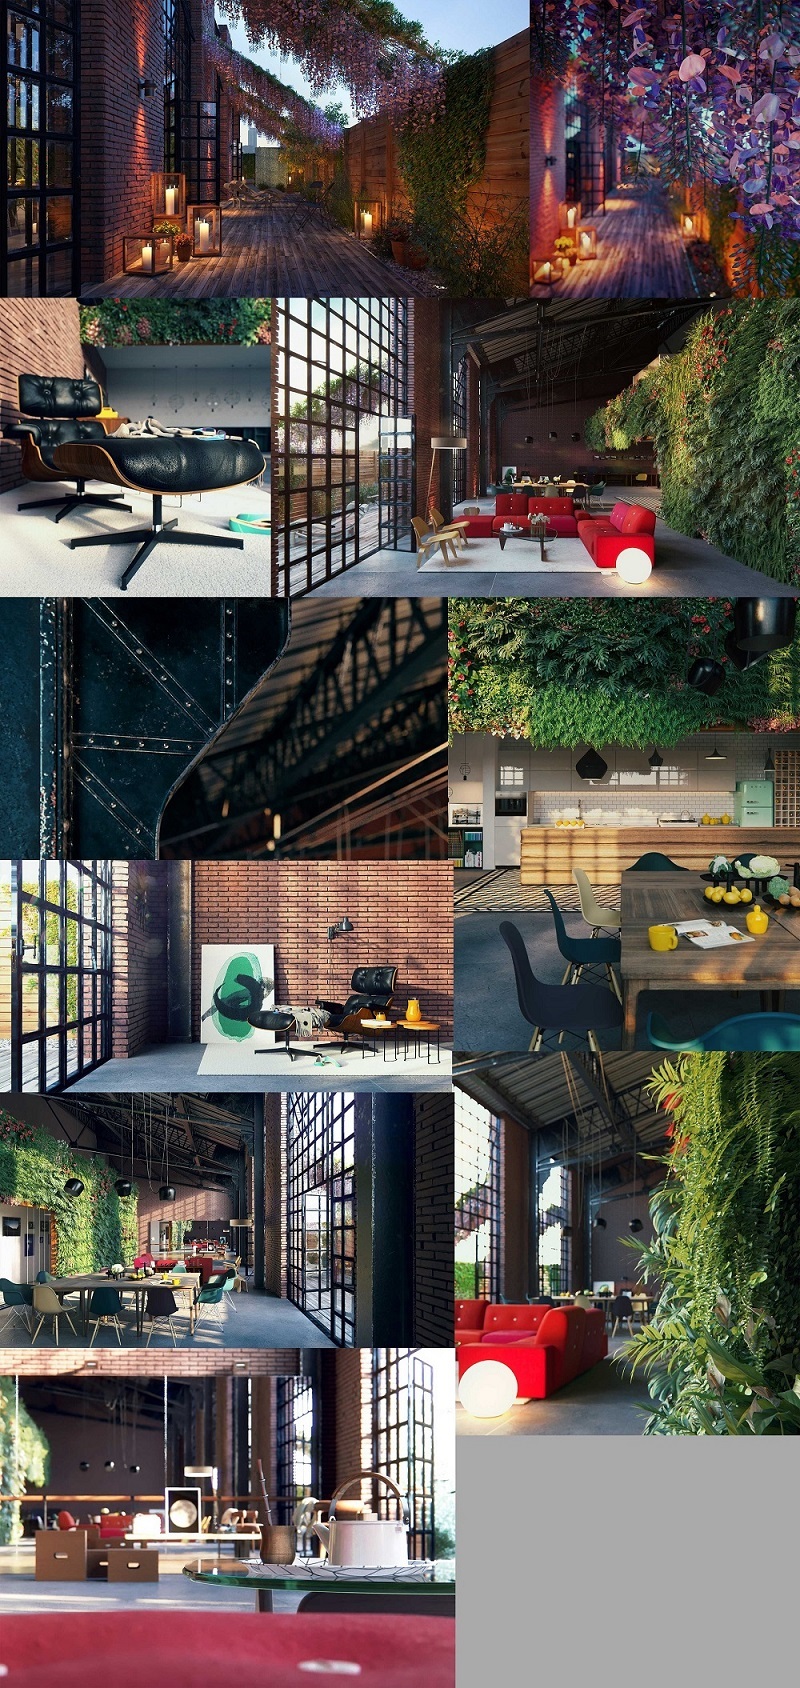
These are the images.
Luckily the implementation was very successful for us and we are really happy with what we have achieved in such short time of learning the software.
The things that work for us about this software is that material creation is intuitive, fast, and in real time. We can now recreate pretty much every material our clients ask us with great accuracy. It’s an everyday struggle when clients send us a 100px by 100px reference for the material they want/need and we can’t find any texture on the web or product manufacturer, even the ones that don’t exist anymore because they’re no longer being produced… we are frequently asked to do that too. At the end, it is faster to create these textures from scratch than invest time looking for them whenever they don’t pop up in the first run.
The hard work is handled by substance software, you don’t have to end up in 3dsmax with a super complex shader network. So there is no need, for example, of the expensive blend materials, just a couple of bitmaps and you are good to go. On top of that, it’s super fun.
References
We thought of this place as a place we would like to live in (apart from being partners with Victoria we’re also a couple). Both of us like old refurbished buildings so we thought of a warehouse loft straight away.
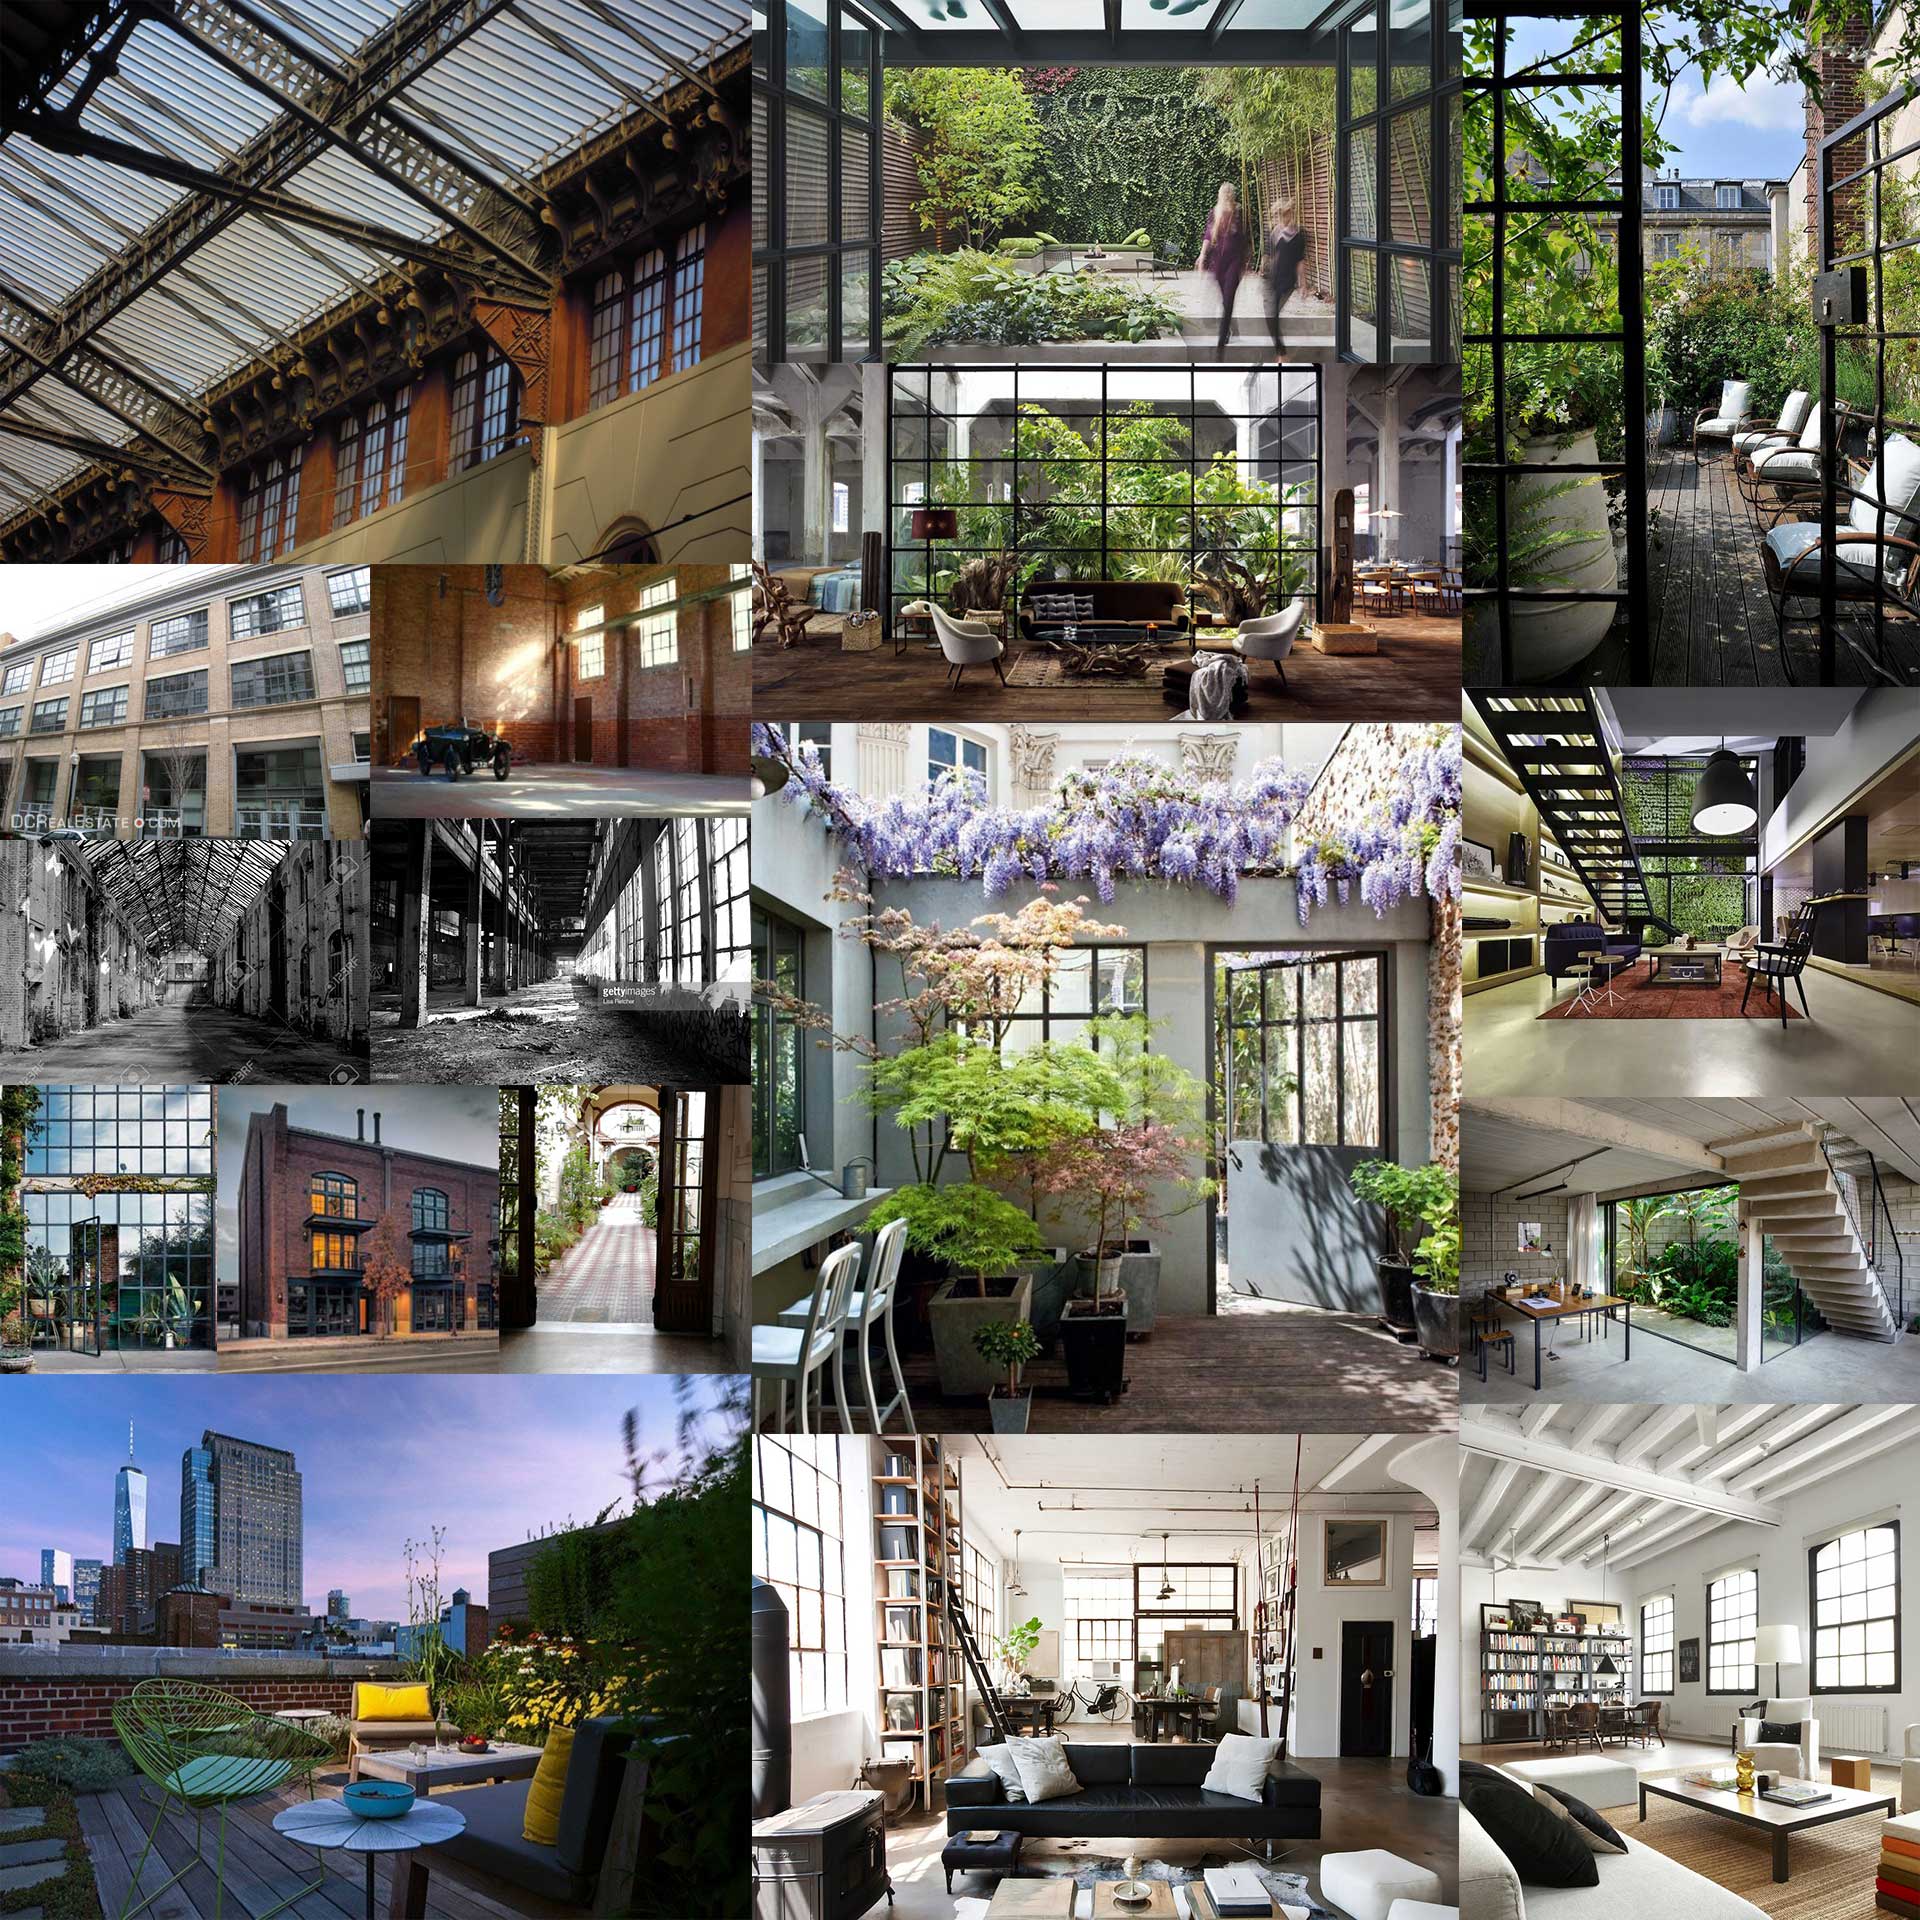
After we decided what we wanted to do we started collecting references and ended up with a huge amount of photos of many lofts of different styles. At that point, we were ready to design our very own loft. We did sketches with traditional media, floor plans, elevations, sections, perspectives and all the things regarding architecture stuff.
When we knew exactly what we wanted, we dived into 3dsmax.
3D Modelling
Modeling, for what was done inside 3ds max, is just simple box modeling so there’s not much to say about that but we do most of our assets, regarding furniture and environment, within Zbrush. This is because it is an incredibly powerful sculpting software and we really like the idea of “scalability” when we build our assets. So we can create super-detailed models (to build up our library) and then decide very easily the resolution of that model regarding our needs or how the project evolves.
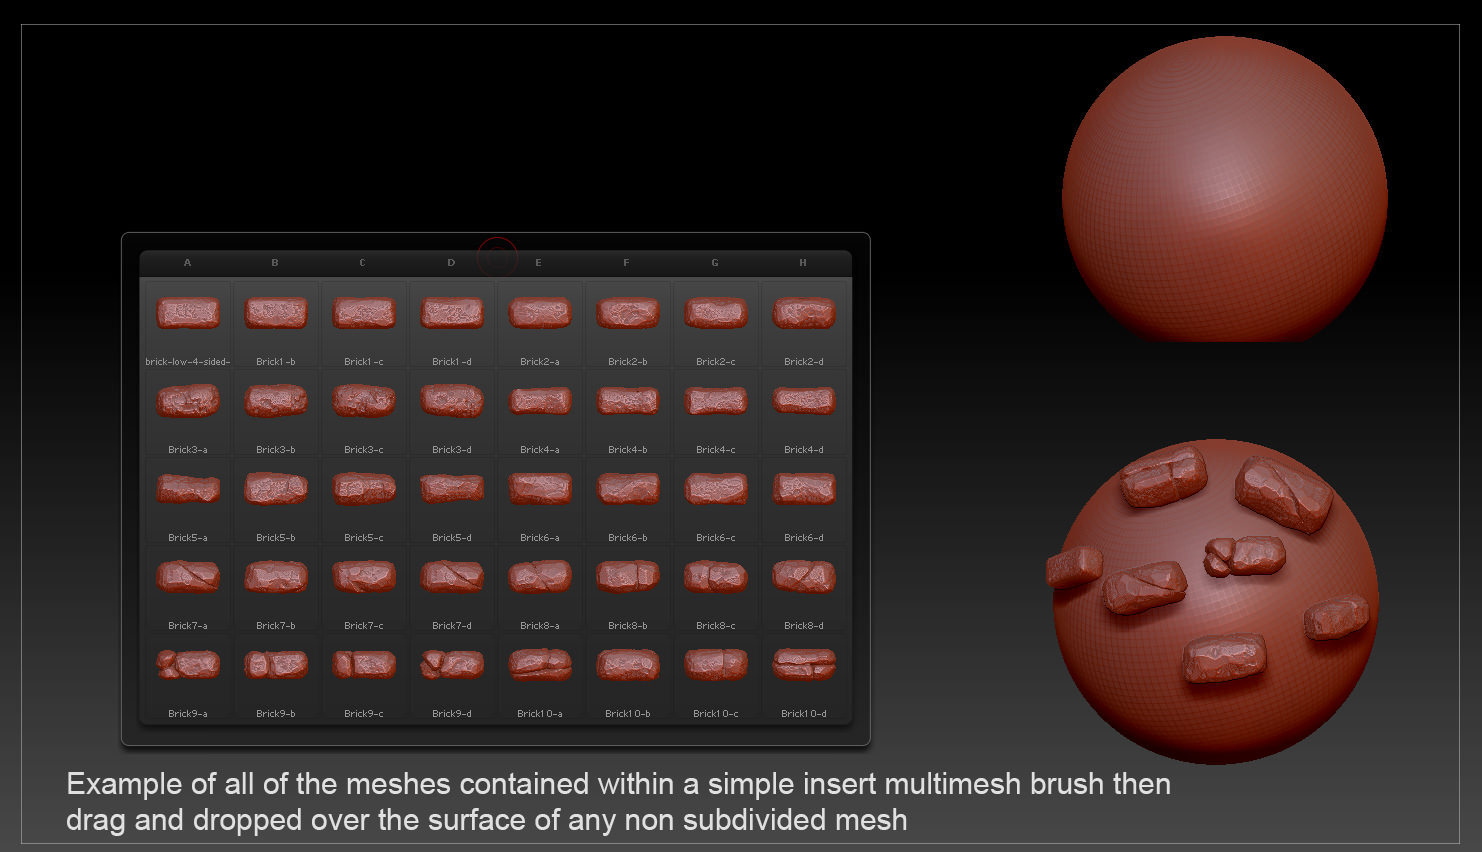
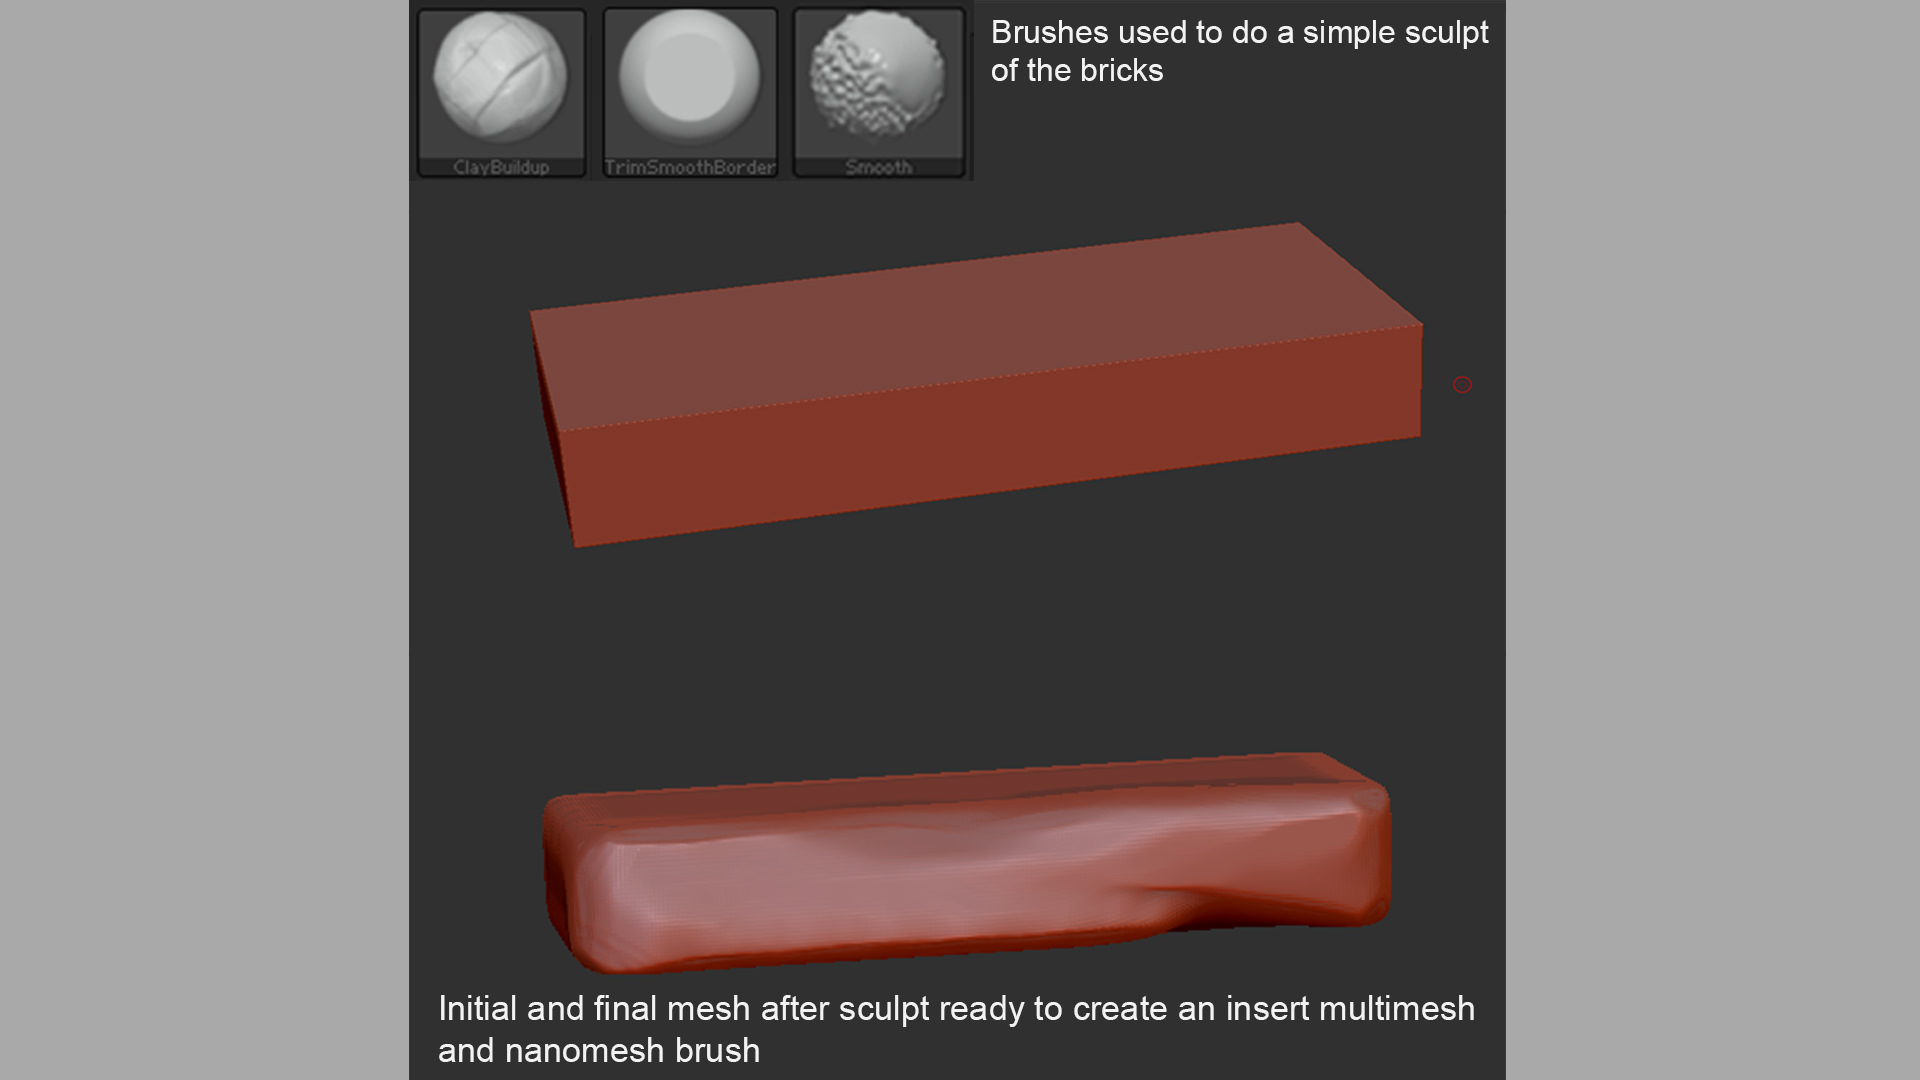
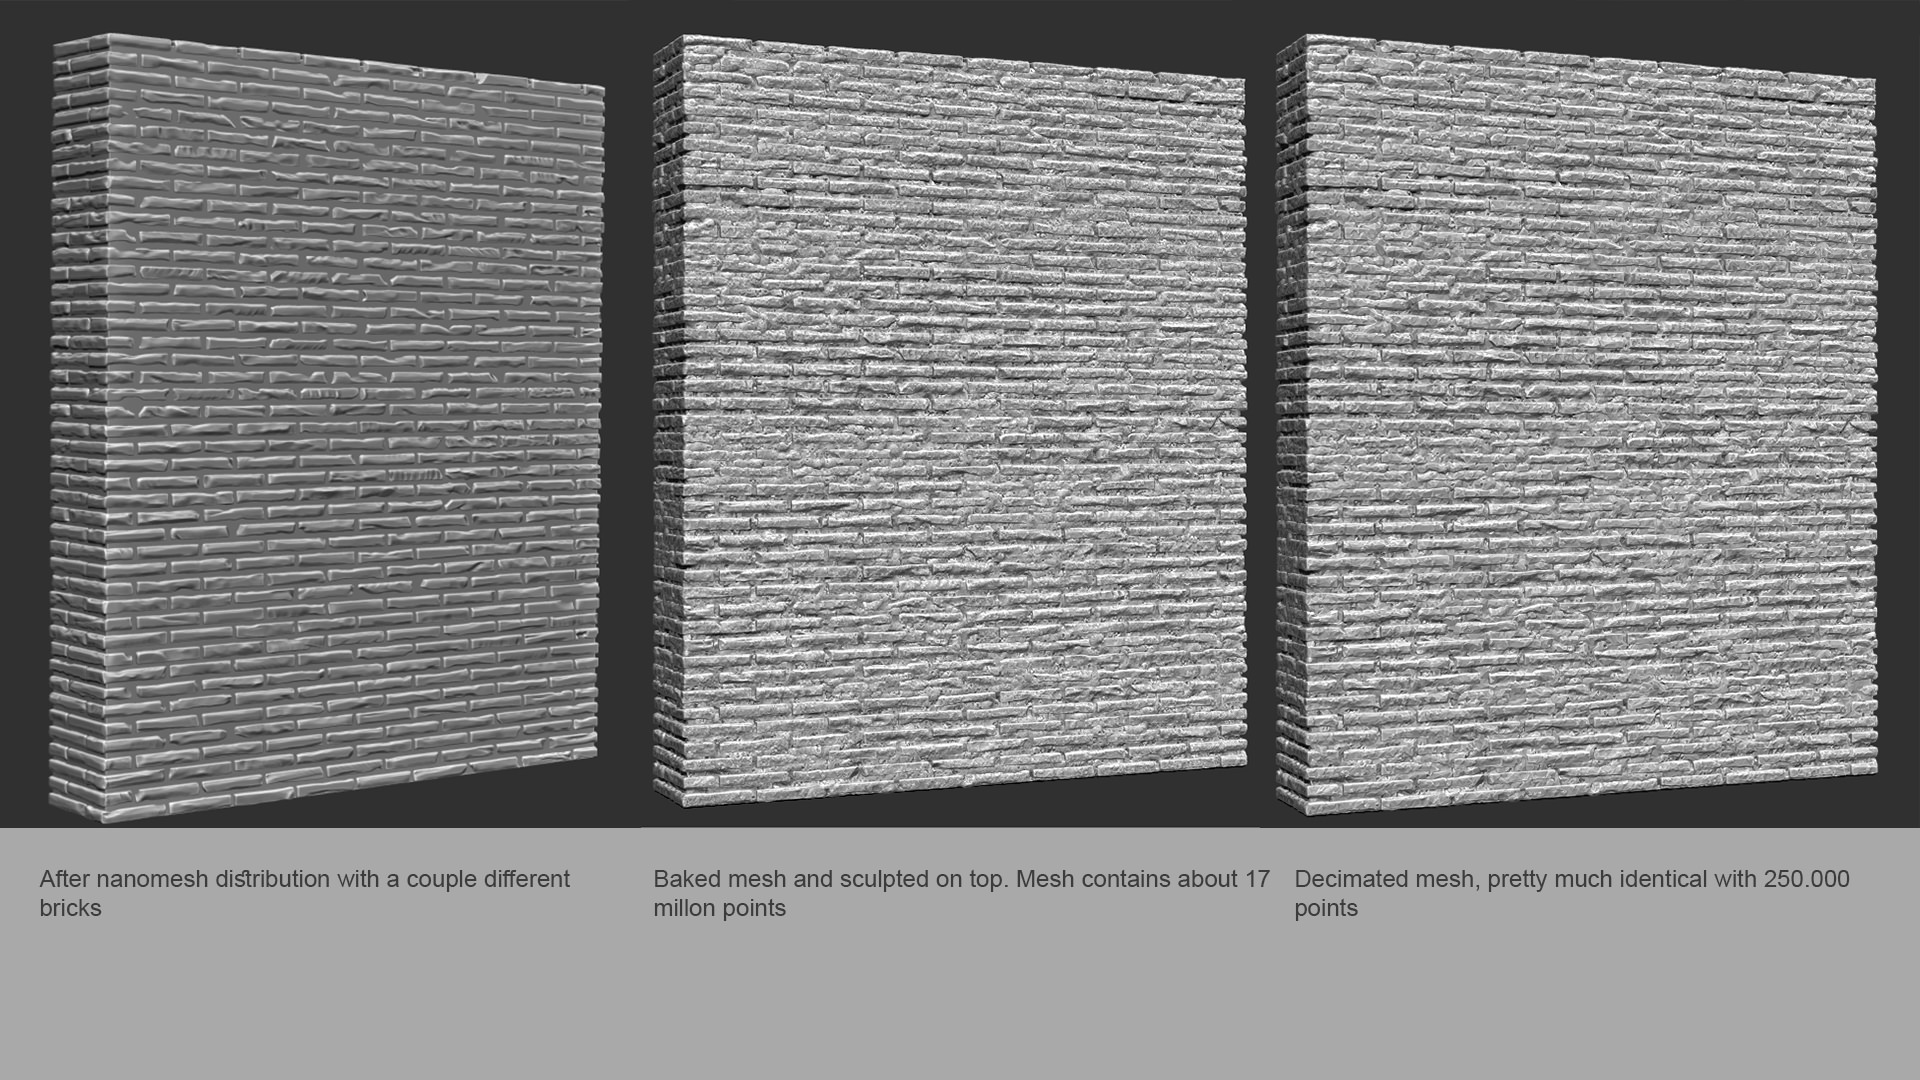
So this was the case, for instance, of the brick walls. I sculpted a few bricks which then were converted to insert multimesh (http://pixologic.com/zclassroom/lesson/brush-creation-insert-mesh) brushes. These are brushes that contain different meshes associated with it and you can use it to insert them onto other meshes.
Then they were scattered, through a base mesh, I brought from 3ds max, using nanomeshes (http://pixologic.com/zclassroom/lesson/nanomesh-functionality) inside of Zbrush (Kind of the Zbrush’s Forest Pack Pro). Then everything was baked into a single mesh and sculpted over.
After that I decimated (http://pixologic.com/zclassroom/lesson/creating-a-picatinny-rail-part-3) the high poly mesh, merged that into 3ds max and turned it into a corona proxy and set in place as individual assets, mirrored, rotated and so on to give the impression they are unique. The whole process took about one hour from start to finish. It is really fast and you always have the high detailed version to go back and make changes or if you decide you need more detail on your final mesh.
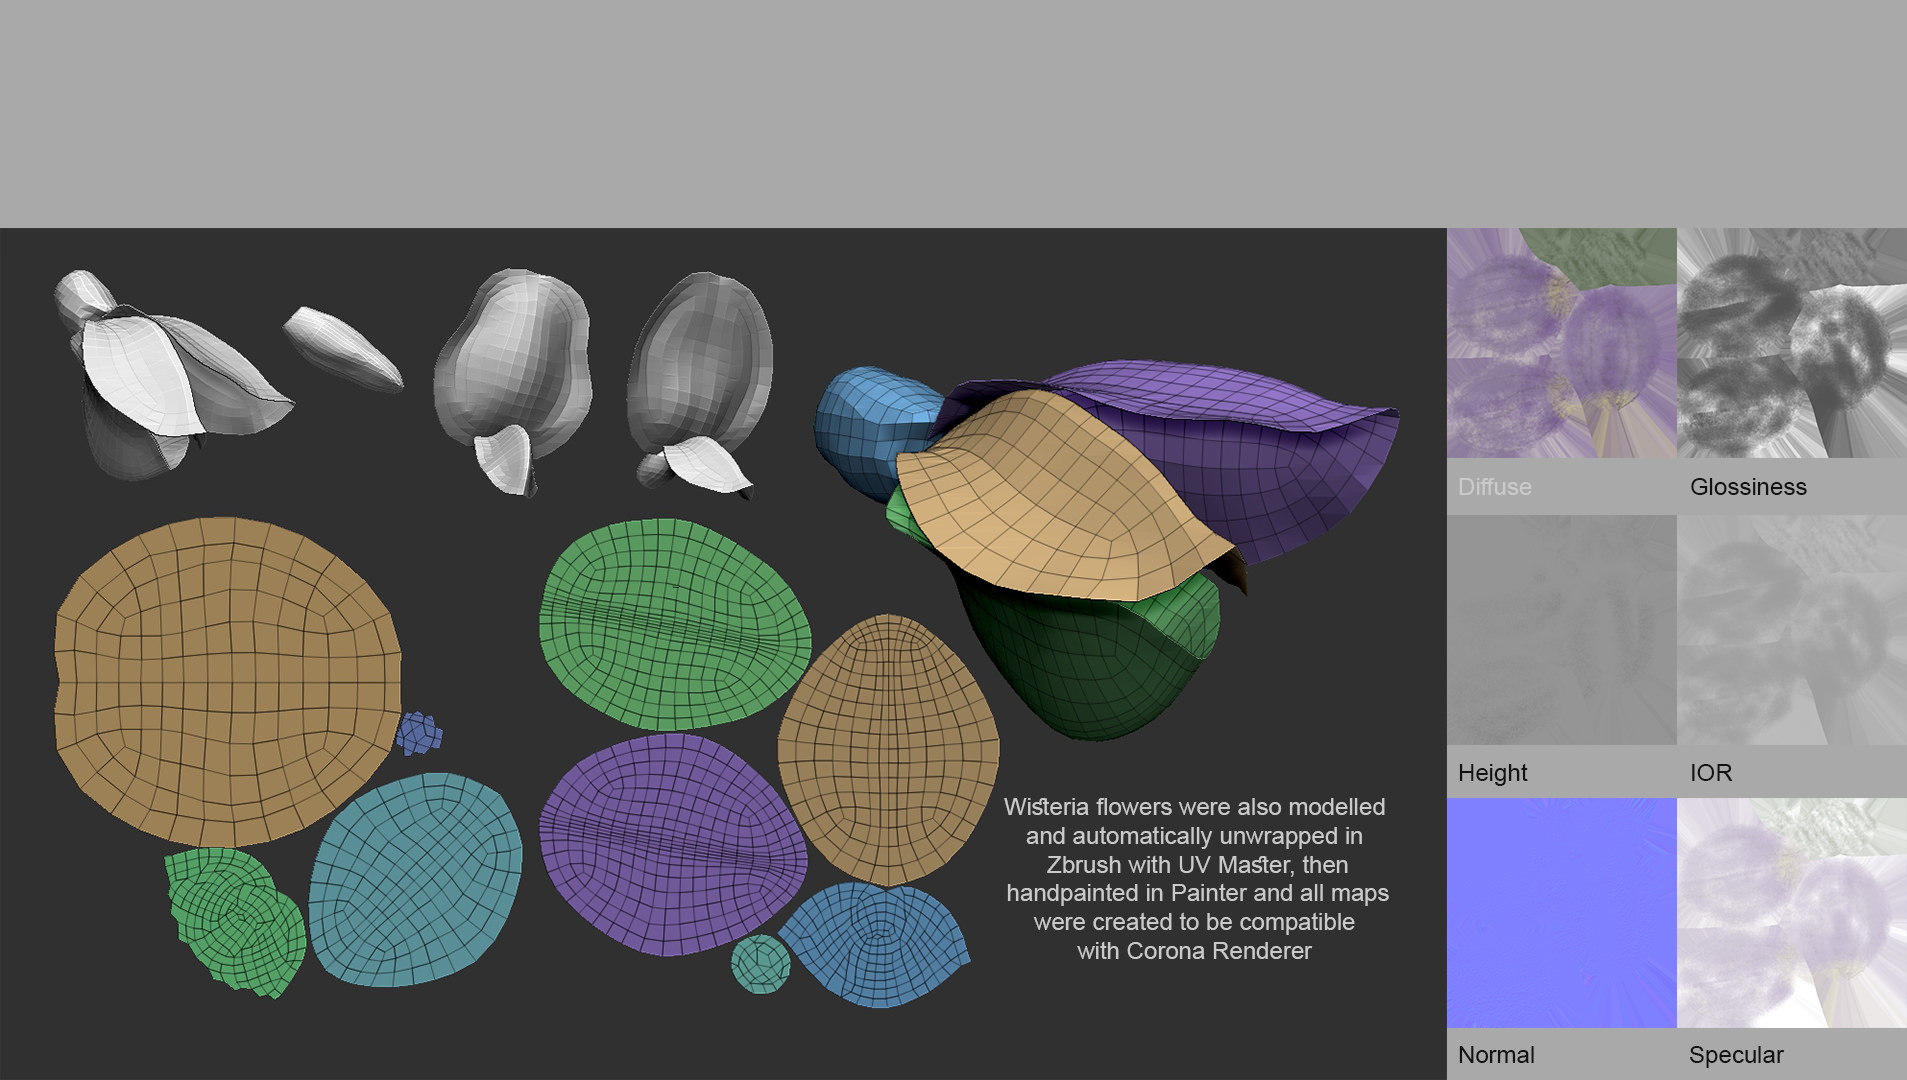
Wisteria flowers were also made with Zbrush because it is easier and faster to move points around and deform the mesh with pen pressure sensitivity and the move brushes. Also, unwrapping of these simple models is automatic with UV Master, the unwrap tool of Zbrush.
If you want to learn Zbrush a great starting point is the Zclassroom at Pixologic website which is awesome and free and the tutorials on hard surface modeling from Mike Jensen.
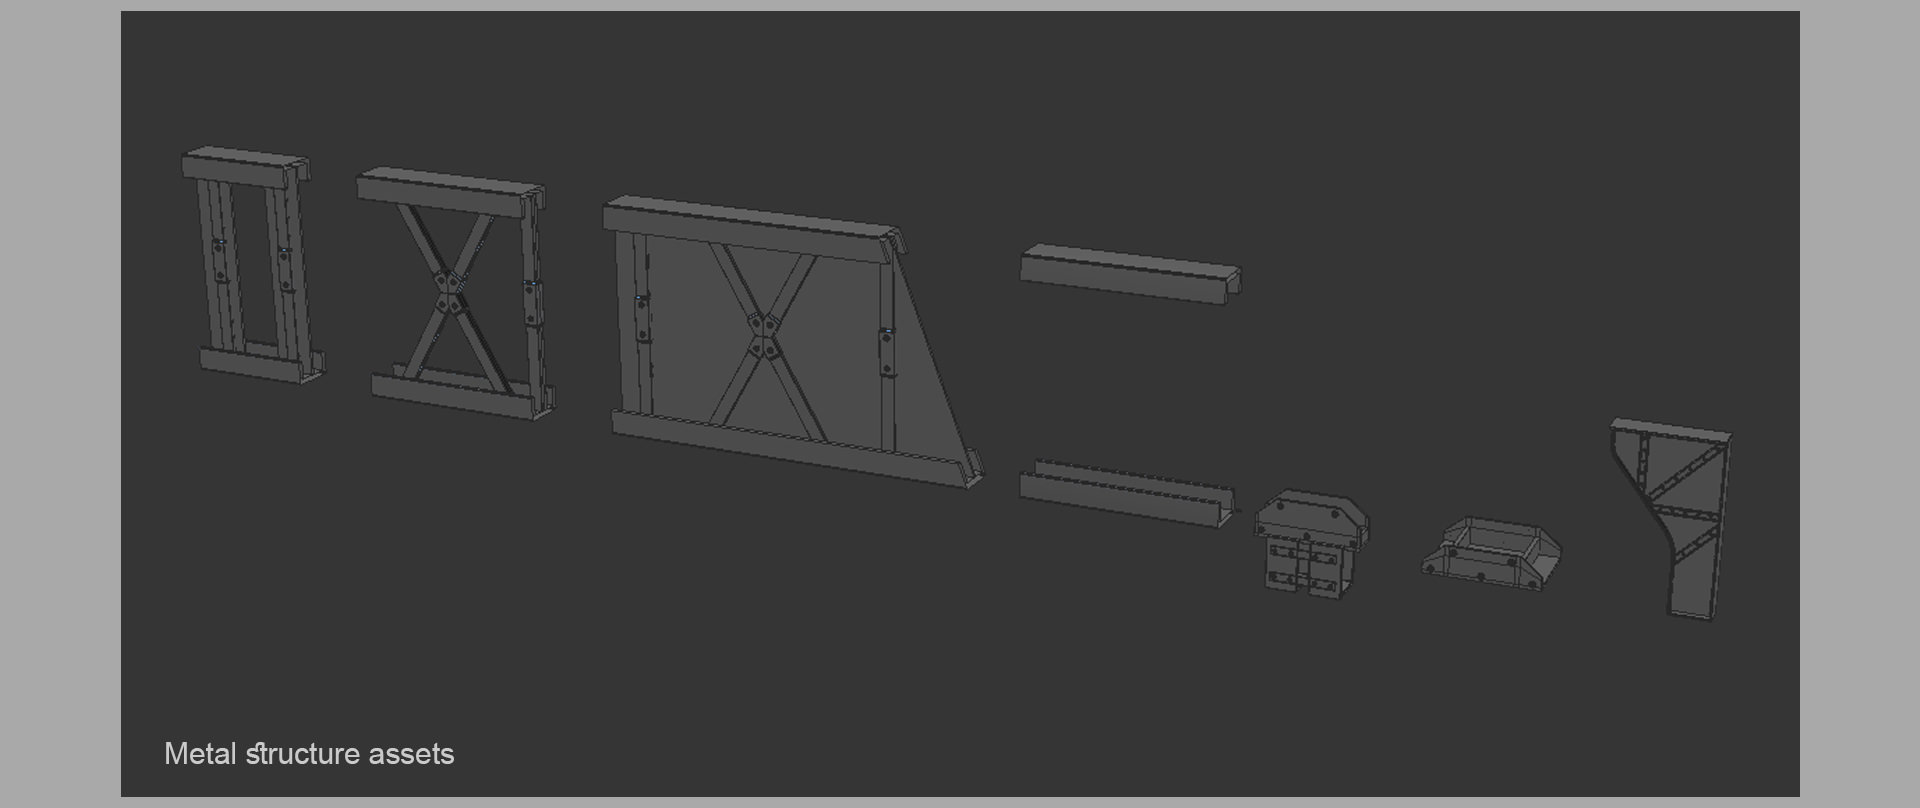
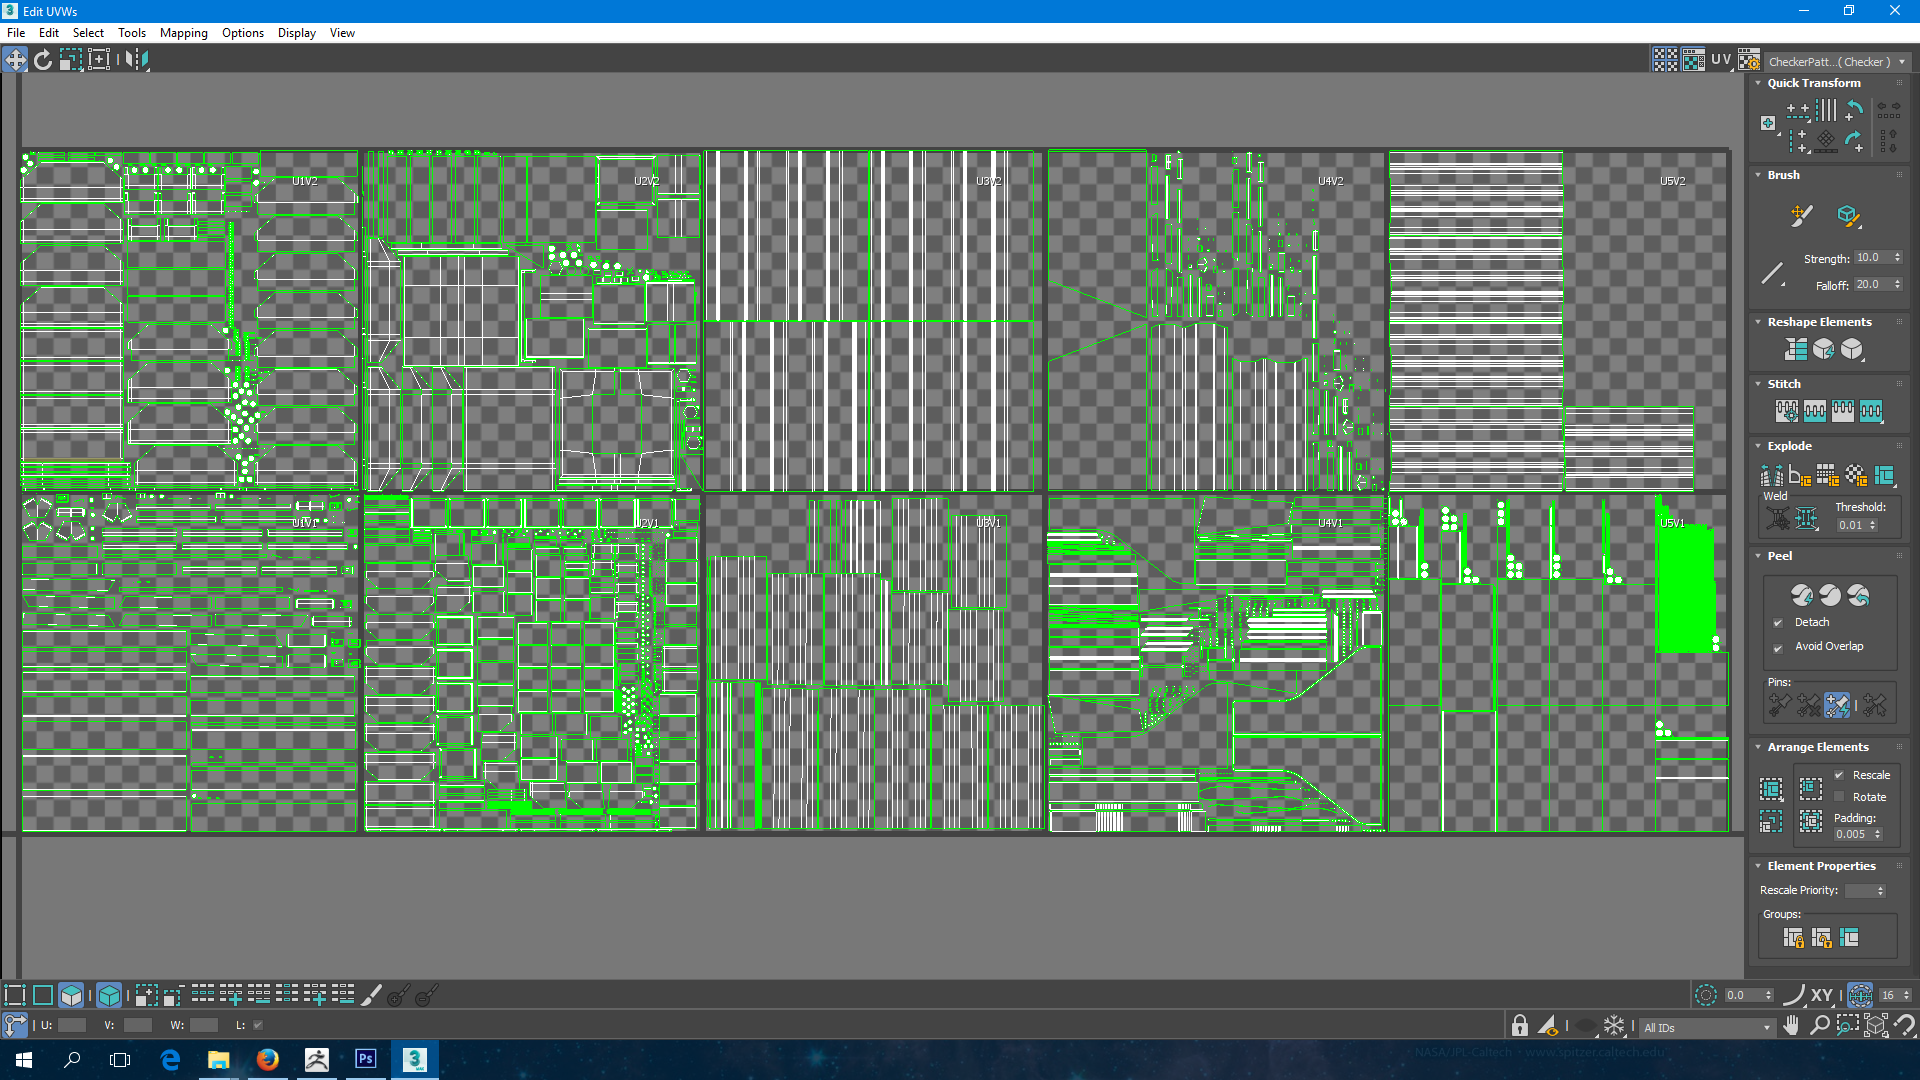
Another thing where we experimented a bit was with the metal structure. It was done in 3ds max with box modeling and we thought of it as different pieces/assets that formed the whole thing. The experimentation came with a new feature of 3ds max 2017 (which is really cool), called multitile unwrapping. It is well known on other software packages but it’s cool to have it now on max.
So basically we unwrapped every piece of the structure, then merged it into one piece and rearranged the UV clusters into different tiles or UV sets.
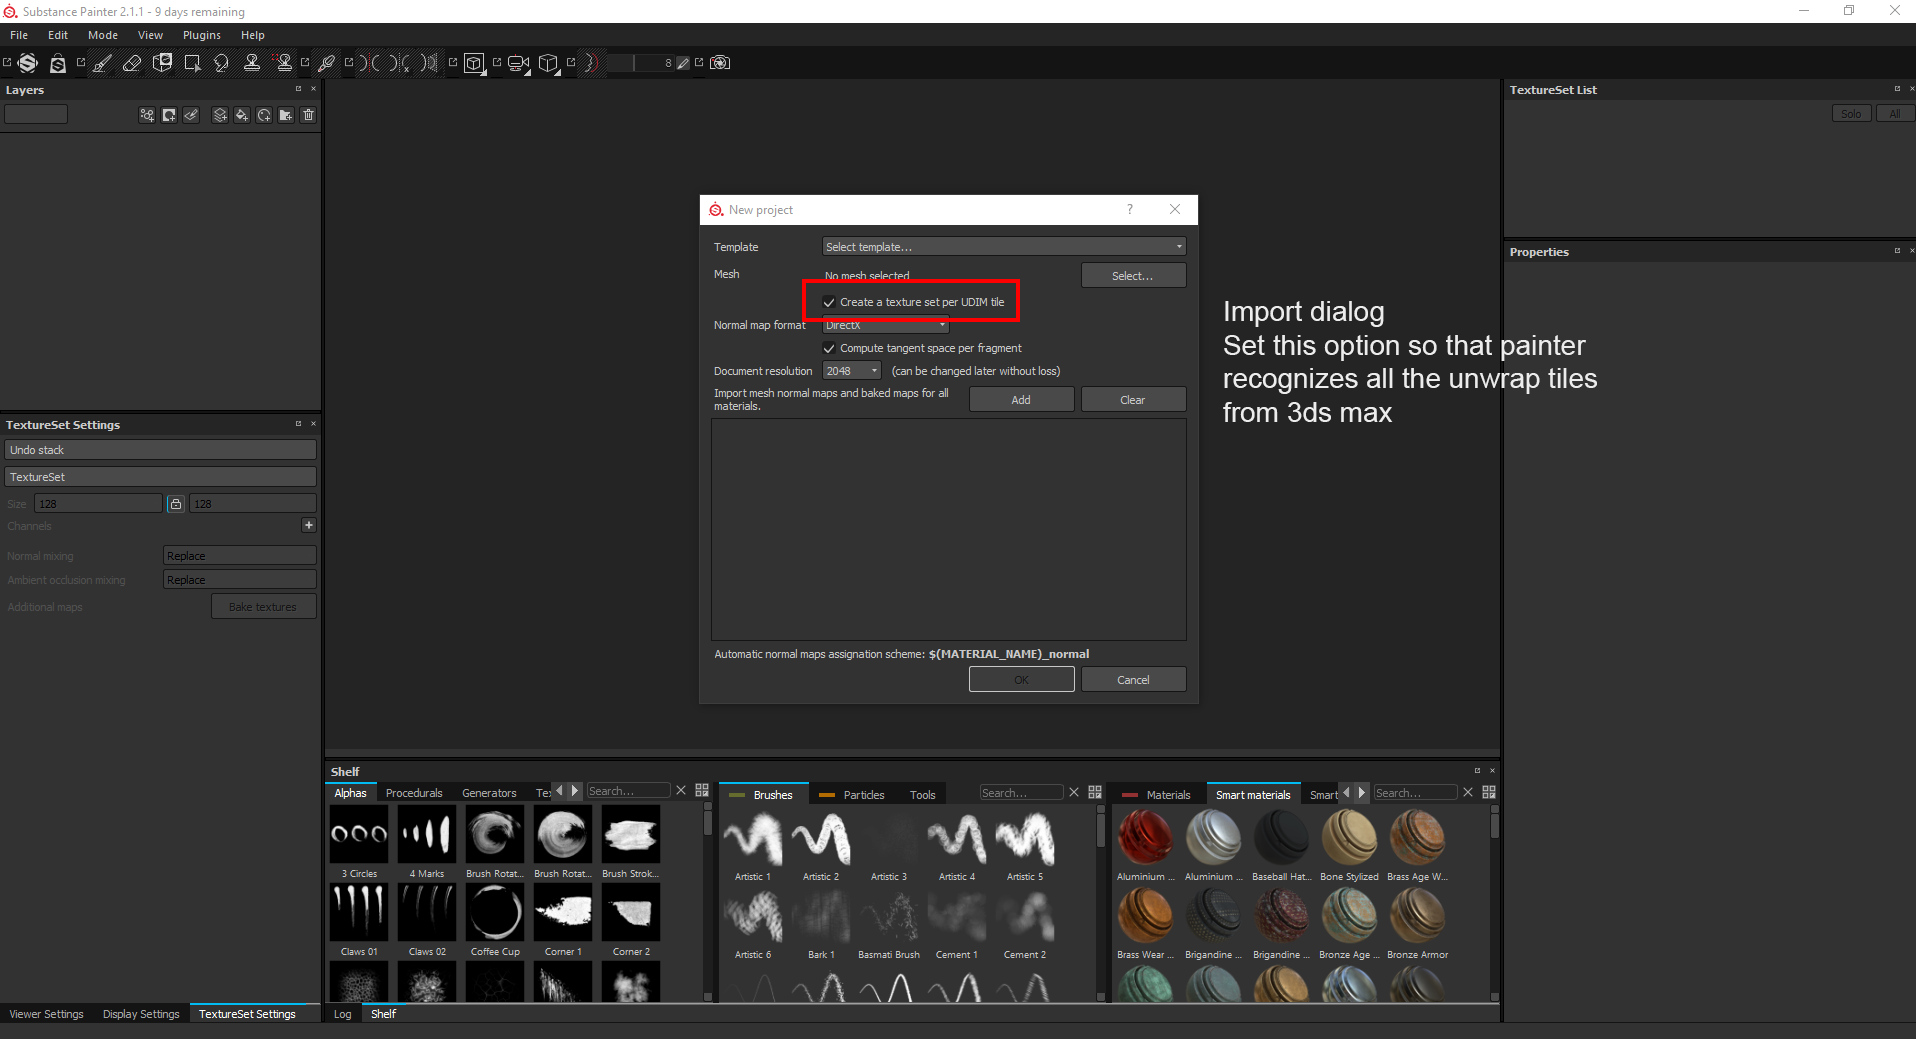
This is great because the latest version of Painter supports UDIM format so whenever you import a multitile unwrapped mesh, painter will automatically separate those pieces of geometry and create different UV sets for you. With this, there is no need to have the same texel density throughout the whole mesh since you can adjust texture scale inside of Substance Painter. Then via the multitile node inside 3ds max you can plug in all your texture sets for your asset.
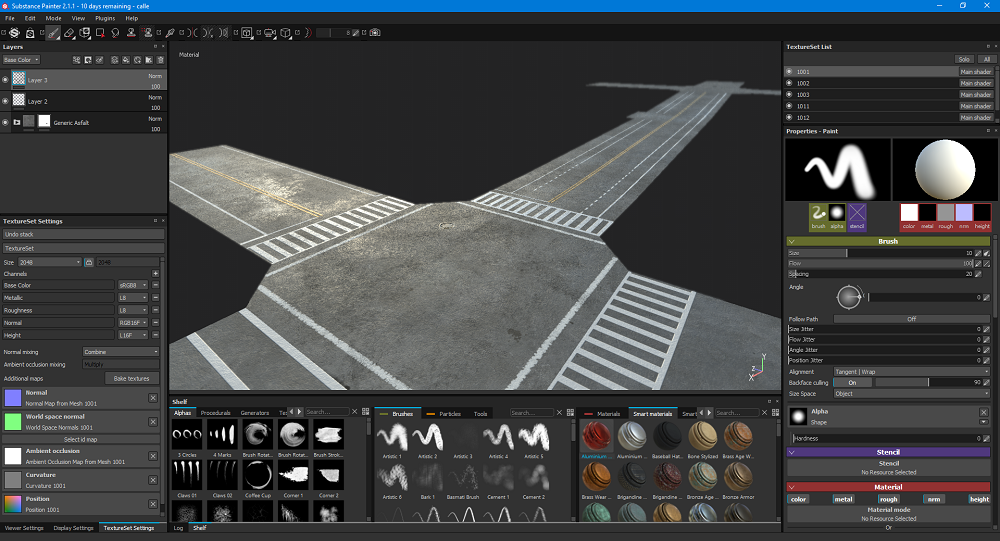
We are using this method now, to texturize big pieces of geometry in real-time with painters, like streets and walkways.
Here is a sample of another project of a big piece of street textured in one go :
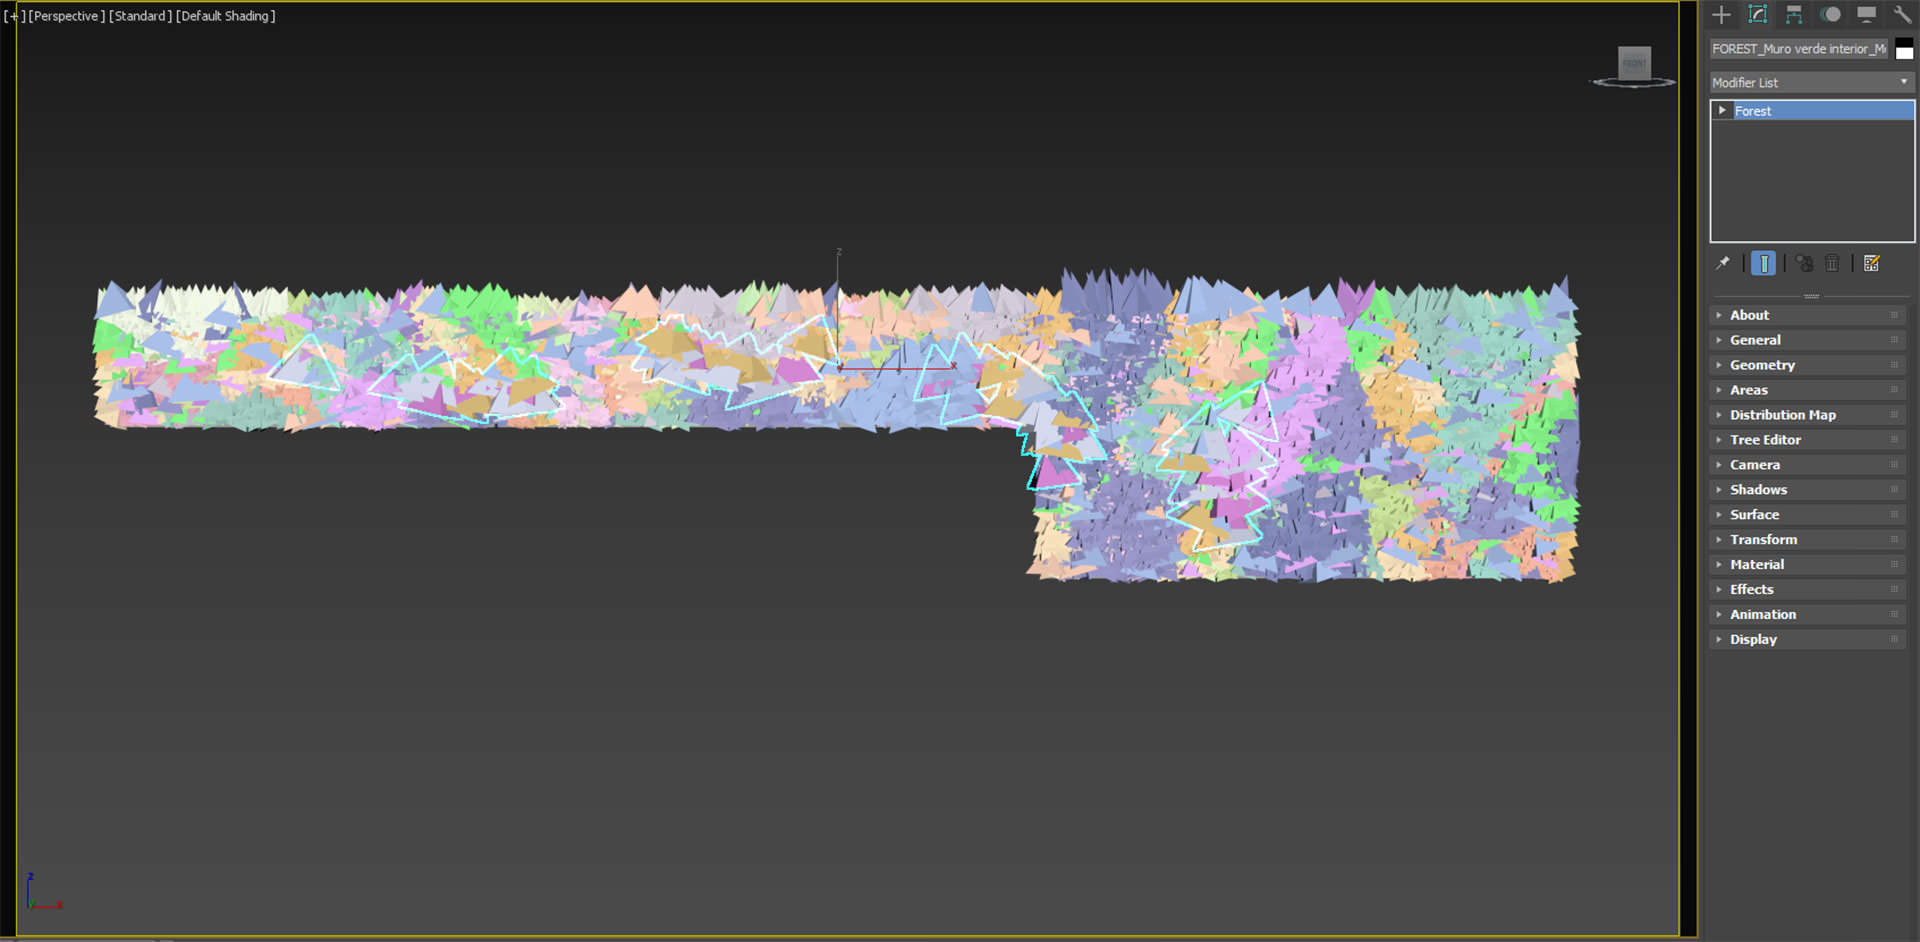
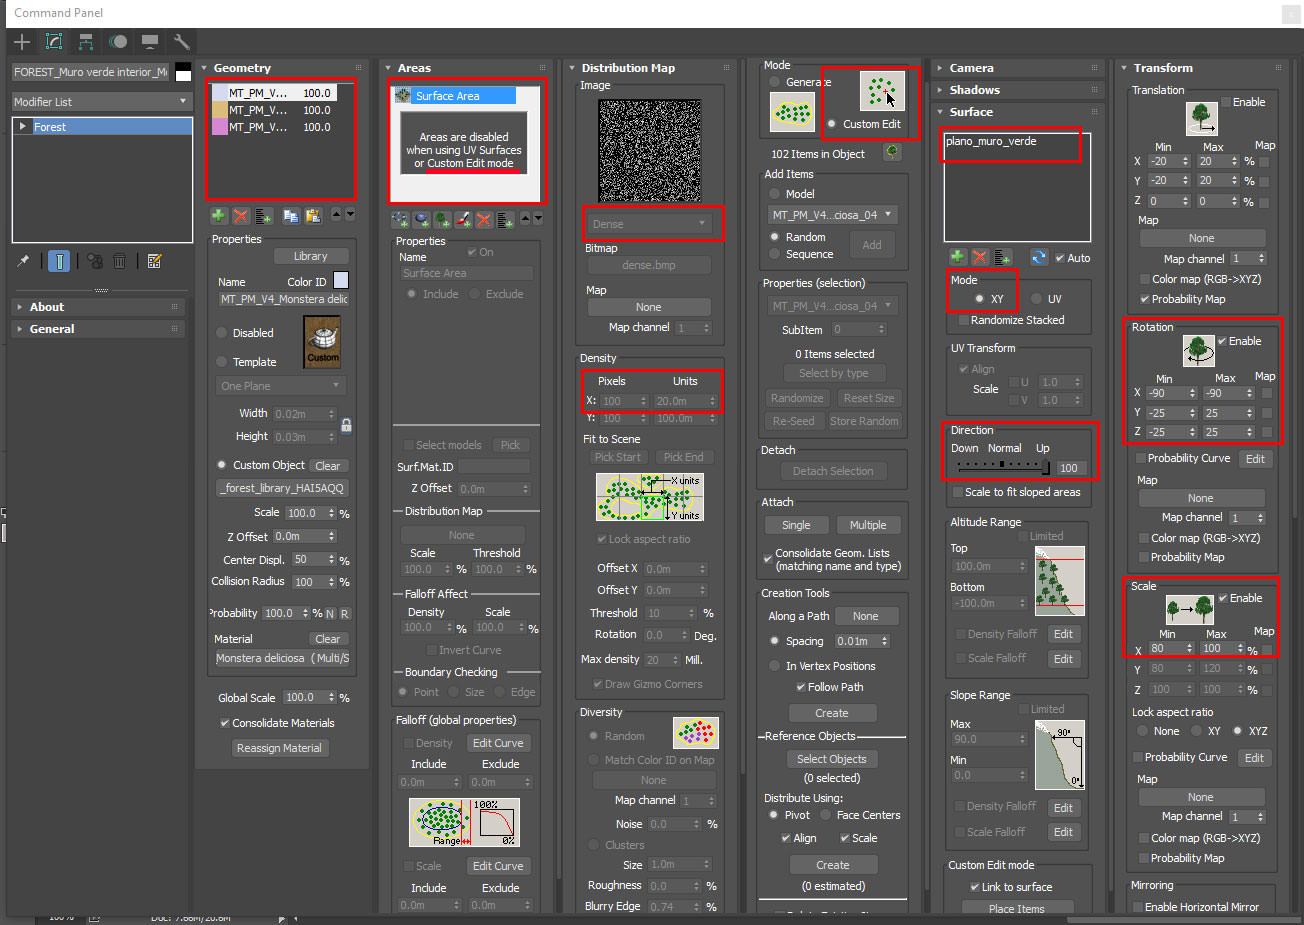
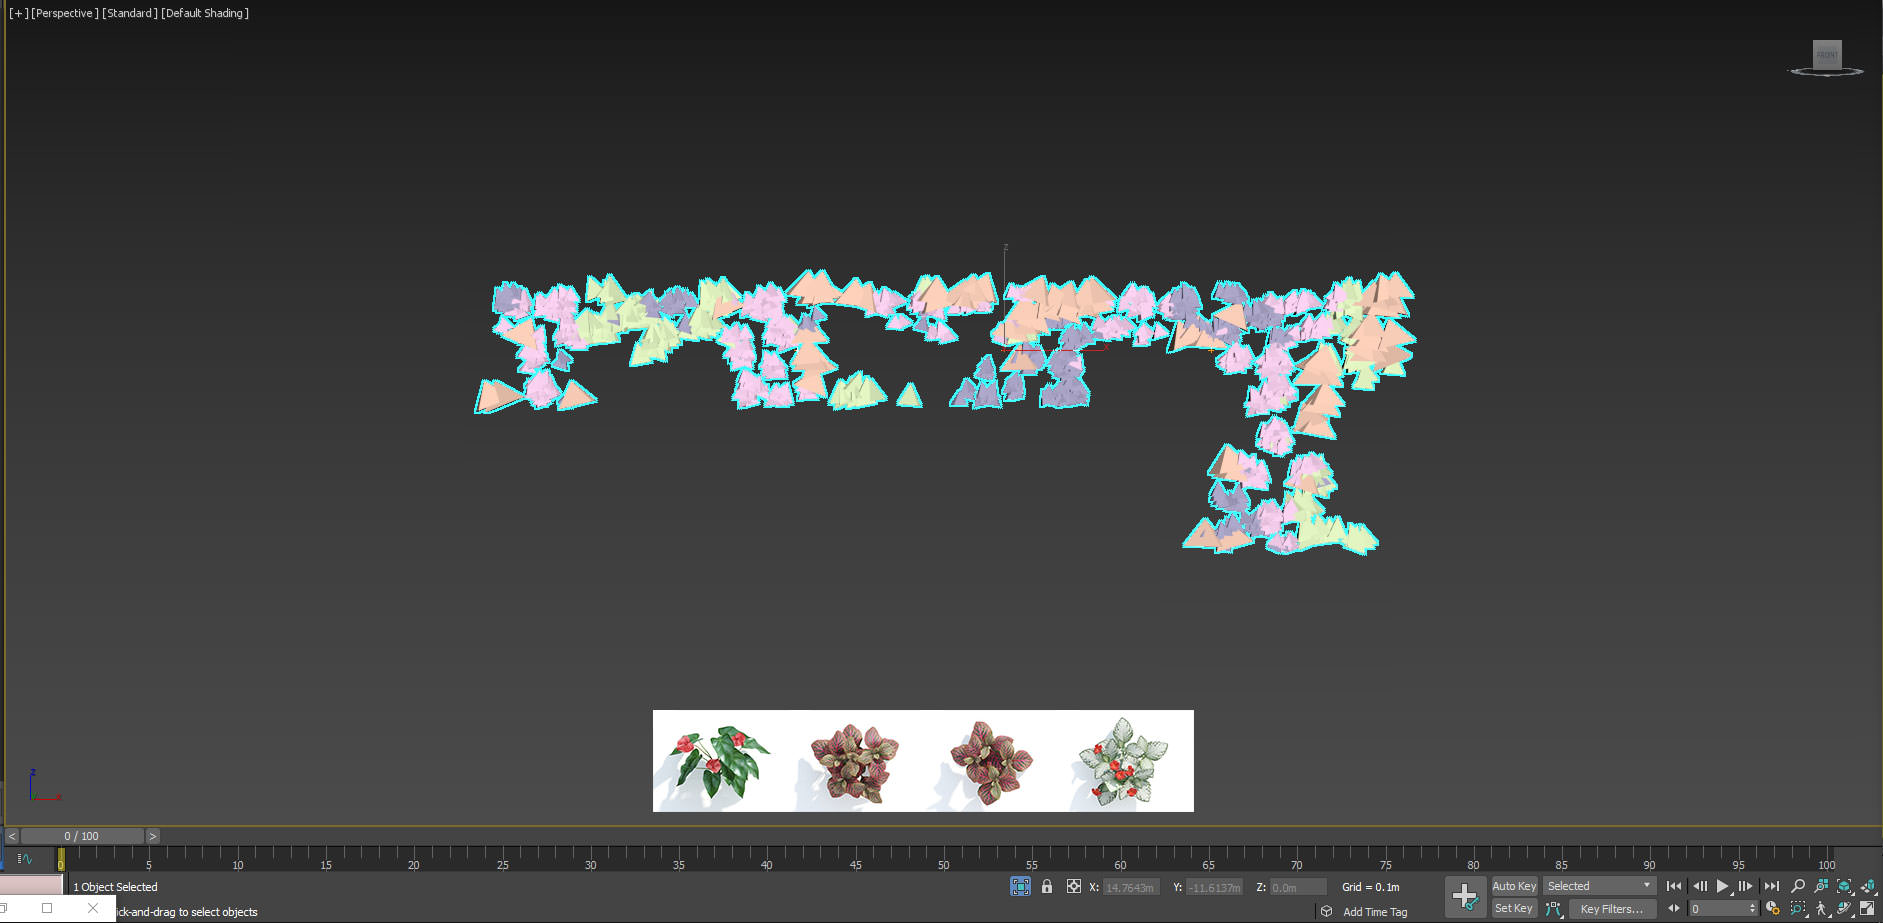
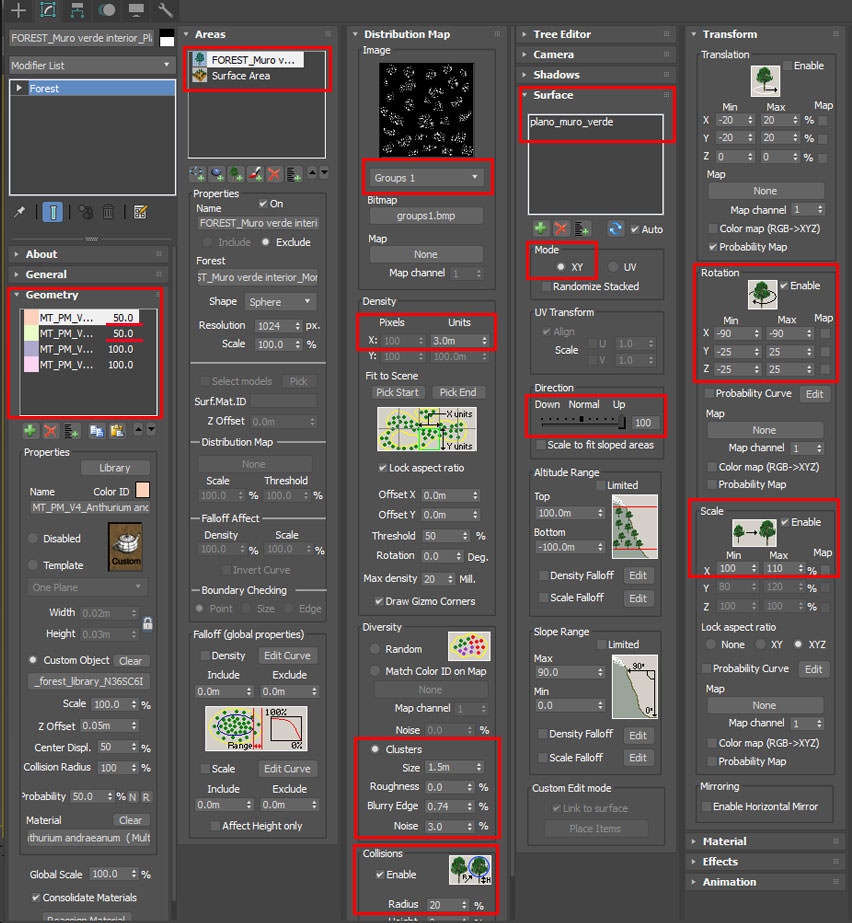
For the creation of the green wall, we used MaxTree plants which are really awesome models and Forest Pack Pro to distribute them along the surface into a specific pattern.
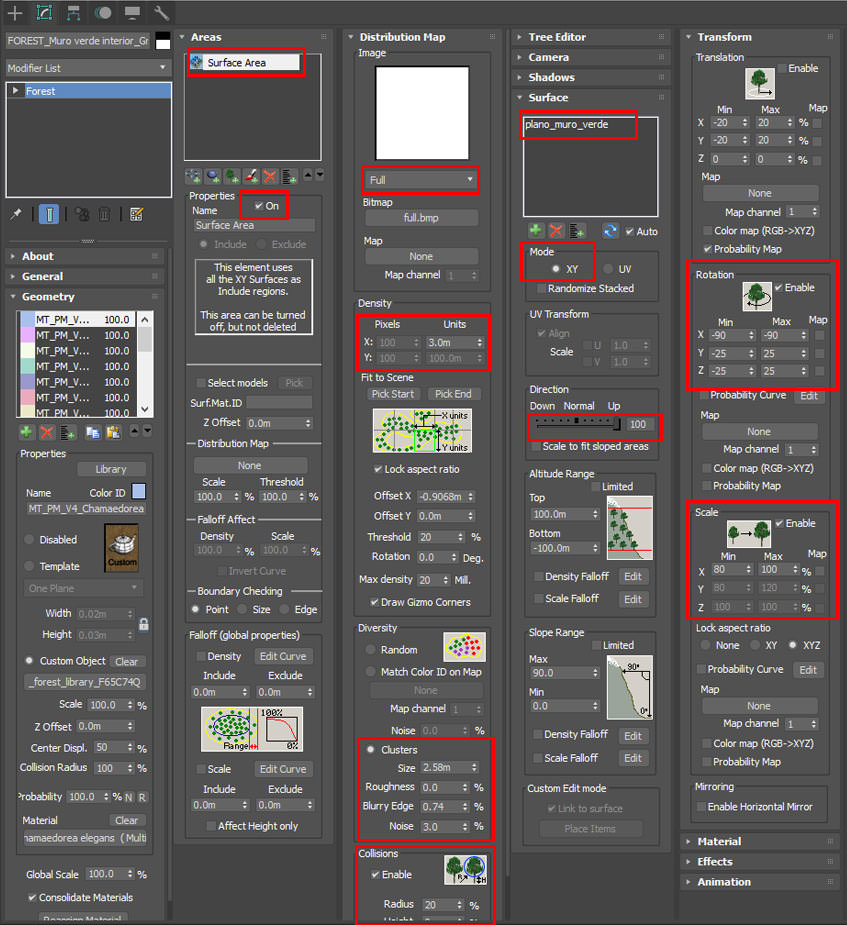
It consists of 3 different Forest objects. Nested within each other as exclusion zones. Also, we used clusters option to avoid noisy an unnatural look of the plant distribution.
Base small layer of plants and their settings.
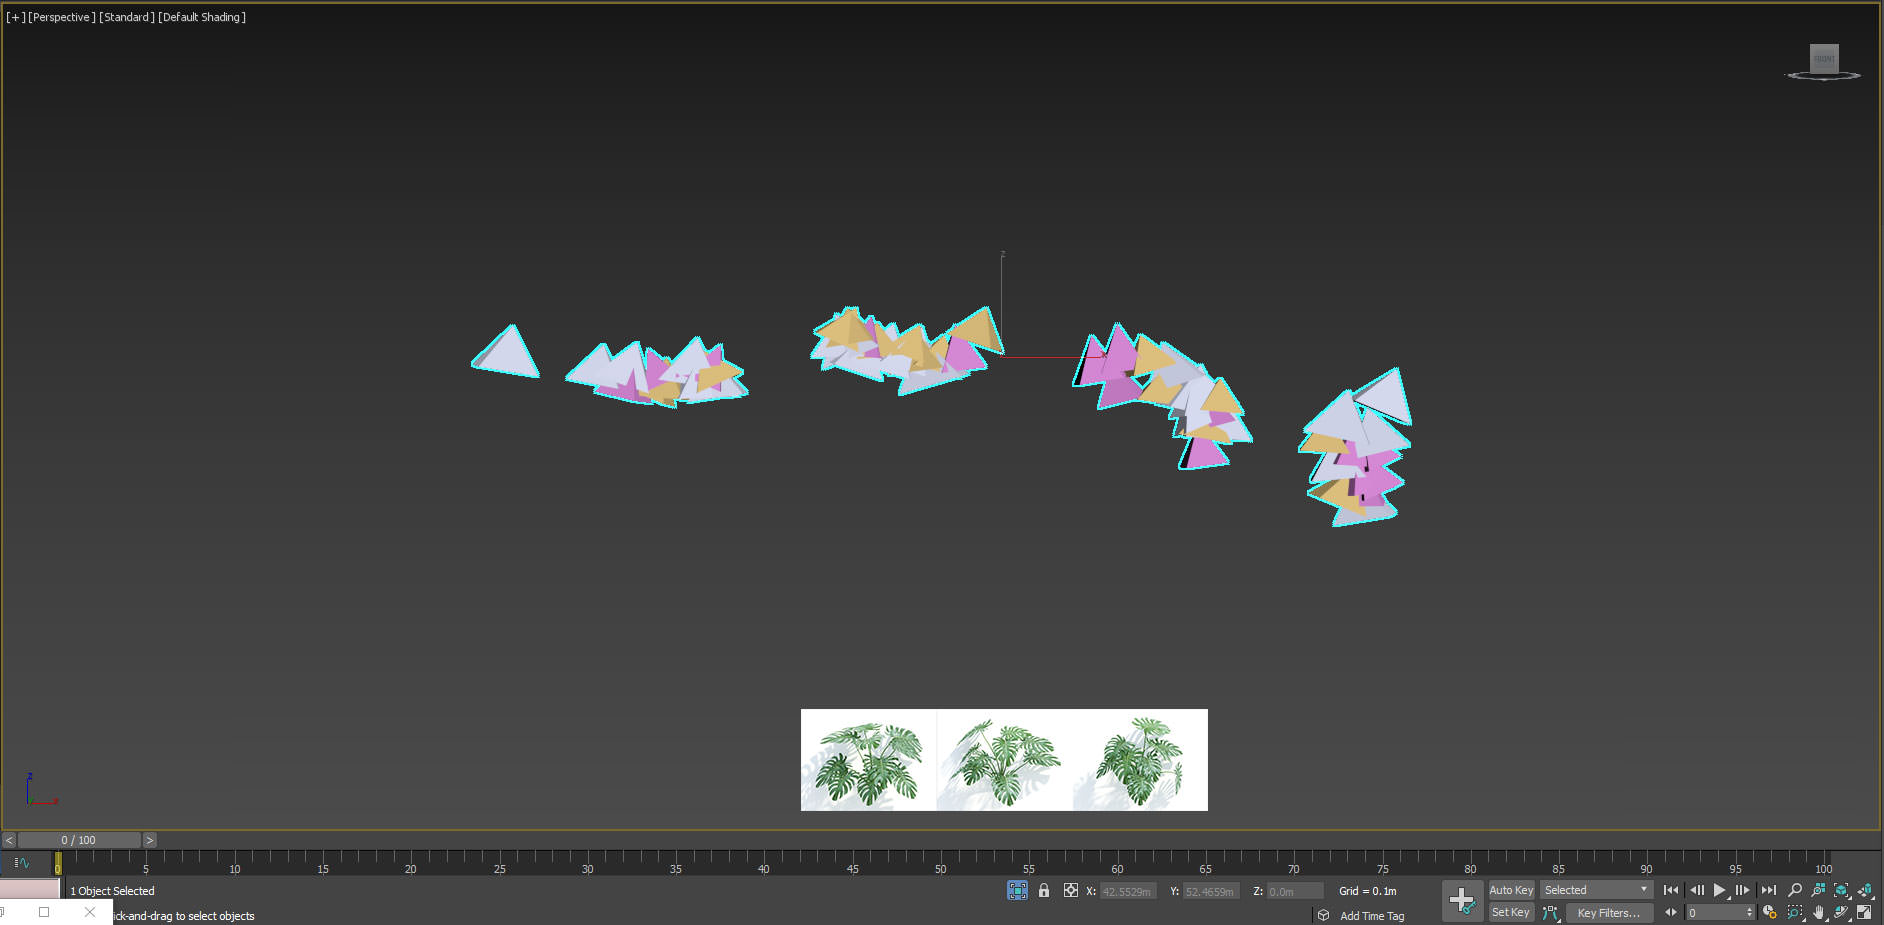
Bigger “monstera” plants :
Medium size and color plants to give and accent to the overall green :
Wisterias were also scattered with Forest Pack Pro over the ivy’s we made with Ivy Generator.
Finally, there are the deck and fence of the balcony that were created with Rail Clone Pro but there is nothing fancy about that. Just made with simple steps you can see here (http://www.itoosoft.com/tutorials/tutorial_parquet_floor.php?back=page%3D2%26tag%3Drc)
That’s all about modeling.
Lighting
This is the simplest topic in term of technical aspects. Since we use Corona Renderer, in the first place, there are no settings to mess with. Just hit render and everything will run smoothly. This is one of the things we like the most about Corona after so many years of using Vray. We feel unshackled.
We used simple exposure settings till we reach the exposure we like and then fix it with a corona cameramod.
The denoise feature is really neat an does a really great job once you reach a reasonable noise level. We never go past 0.7 though, to avoid textures being blurred.
So about lighting, we tested based on references till we got something that we liked. Everything was lit with an HDR image on a Corona bitmap on the environment. Sometimes we adjust the curves to get a little bit more contrast and that’s pretty much all there is to it.
We used Peter Guthrie’s HDR’s.
Texturing
This was the interesting part of our process in this particular project. First, I would like to talk about our workflow between Substance and when and where we use it.
It was very important to identify which parts of the scene were going to go through Substance and which ones not in order to successfully implement the software in our pipeline.
The criteria were as follows :
- Importance of the material in the scene
- Complexity or the material
- Availability of textures
- Complexity of the model
The other aspect of deciding about implementation was in which cases utilize what piece of software. Substance Designer and Substance Painter are meant to work together and they complement each other but at the same time, they offer very different toolsets so you have a lot of flexibility to decide in which way to work.
So, after a bit of experimentation and trial and error, our workflow came up to be using Substance Painter for small assets like furniture or any kind of gadgets and Substance Designer to generate procedural tileable textures for any kind of surfaces and environments. We also use the substance directly within 3ds max which gives you and an infinite amount of variations for your textures and you can modify it directly in 3ds max. Also, we do our baking process inside of Substance Designer even though you can do it with Painter as well.
We’ll go through a couple of materials, the most important ones, and try to explain the process as best as we can but we strongly recommend you to take a look at the Allegorithmic’s YouTube channel since there you will find pretty much everything you need to get up and running with Substance suite.
The metal structure material on Substance Painter
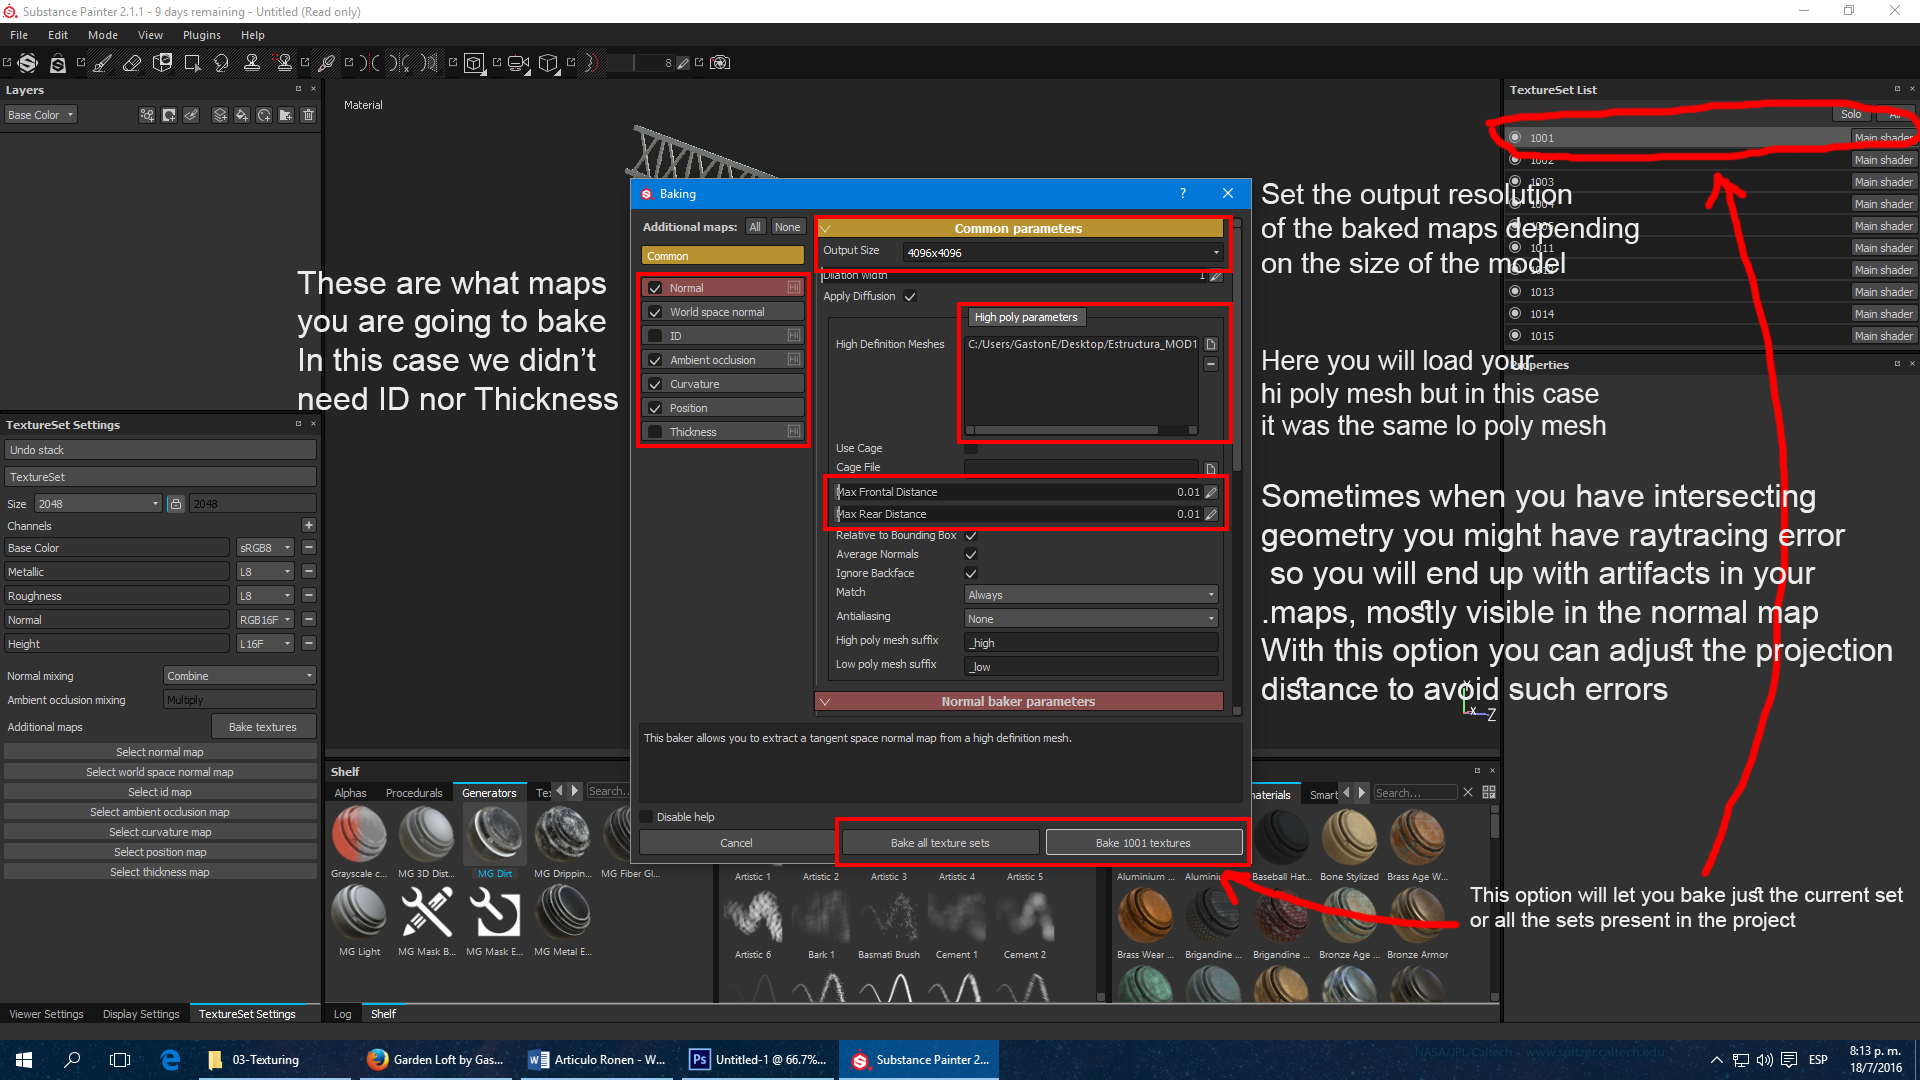
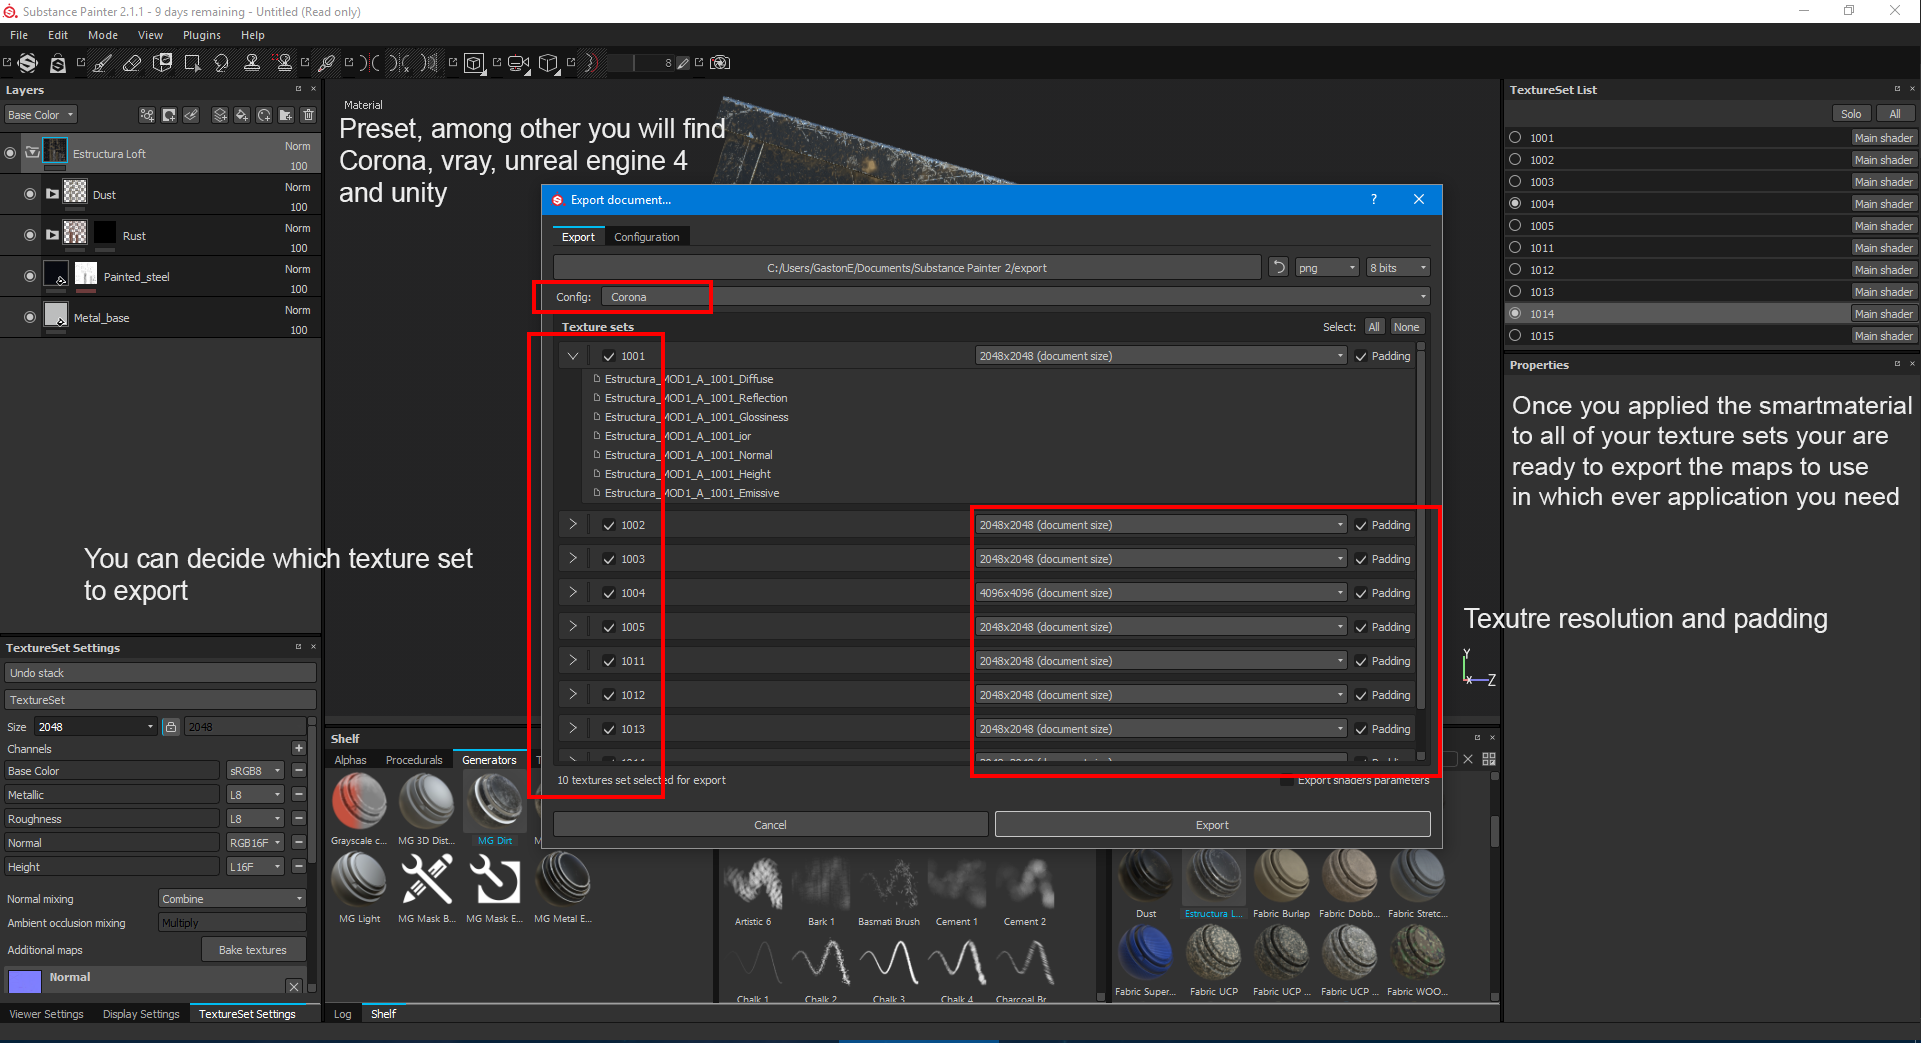
The one thing you will always want to have when working with Substance is properly unwrapped geometry. So after the preparation of the model as described in the modeling section we brought the model to Painter and baked the model information to different maps as normal, occlusion, curvature, world space normal and position.
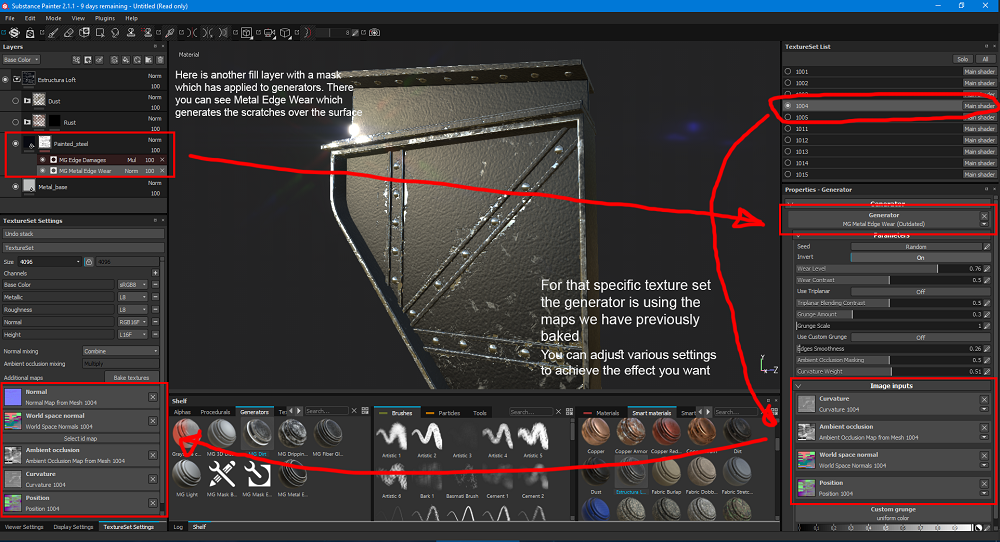
You will need this maps because the procedural mask generators use this information to “know” how the mesh is like so they can create, edge damages based on curvature maps, dust based on world space normal or position and so on. You usually bake a high poly model to a low poly model but in this case, we baked the model onto itself in order to get these maps.
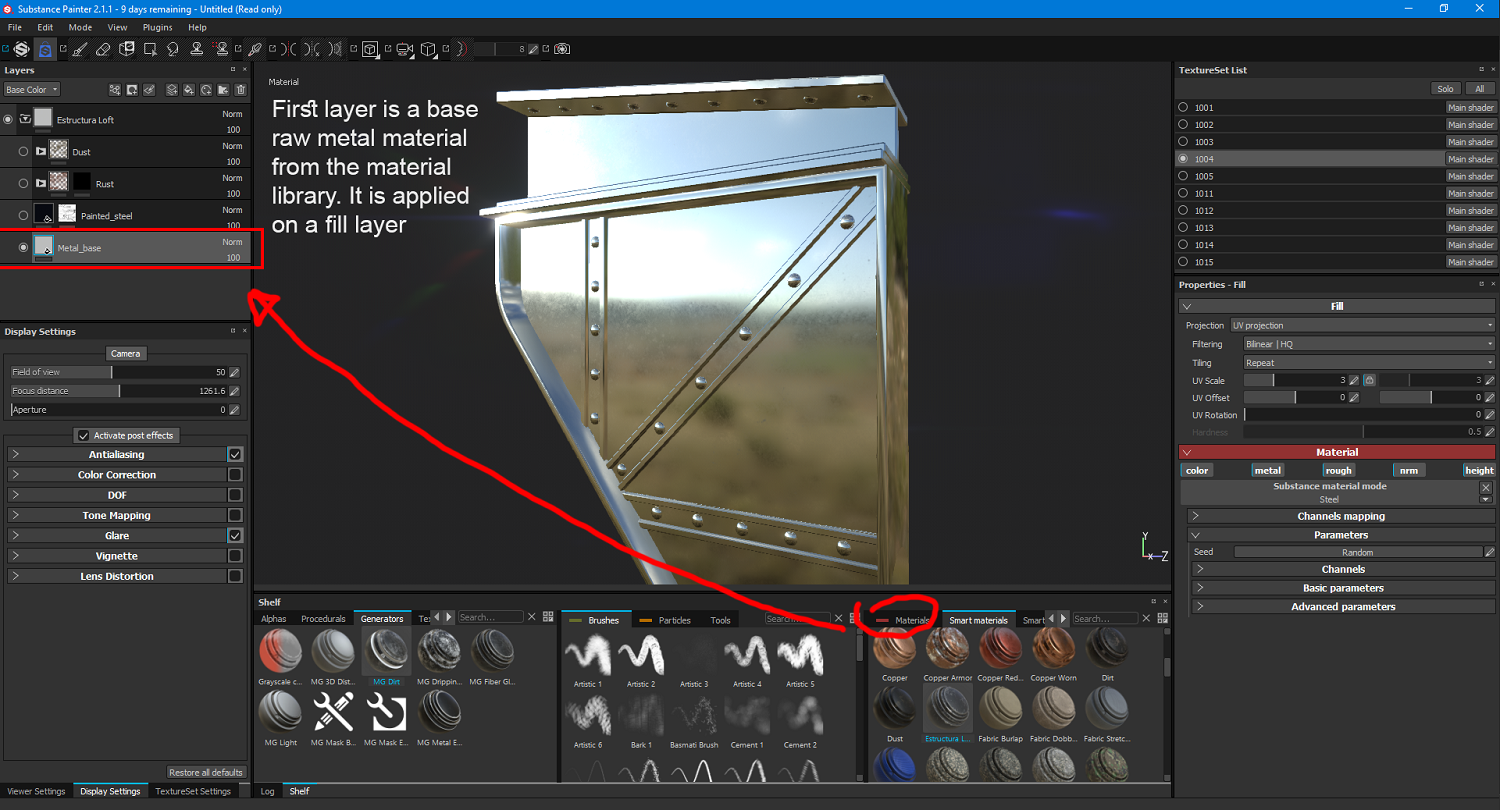
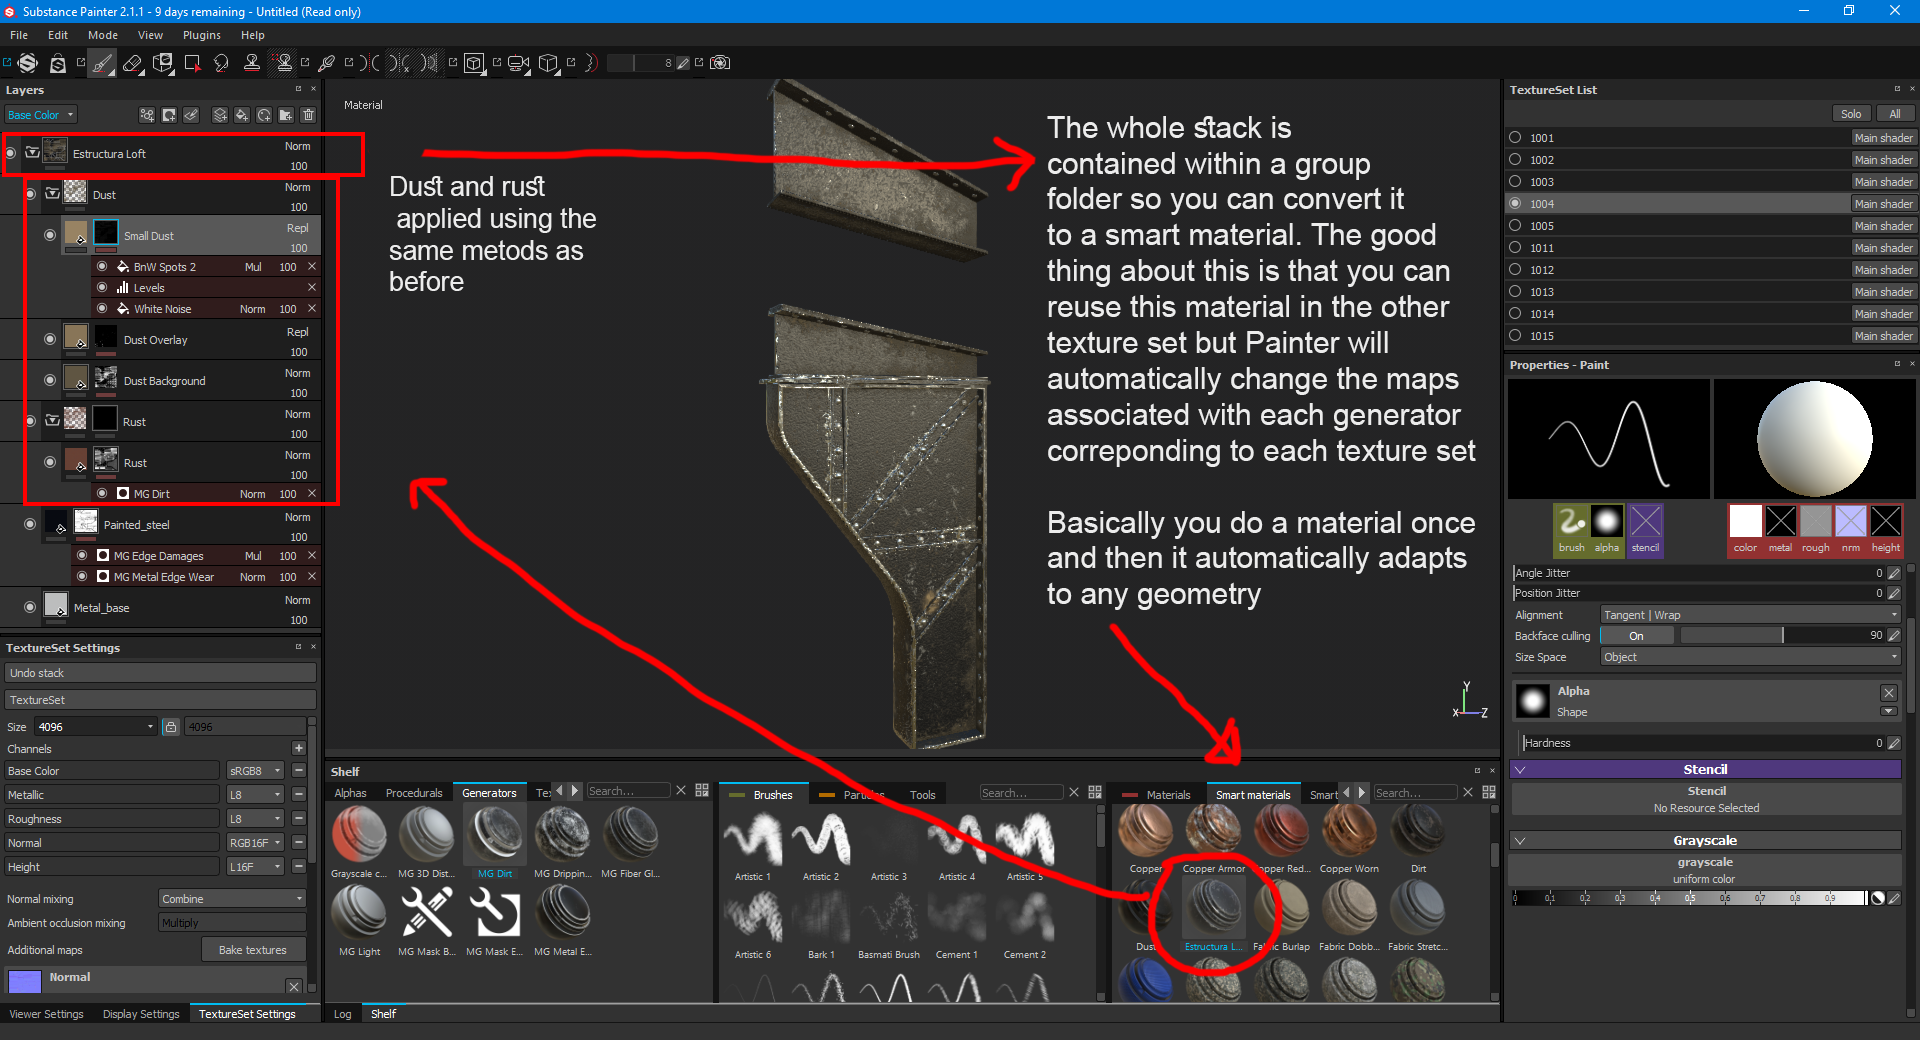
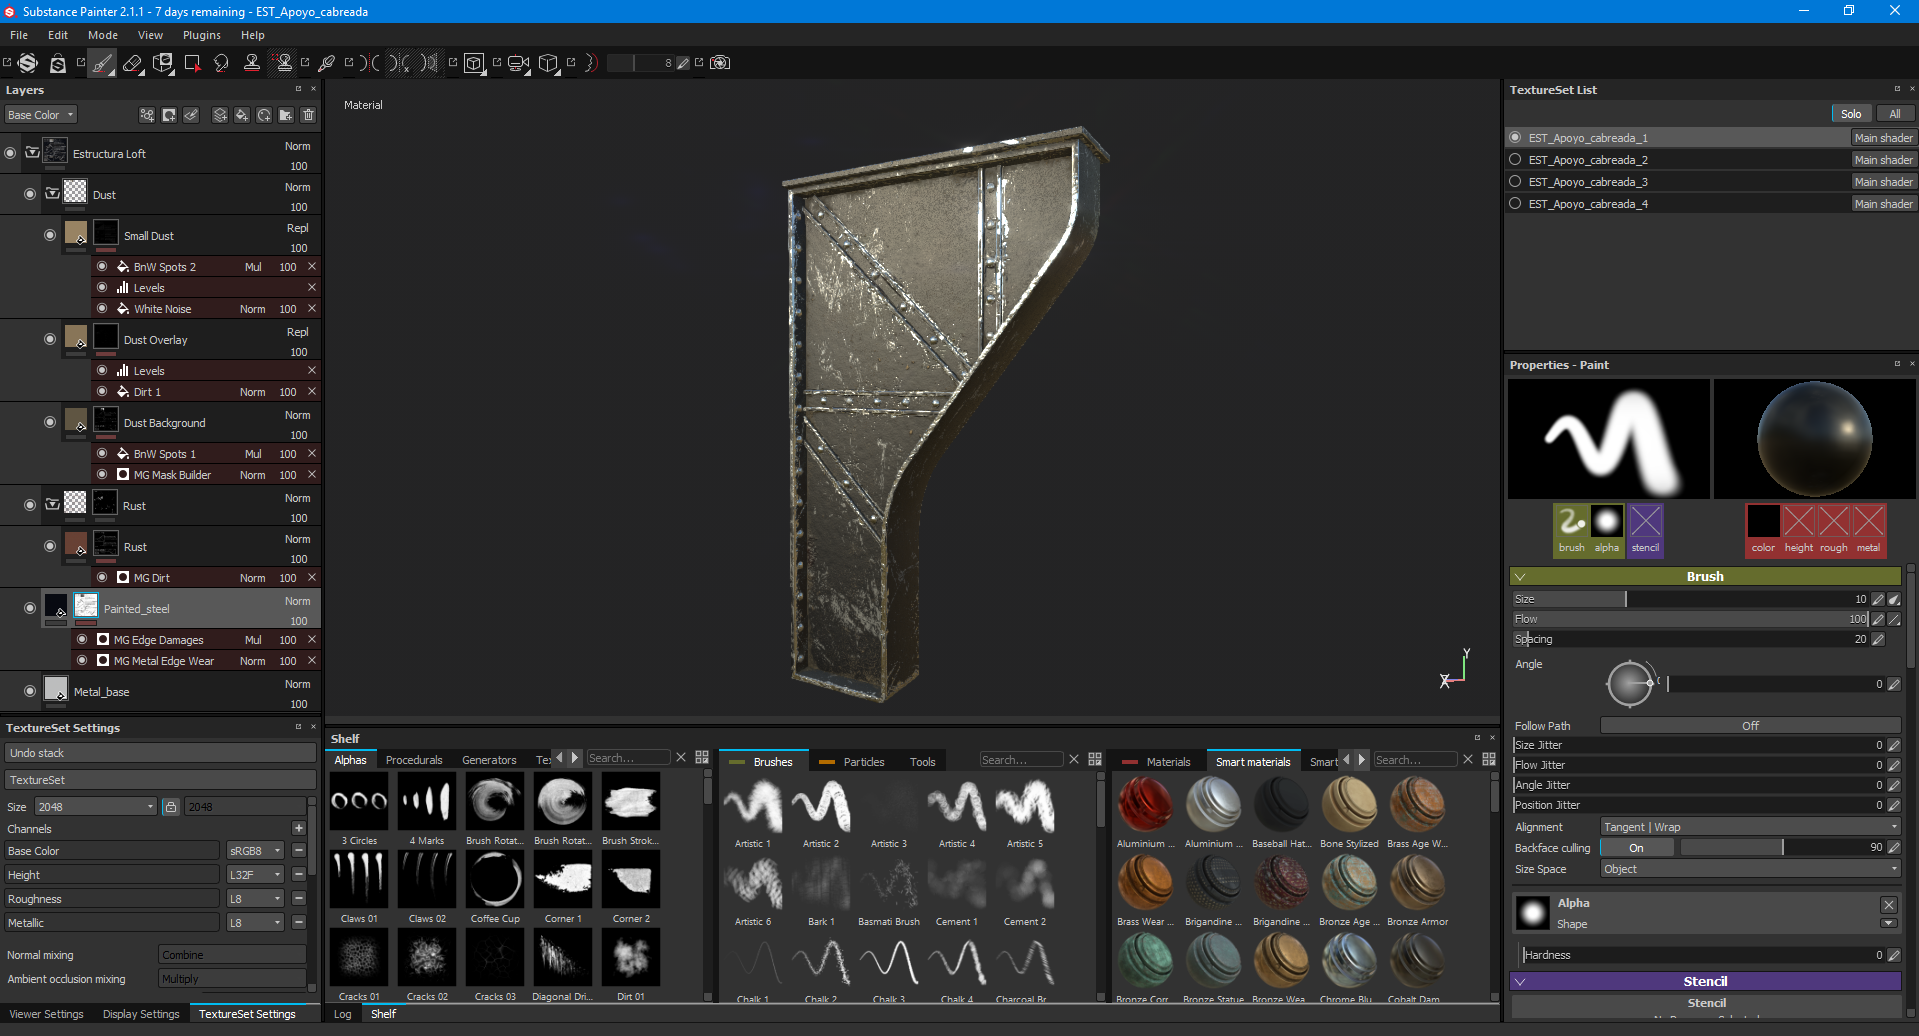
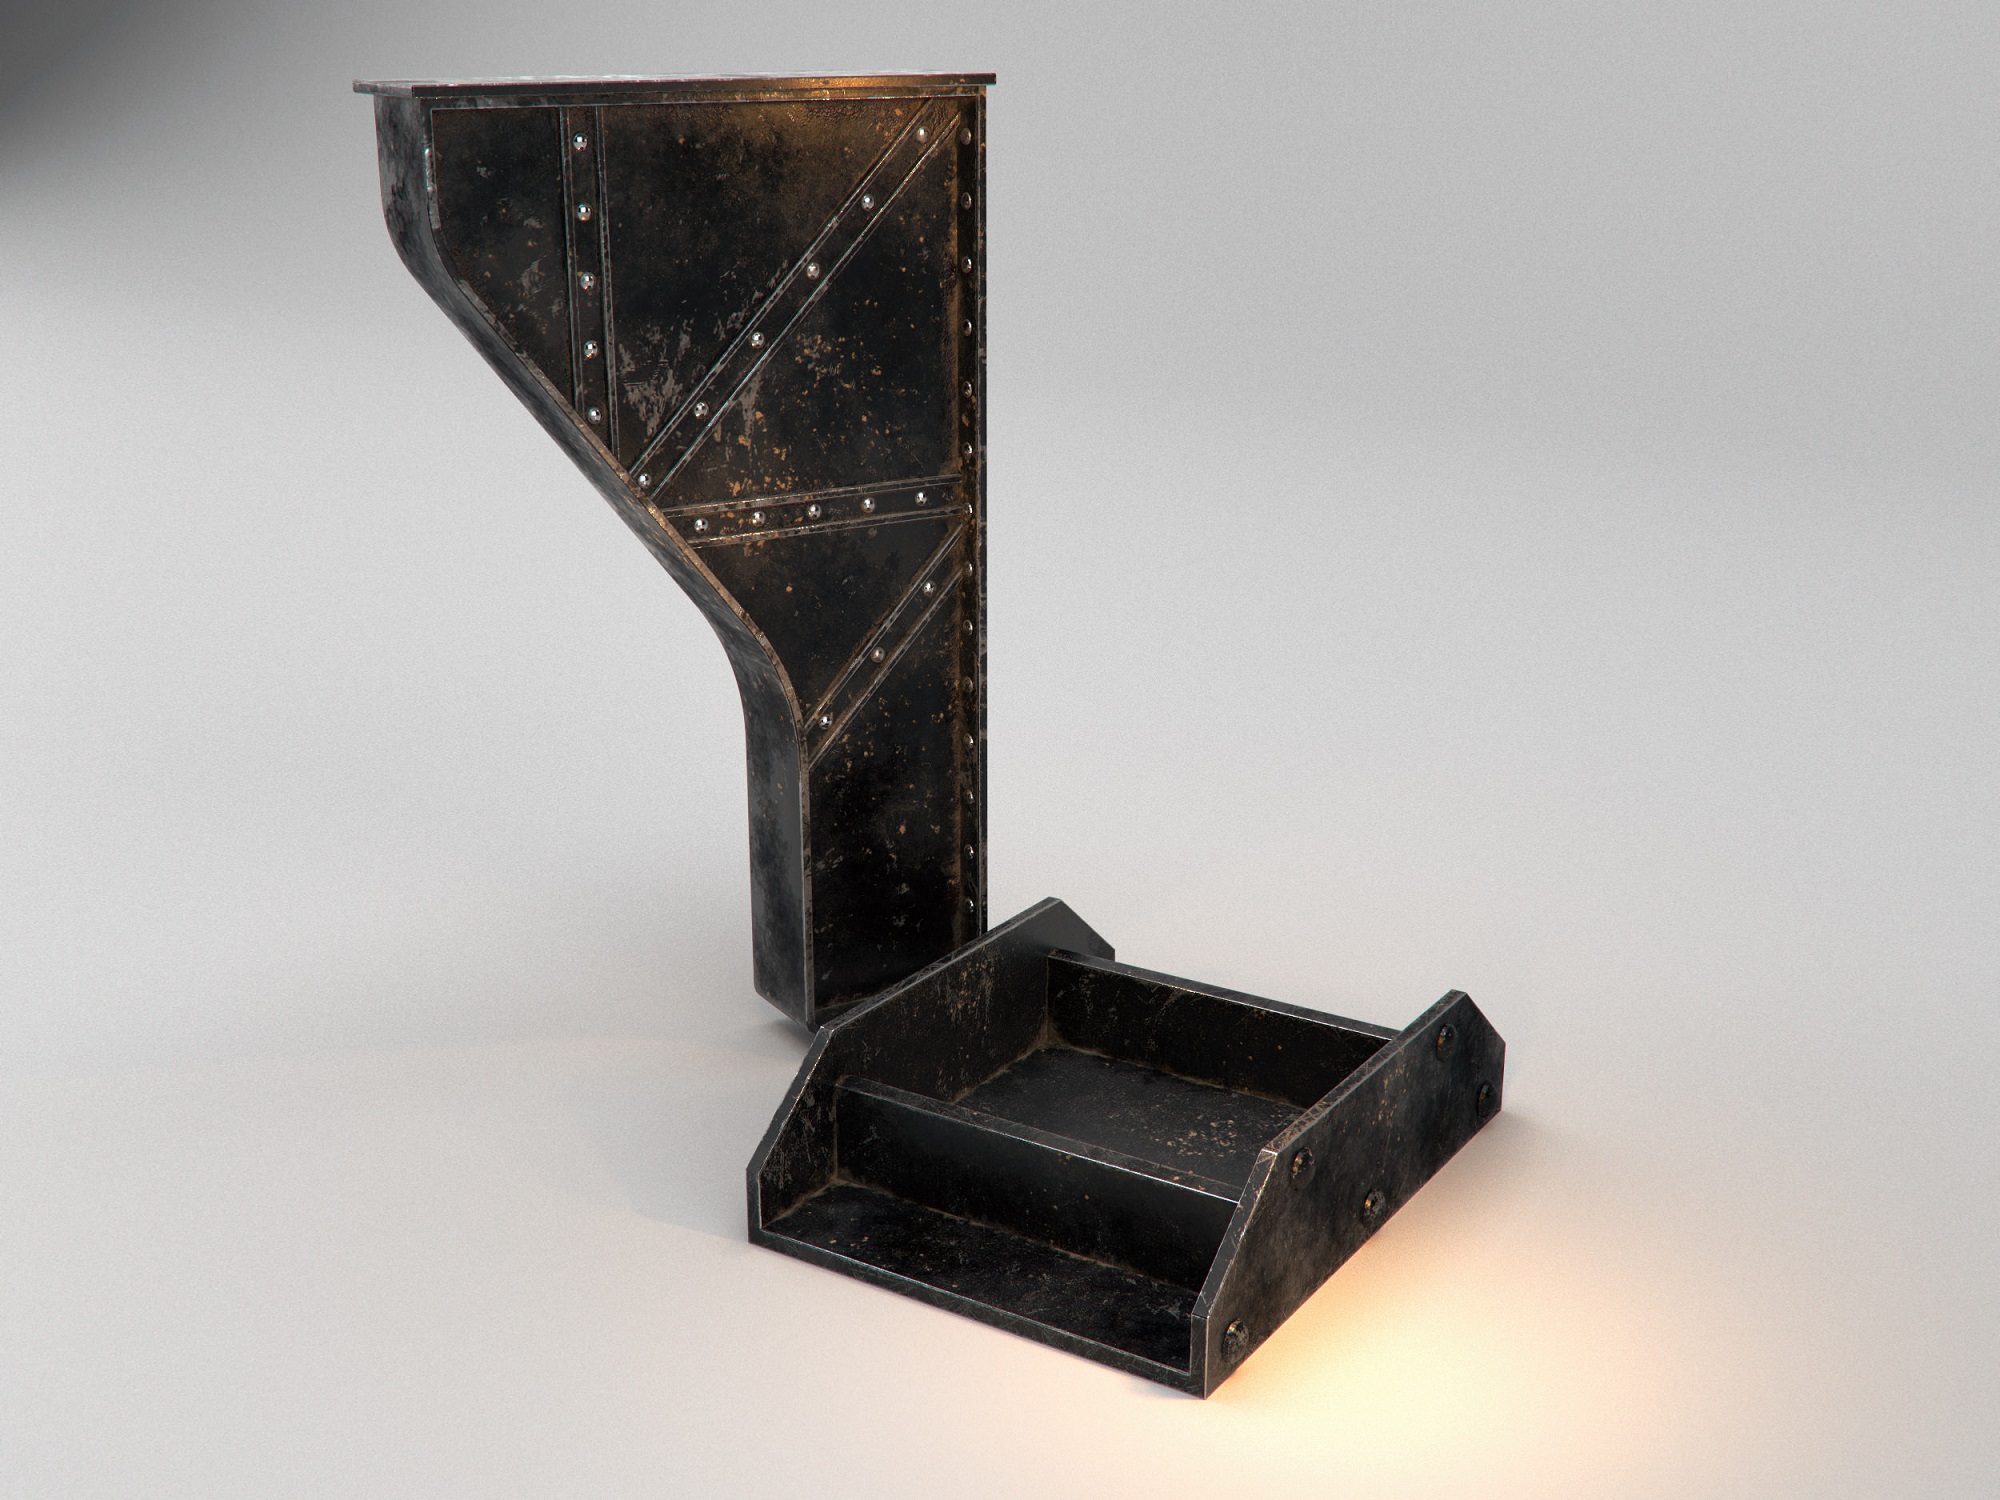
Here is a screenshot of the painter project with all the material layers and then the asset rendered in 3ds max with corona renderer :
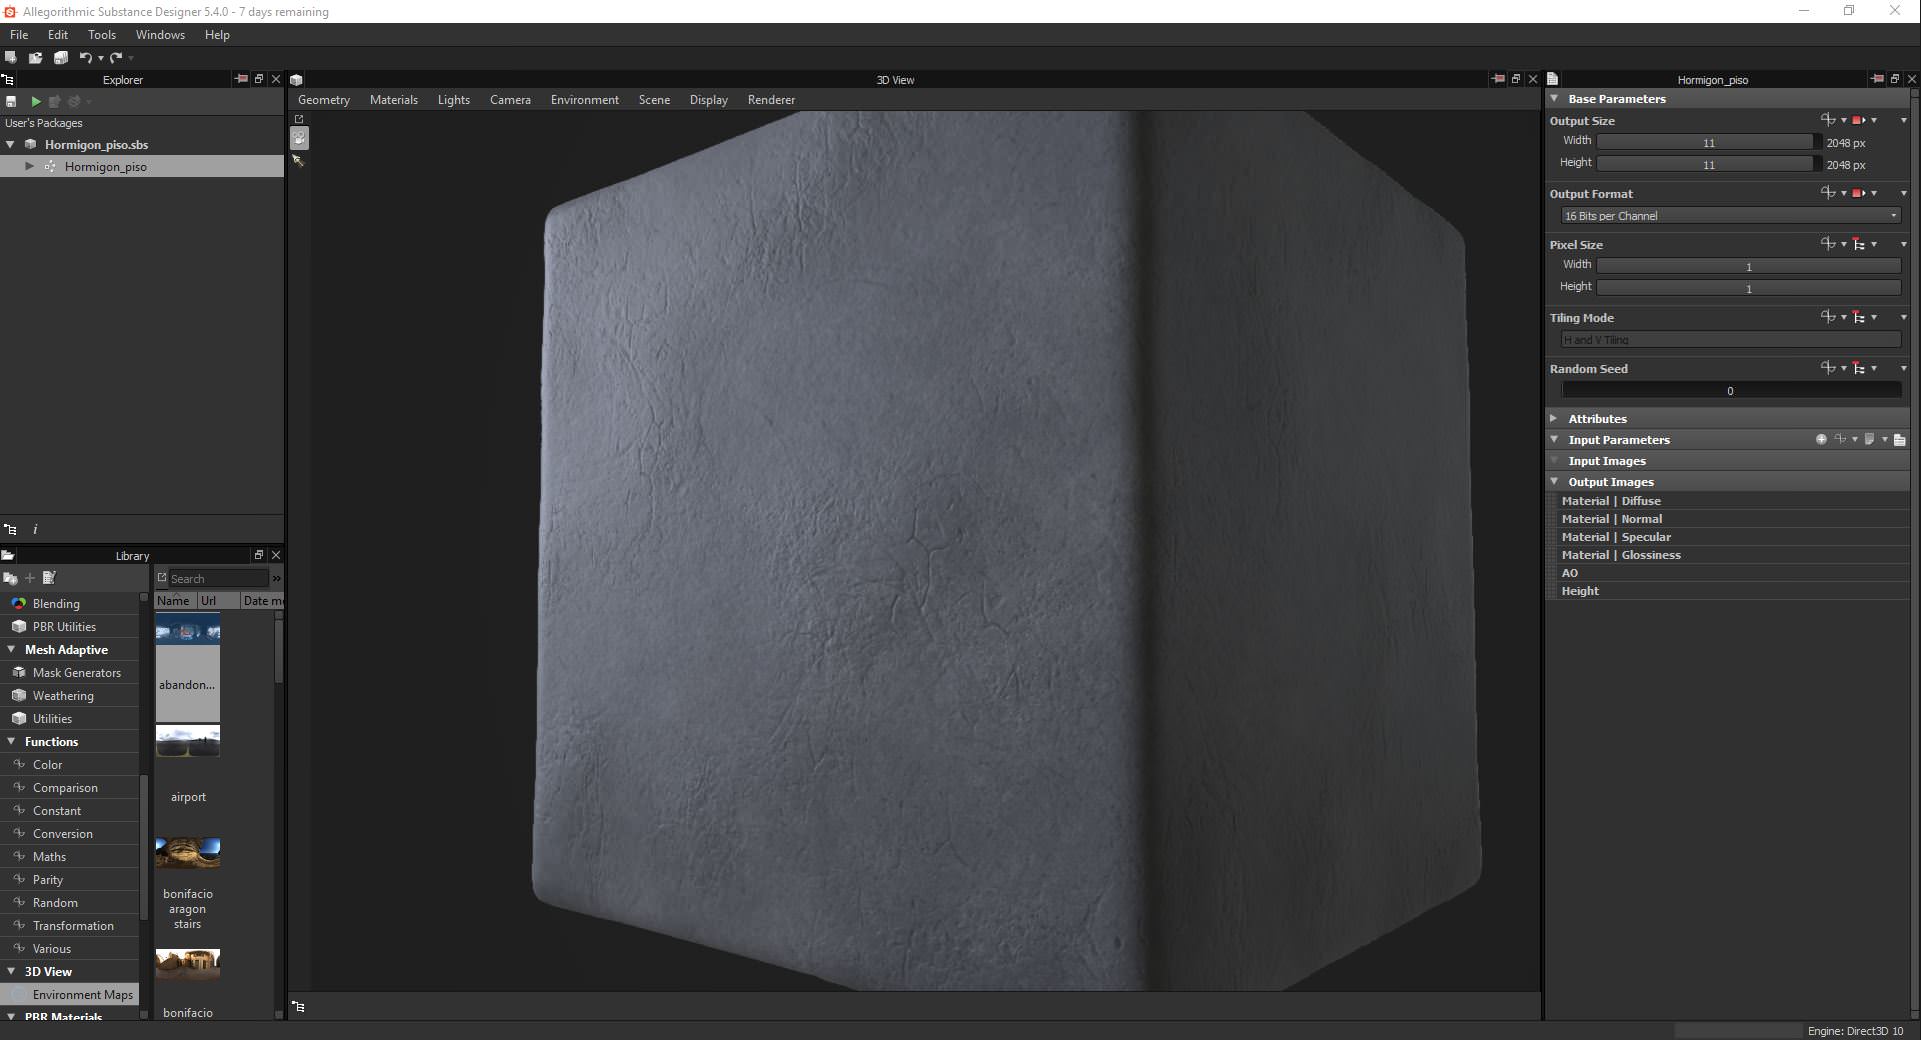
Simple concrete floor material in Substance Designer :
Substance Designer might be a bit more complicated than Substance Painter since it has a node based nonlinear workflow, so basically you will be plugging nodes back and forth and reusing already placed nodes to create the effect you need.
You can set up the project for both metal/roughness or specular/glossiness models and work in a nondestructive way; the same as Painter. You can work in low resolutions and when you are ready to export the textures change the output size and Designer will “redraw” all your textures in higher res without losing detail. In fact, the opposite – increasing it.
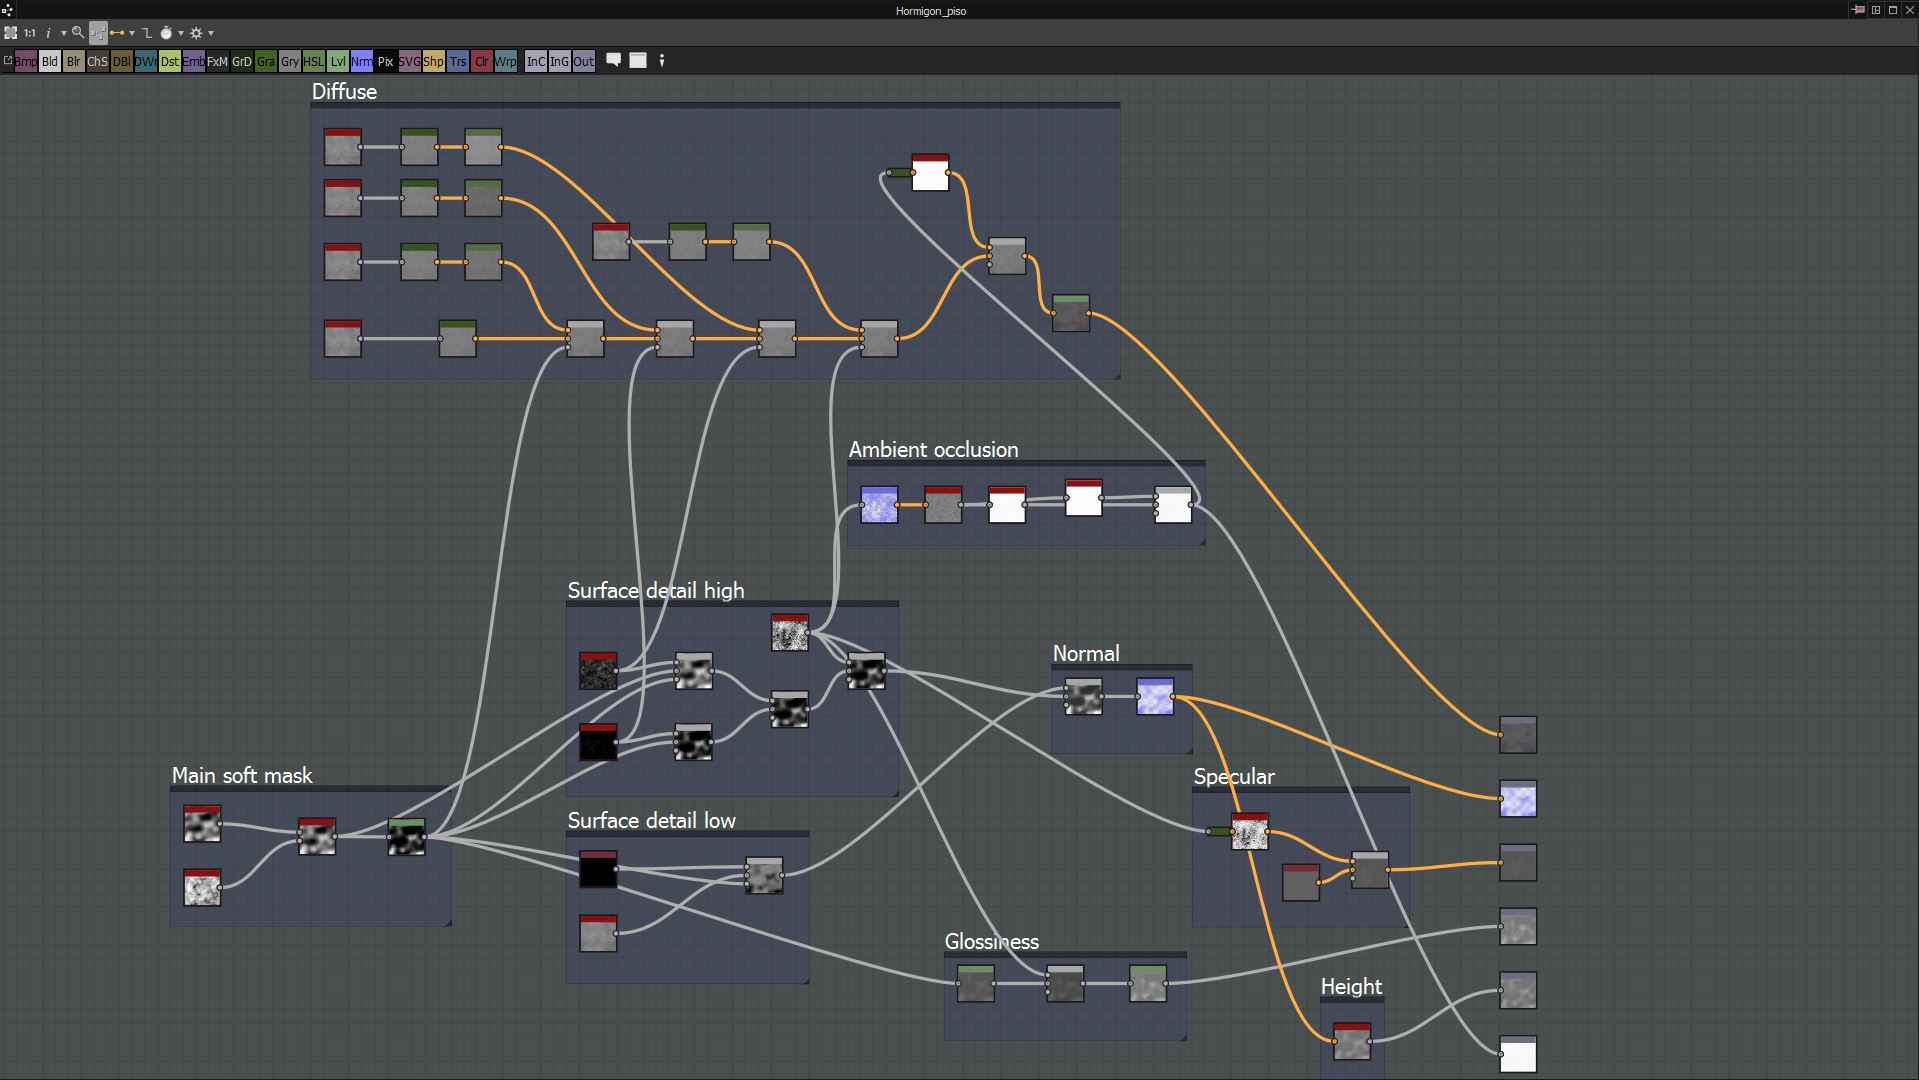
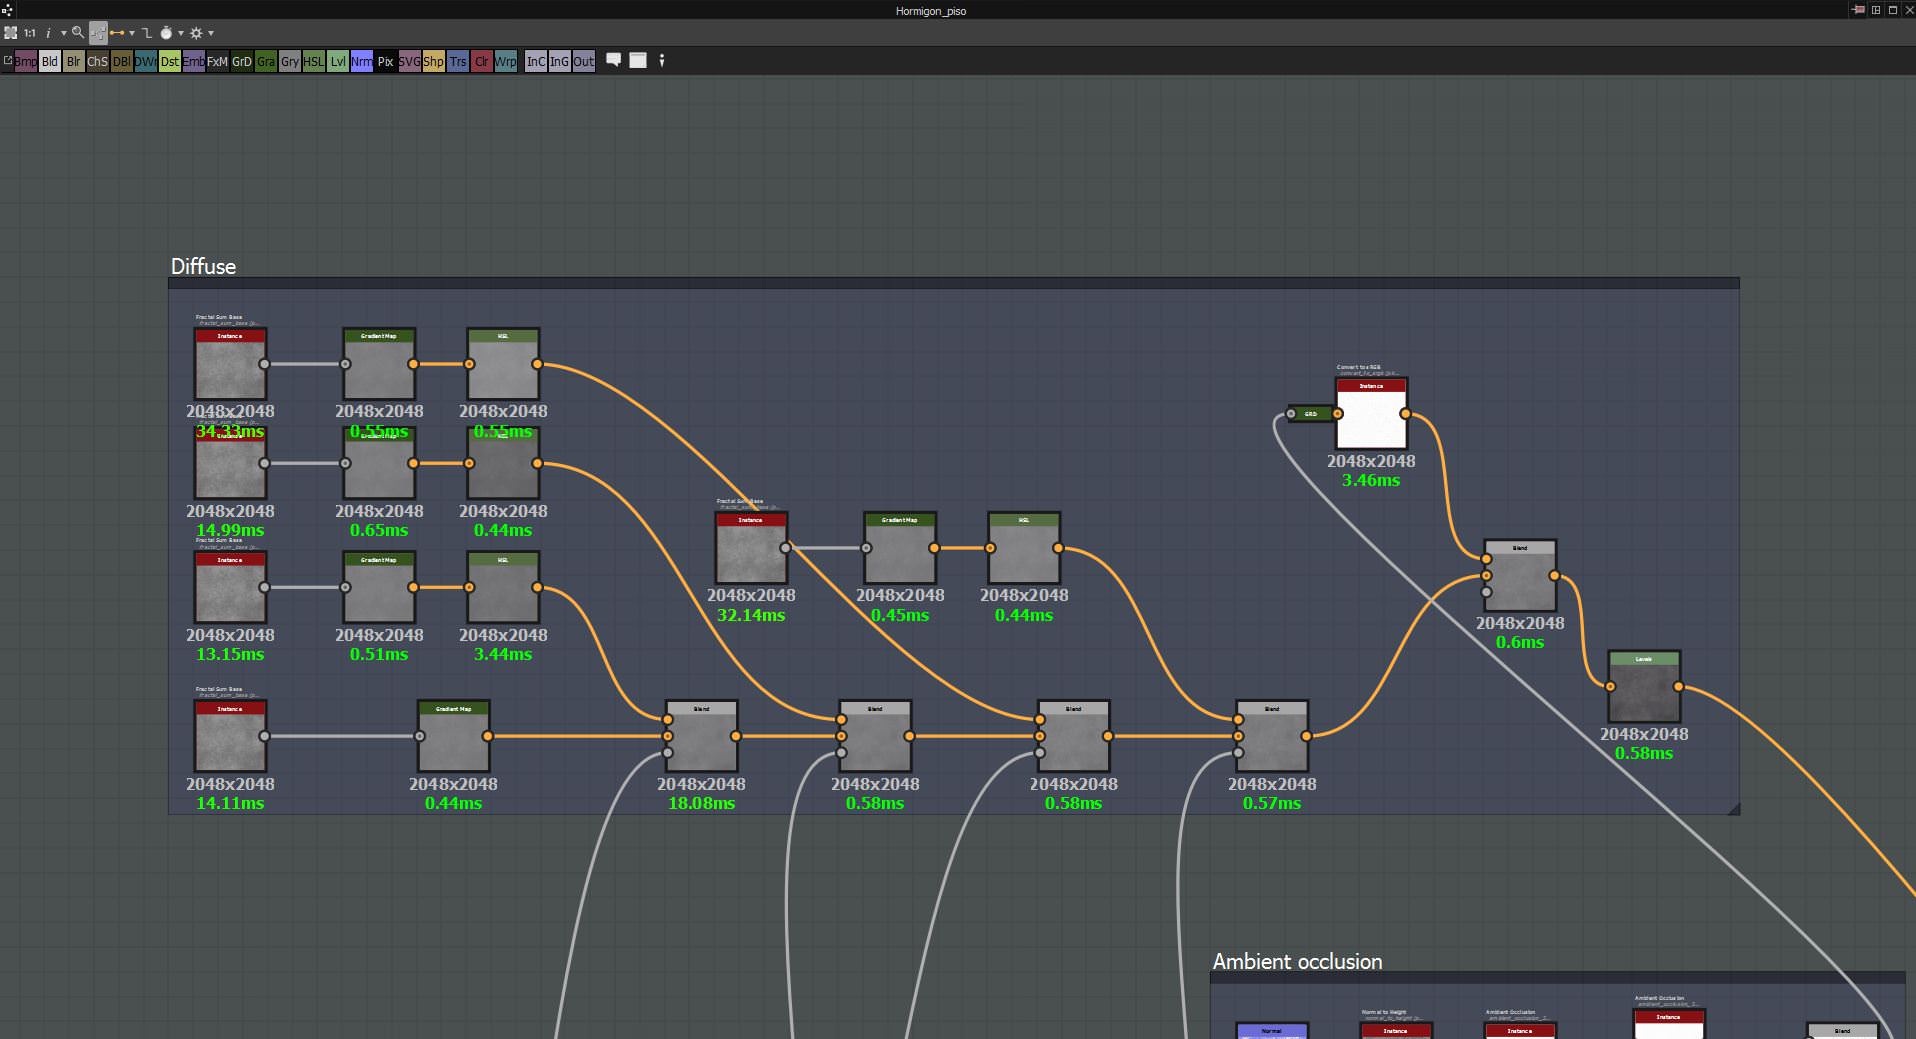
This is the graph for the concrete material. At first it can be a bit daunting but in fact, this is a really simple material and once you get familiar with what each node does your graphs will grow exponentially as well as the complexity of your materials. The workflow is pretty much the same as creating a material in the slate material editor in 3ds max.
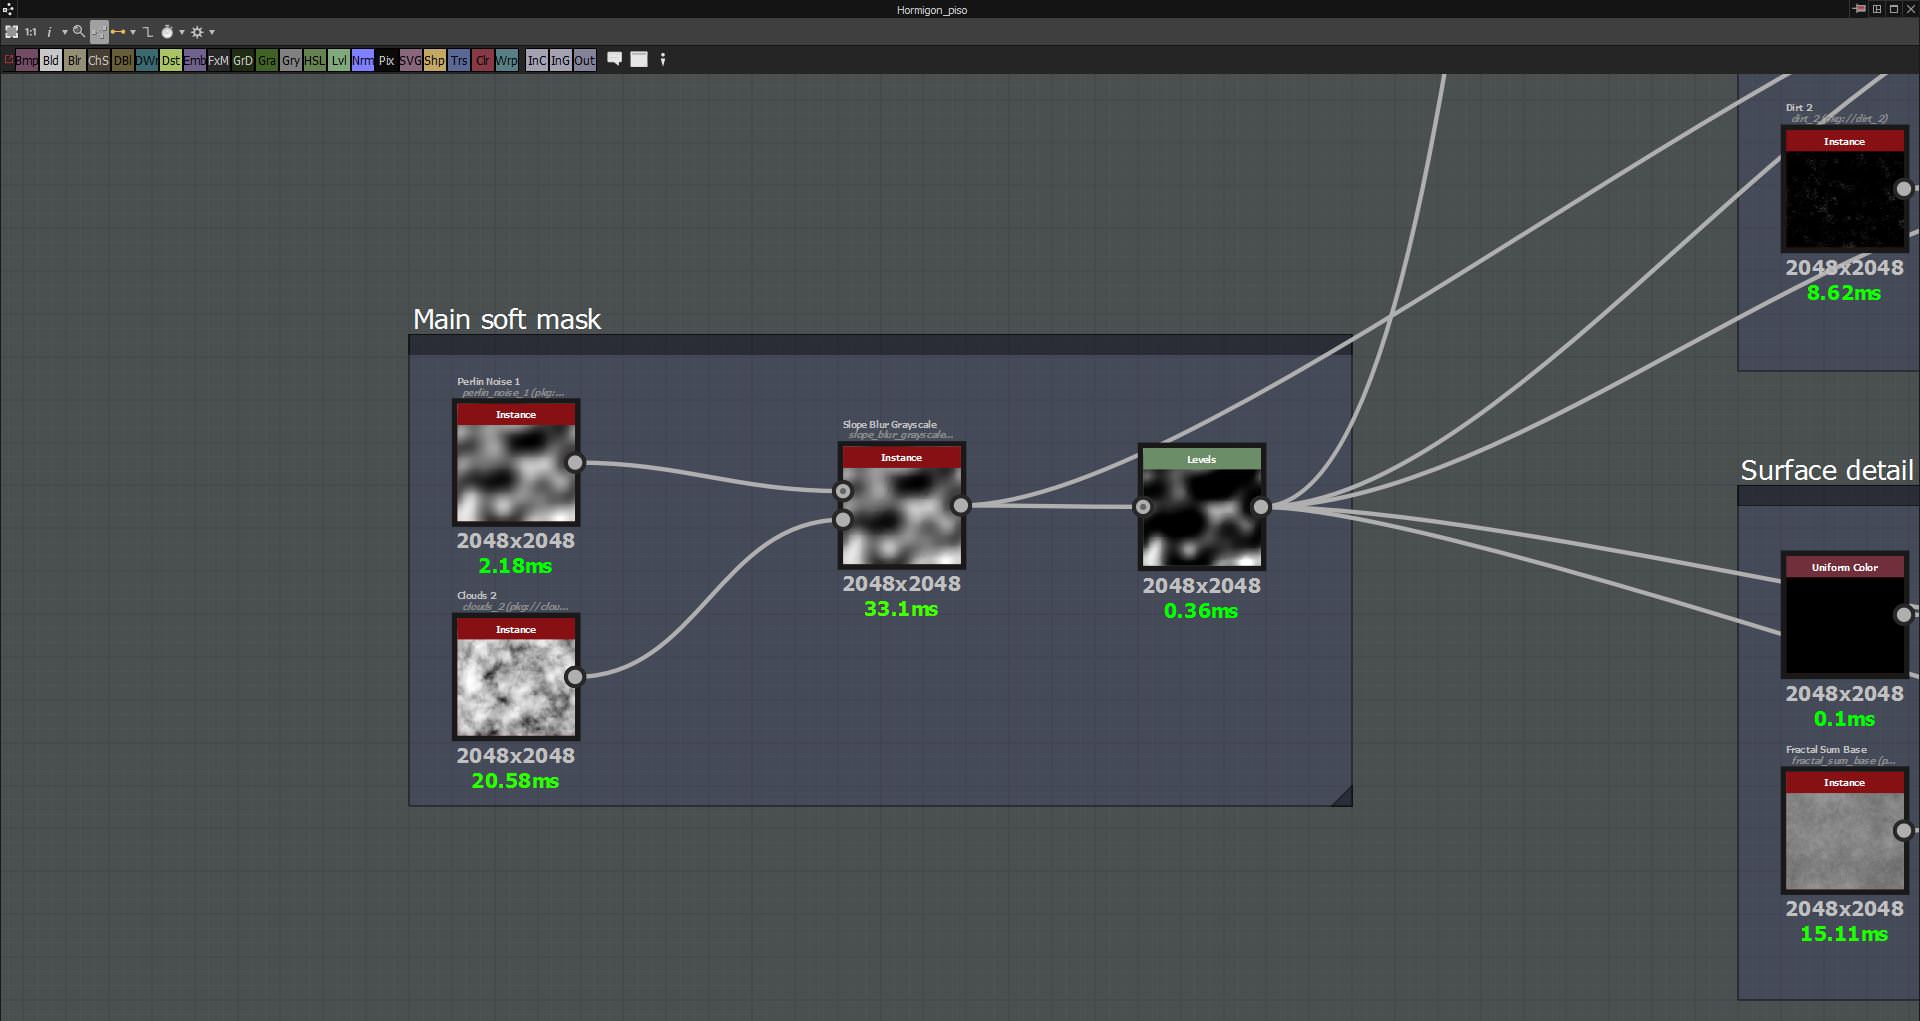
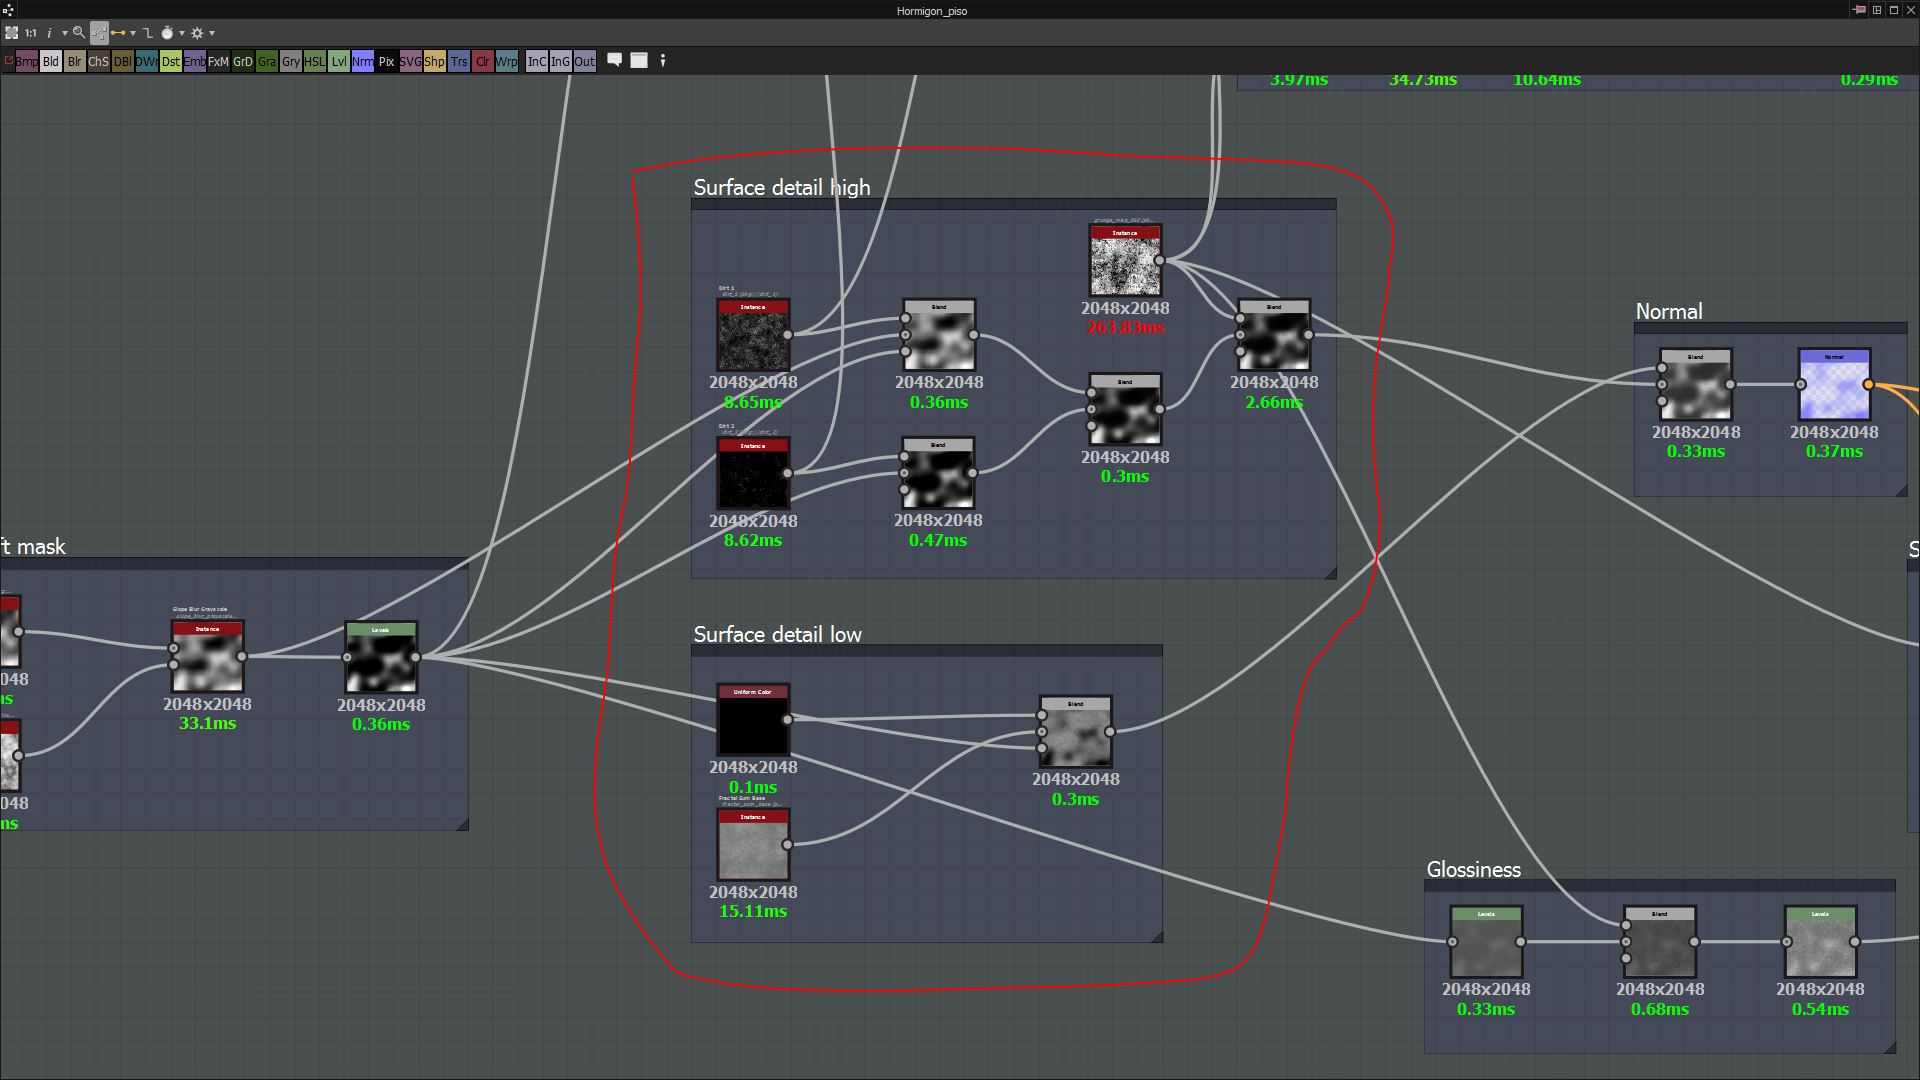
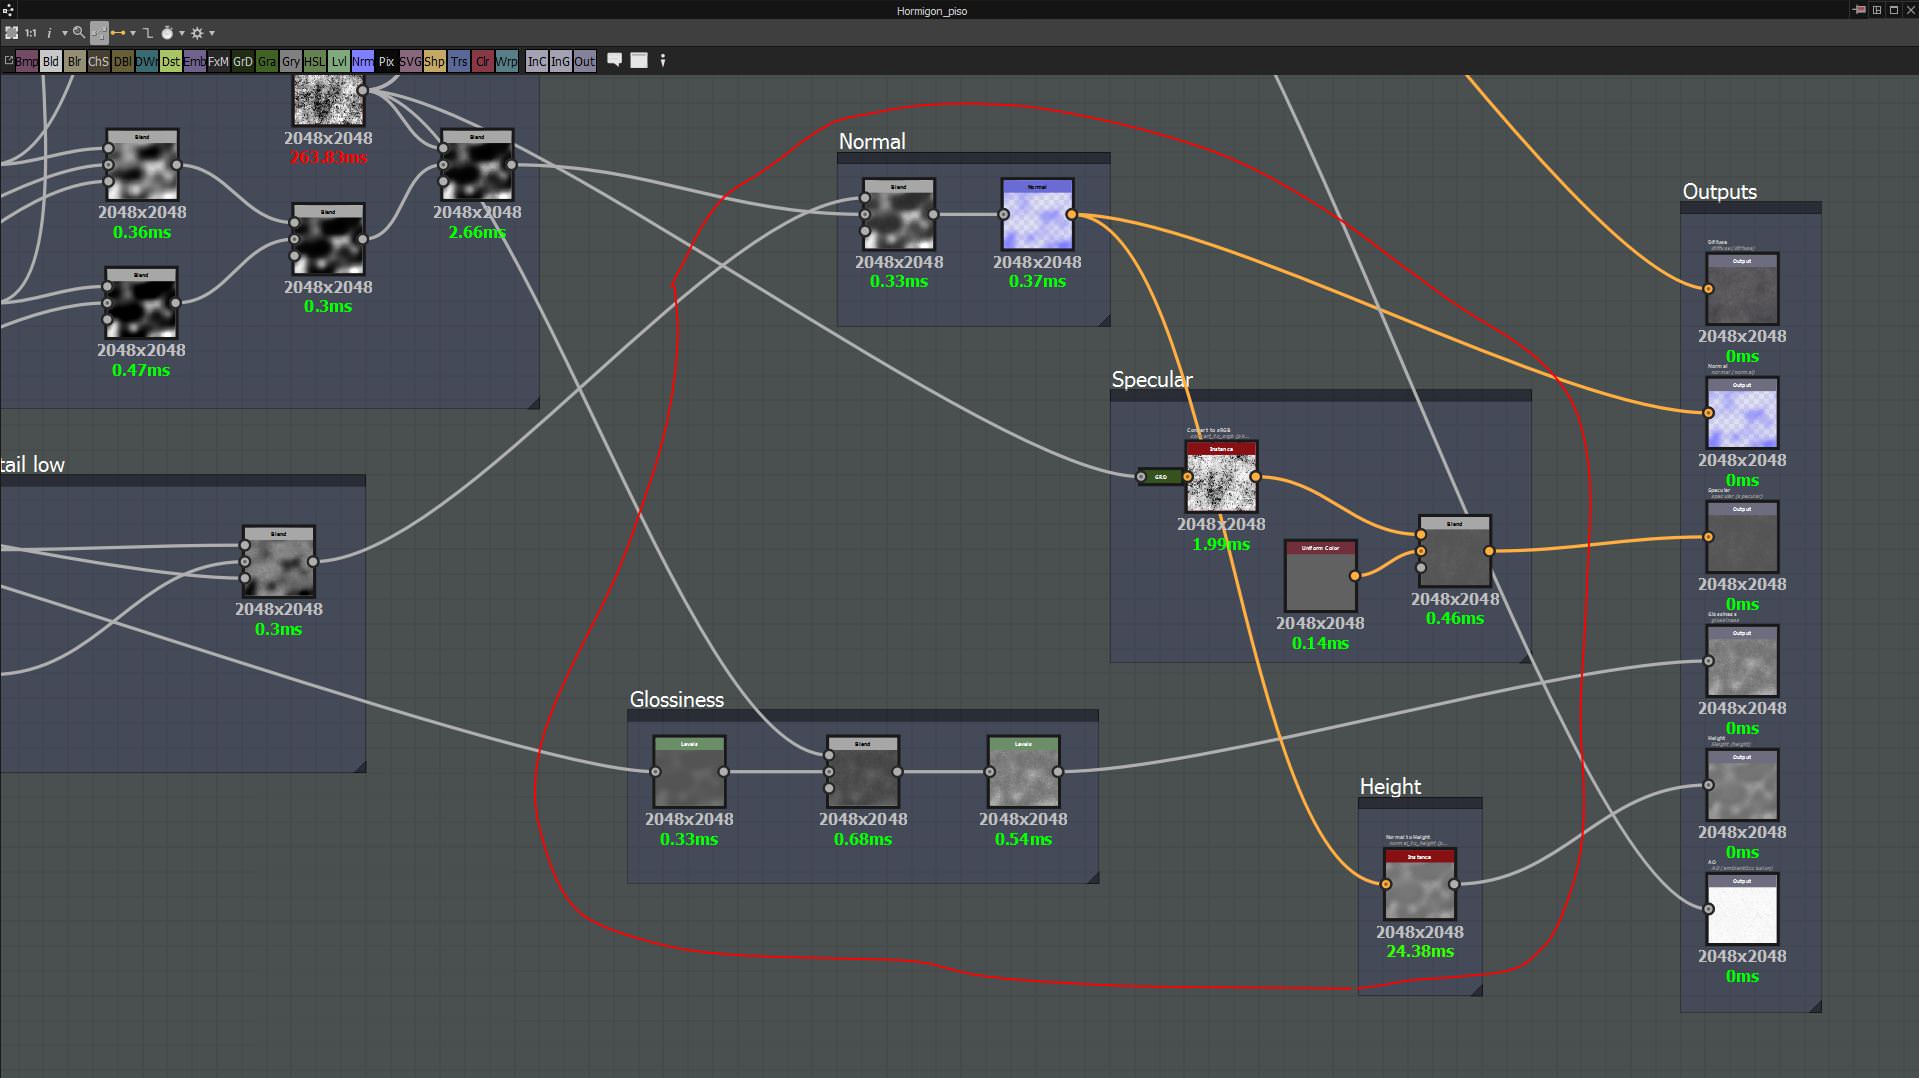
As you can see, the part in which the material is broken down let you understand more clearly how it works. It is always good practice to comment your graph sections. Otherwise, it will be extremely difficult to track down what a specific node is doing.
This part of the graph is driving the big bumps of the surface with a little bit of break up in the transition areas. Basically, two different noises combined and ran through a levels correction to make it more contrasted.
This part generates the surface detail. It is divided into two sections. The detail in the elevated areas (white) and on low areas (black). Again, procedural noises mixed by a blend node which mixes to nodes together. The placement of the different surface details is driven by the mask created in the previous step.
In this section, we create normal, specular and glossiness maps as well as height.
The normal map is created by blending both surface textures by and Add (linear dodge) transfer mode and then plugged into a normal node which basically transforms any height map type to a normal format either DirectX or OpenGL. Here you can set the intensity as well.
Specular and Glossiness are created by blending the surface details maps and multiplying them by a color which in a whole is driven by the main mask. With the authoring of these maps, I strongly recommend you to stick to the PBR workflow and your textures will work almost straight forward with your renderer. With this, I am talking about specular range and F0 value for dielectrics and the specular range for metals as well as PBR values for the glossiness maps.
You can read the Allegorithmic guide which is very clear and comprehensive. Then you have your outputs which will be the maps to be exported.
The diffuse creation is simply a layering of subtle variations of shades mixed on top of slightly different noise patterns. They key when building procedural materials is layering, since it is the only way to break up the CG look of your textures. When creating surface textures keep in mind that variations need to be subtle otherwise, even though your texture is seamless, you will end up with a strongly noticeable pattern.
Finally, there is the ambient occlusion generation which is both exported as a map and baked into the diffuse map. In SD there is a node to generate AO, you need to feed it a Heightmap which is created from a normal map. That is basically the flow in the graph. When creating textures be sure to always create an AO pass for your diffuse information since the normal map will do the job when the surface is being hit by a light source and the AO will help to still read the details when only affected by diffuse lighting.
To sum up texturing consider that your Diffuse, Specular, and AO have to be loaded into your Corona Renderer / V-Ray material in SRGB mode and all the rest in Linear grayscale. This is very important, otherwise, your textures won’t look as in SD/Painter.
Post Production
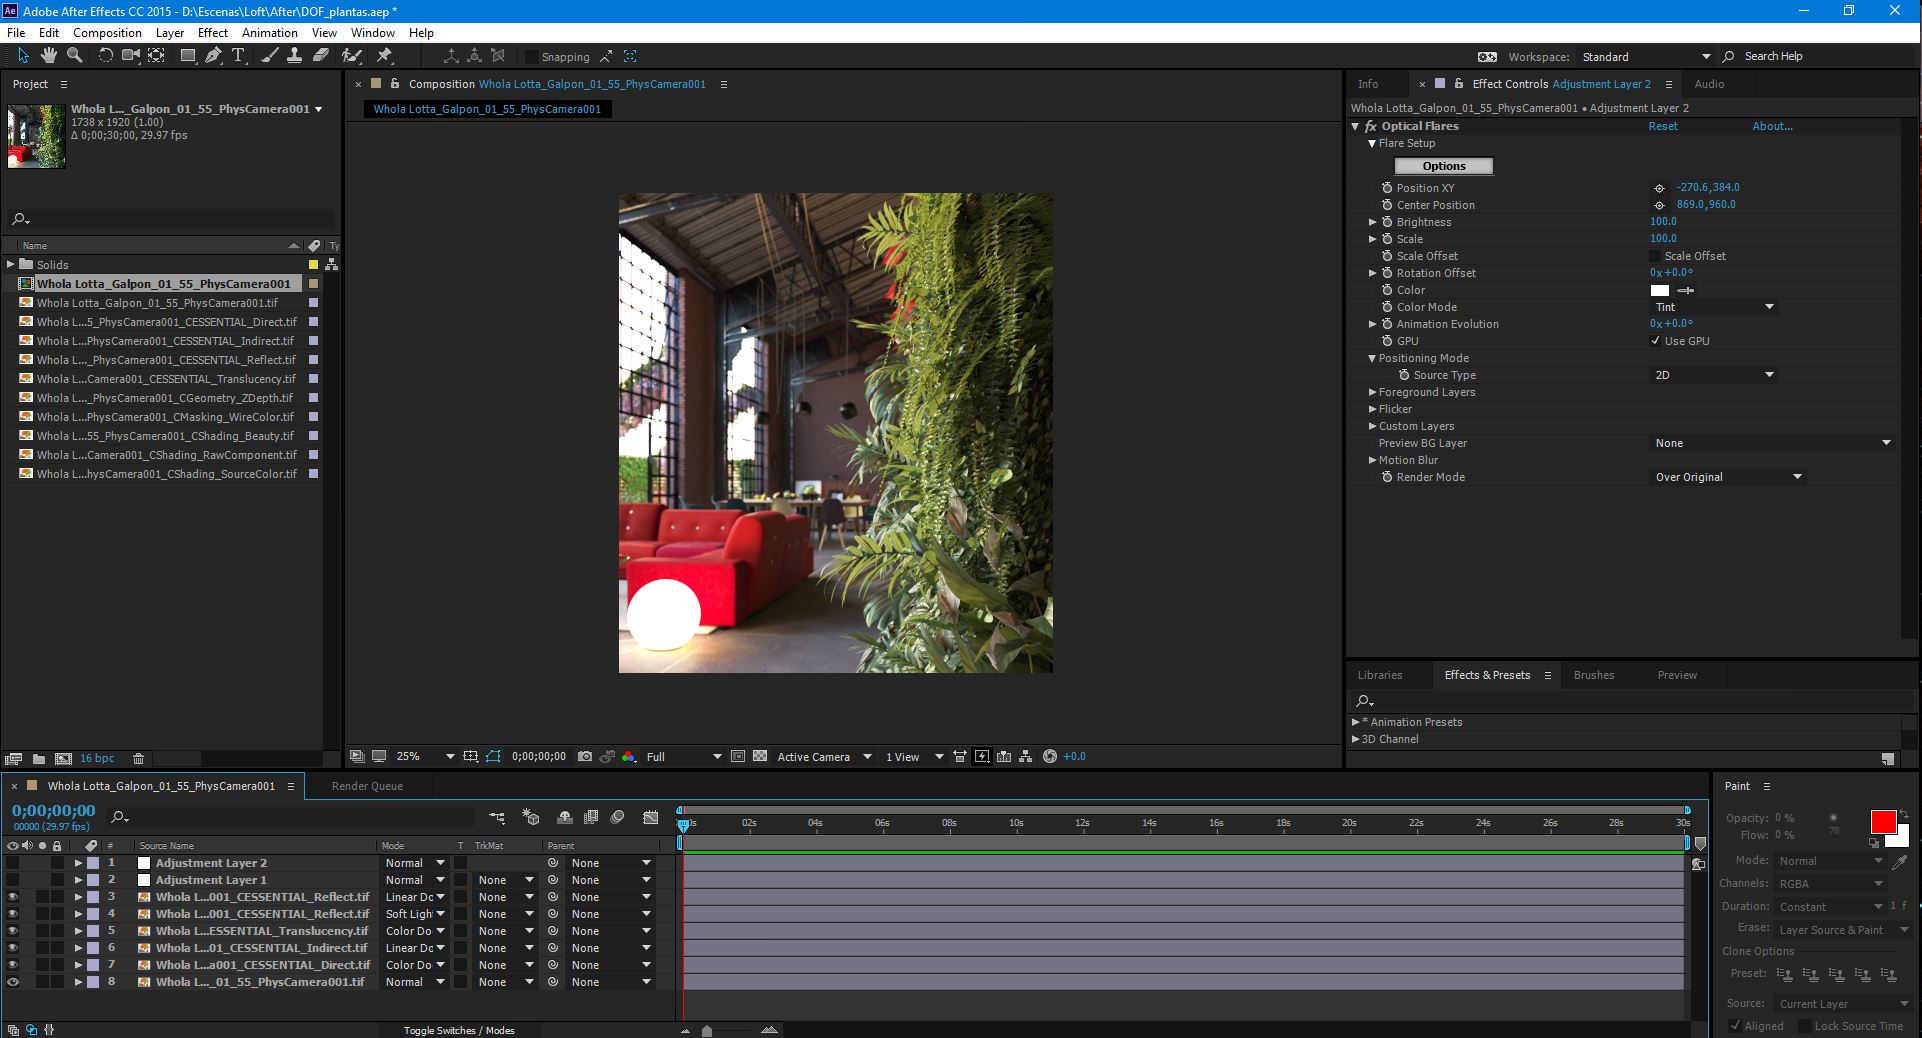
We like to do the post on After Effects because of 3 main reasons. We try to do our best and most of the work in 3d so there is not much to do in post besides color grading, it is really easy to iterate in the post with AE and you always work in a nondestructive way. You can do really cool stuff with the awesome plugins available.
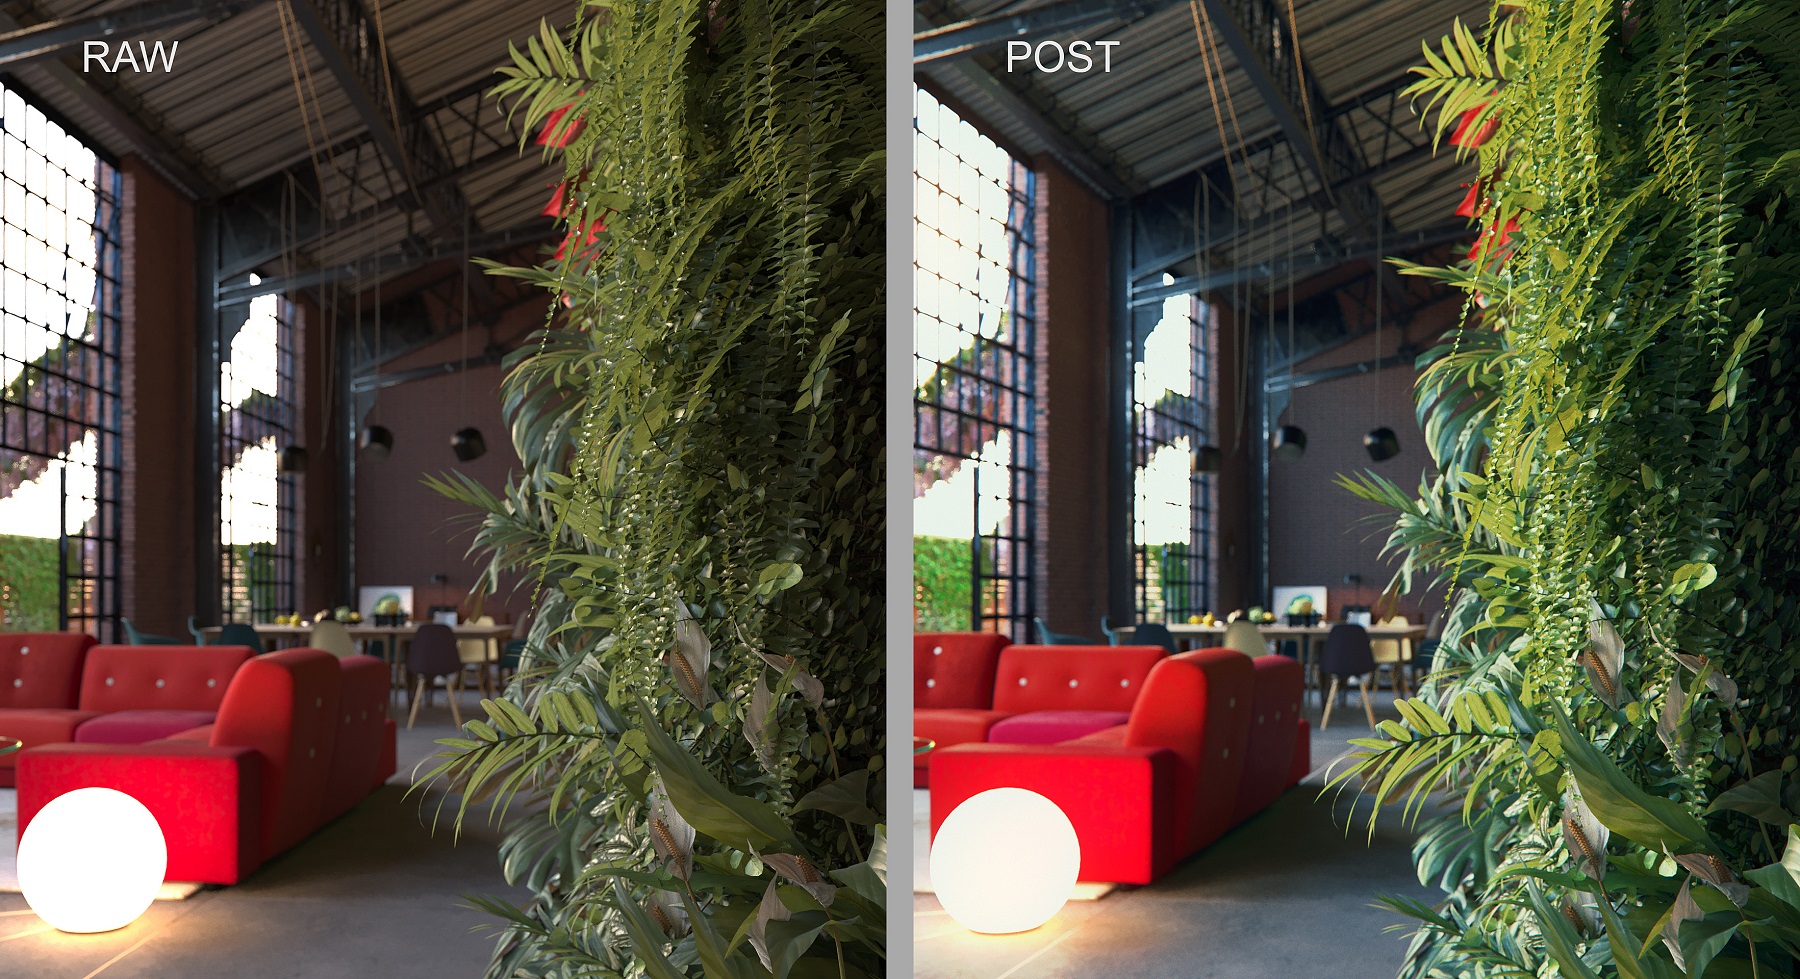
Here is the RAW plus the composition of all the passes. In this case, direct, indirect, translucency and reflect and you can see there the transfer modes mainly to give more contrast.
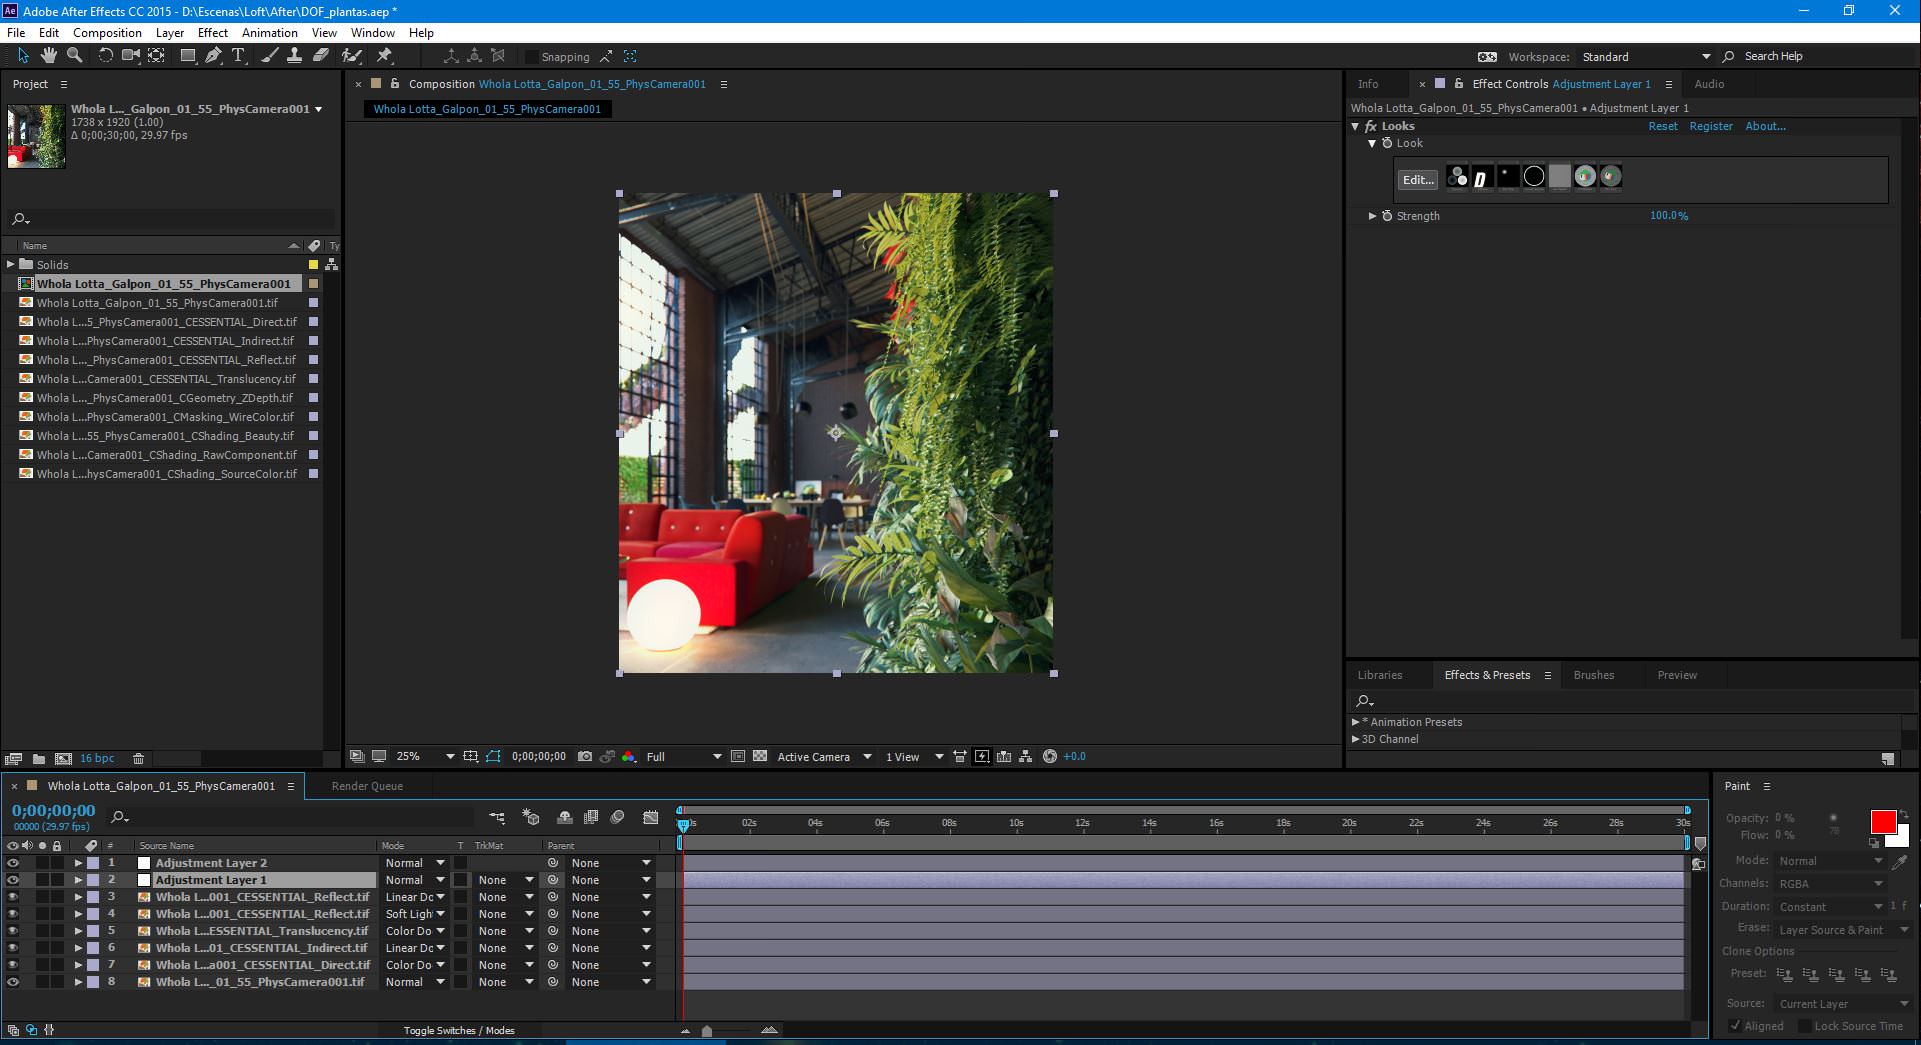
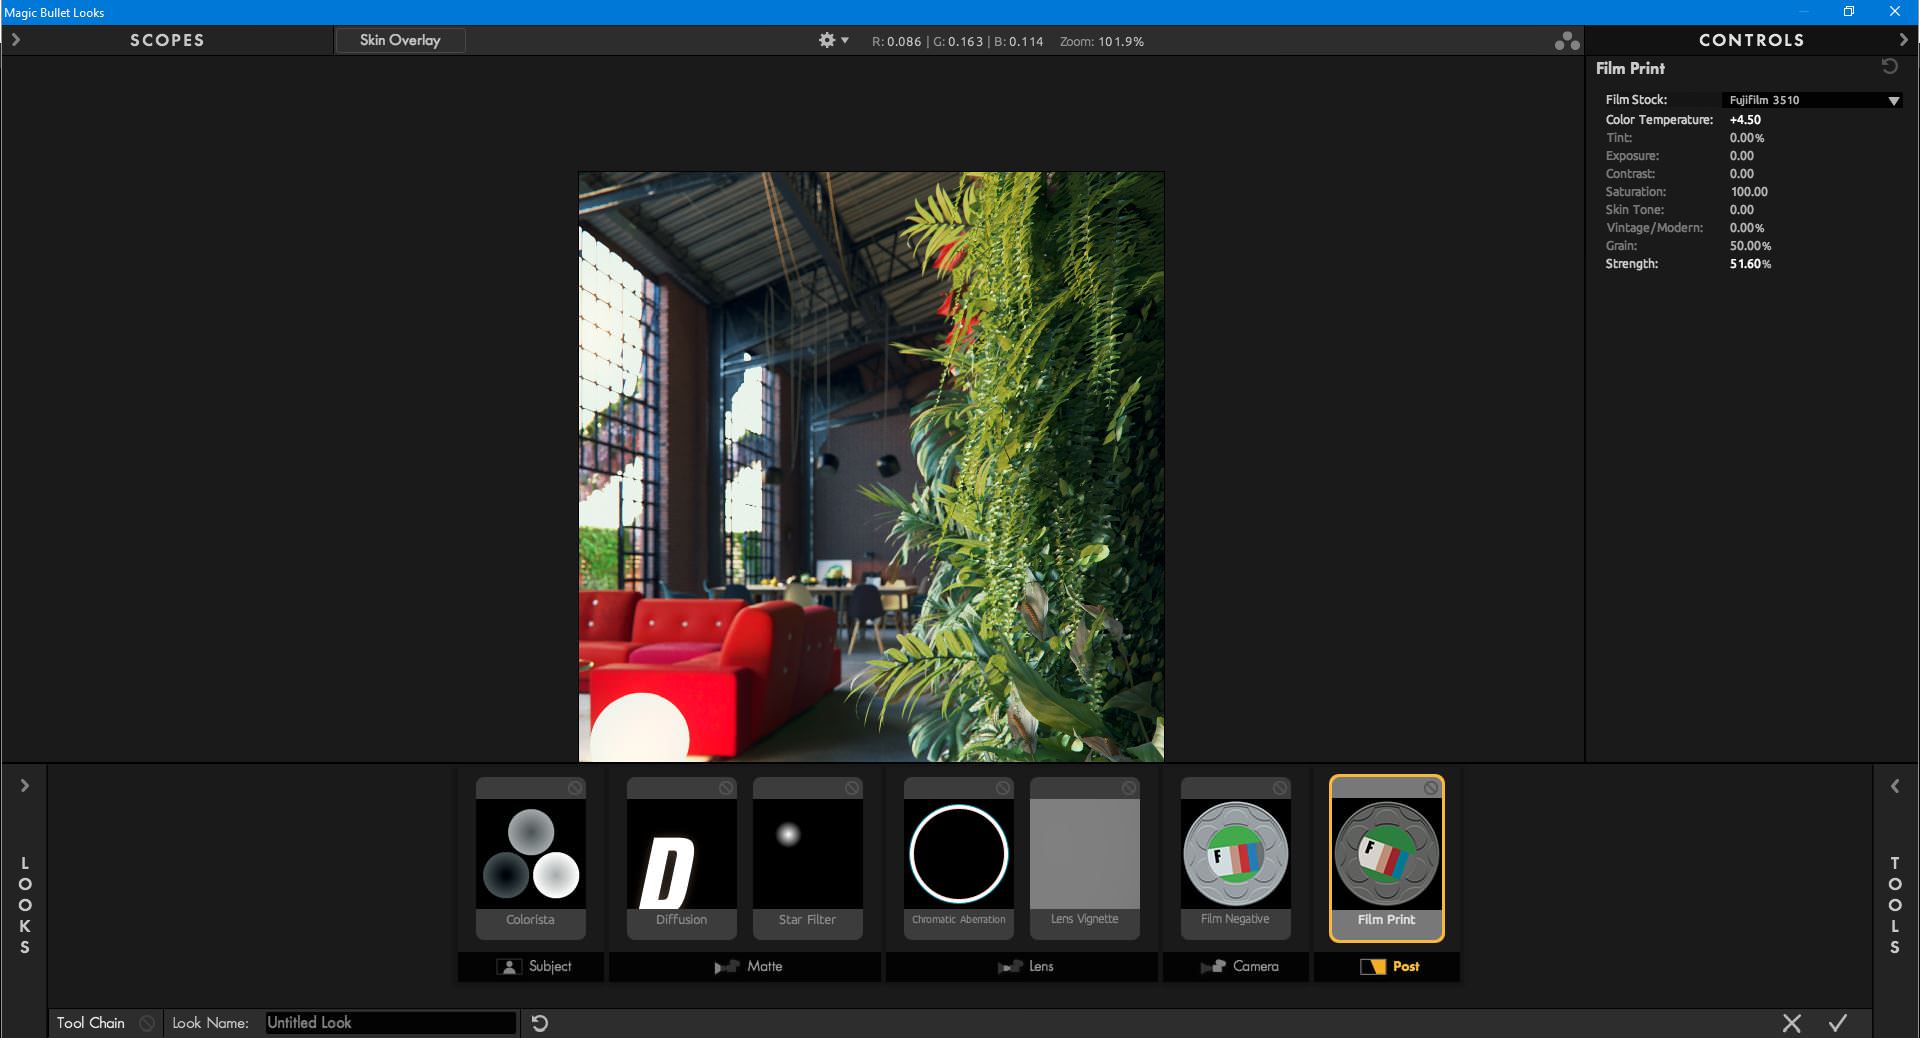
Here is the final touch with Magic Bullet Suite. We use it for color grading as well as other subtle effects like diffusion and film prints.
That is all.
I hope this will help someone in someway. I encourage you try Substance, it is a really awesome software and with all the hype there is around real time arch viz the use of real time engines like UE4, texturing is a really important matter to take into consideration since you will need to deal with two different shading models. Having a texturing solution which can be neutral to both ends is a really nice way of working and keeping things simple.
Thanks for reading and thanks Ronen for giving us the opportunity to show our work here.











Great Tutorial,Hello Ronen Bekerman – 3D Architectural Visualization Blog,i’m a new member of your forum,sorry but i can’t find the “post new thread” button,can you show me that,sorry for this bother 🙂
Amazing job!!!!
Hi guys!!! I think it’s a very great tutorial: the workflow it’s very quick and you can achieve a real great result!!
but i have a question: if i don’t have 3ds max 2017, but I’m using 3ds max 2015 and i don’t have multi tile in my uv unwrap, what is the workflow about uv ??
I have to unwrap every single piece, then attach them together and then what??
thanks a lot
Claudio Ragnar Hi, thanks Claudio. It is not mandatory to multitile unwrap your geometry, it is just another way to do it. You can still perfectly work with max 2015. The workflow with UDIM is easier since you can select in painter at import time the UDIM format checkbox and painter will create a texture set for each tile you have in your mesh. With max 2015, imagine you have 4 different geometries that you want to export to painter, simply unwrap them in the traditional way without attaching the geometry. Then add a unique material to each piece of geometry and then select everything and export as FBX.
When you import your file in painter it will create a different texture set for every single material in the fbx file. Since each one of your meshes will have a unique material you will be able to paint your meshes individualy.
In this video (https://www.youtube.com/watch?v=vrVvu9q6dXg&list=PLB0wXHrWAmCyvb0TsSFb3UunisJHcGcuq&index=2) at arround minute 5:30 you will be able to see the workflow more clear about how meshes are set up for export. It is done with Maya but the concept is exactly the same in max.
Hope this is clear enough
Gaston Suarez Pastor Claudio Ragnar thx a lot for answering to me!!! I finally understand it!!
me encantaria quedar en contacto contigo para aprender todo lo que puedo. He visto tus trabajos y son espectaculares y he visto que usas tambien UE4…intento aprenderlo yo tambien!
espero verte pronto en esta pagina web!!!
thx a lot to @ronenbekerman to take care of this blog…I learn a lot from this tutorial
substance designer mainly works as a material creator for painter. designer can be used for procedural textures creation to texture model roughly while painter can use sbsar created in designer as material to precisely paint your unwrapped model. they both were used in game production pipeline for many years
Lantrancy Hi, thanks for taking the time to write. I would like to clarify on what you say here as it might be misunderstood or misinterpreted by people who want to learn the software and lead them into a wrong path. What you say is just one possible way to use the software. As I said in the article, you can fit both programs to your needs since they are extremely flexible.
Substance Designer does NOT mainly work as a material creator for painter. It is a procedural texture generator (as you say) so that is its main use and about roughly texturing the models well, you can see the work of naughty dog or ubi soft just to name two. Uncharted 4 environments where fully textured with substance designer and I wouldn’t call them roughly textured. Just see the work of Rogelio Olguin.
Regarding painter and as Wes McDermott says though out most of the Allegorithmic instructional videos “…painter ships with a huge library of procedural substance textures and materials so you will rarely need to create them in designer but you can go ahead and do so if you wish…” in fact if you see the Unreal implementation videos, Substance Designer and Painter are used exactly the opposite as you mention here. Most studios which don’t work through high poly baking, texture directly inside substance designer.
Again, stating that the main use or function of the software is “this or that” is a misconception. Besides Substance Designer was released in 2010 and I believe painter two or three years later.
I don’t want to sound rude or say that you are completly wrong in any way, I just could not understand what you intended with you comment and in which way it contributes so that is why I wanted to clarify over what you said
Cheers
Gaston Suarez Pastor
As you said, designer is procedural, that means it has limitations, e.g, left seams on unwrapped model, I don’t think you will like to texture a character with designer, so I call it roughly. of course I know uncharted4, NOT all their stuff was textured in designer. designer is a procedural tileable texture generator from the beginning.
the painter doesn’t have the ability to adjust texture you dragged to the brush slots, besides any library comes with software you will not use them much in real project, that means, if you want to use painter in your pipeline, you’d better purchase them both. this is my point
Thks for sharing! It’s a greate tut! it seem u are good at all skill!
But i got a question, how can u use nanomesh to model the brick wall? Can u show me the detail of that step?
Thks a lot!
VoThanhVinh Hi, to create the brick wall first I did a base mesh in 3ds max with the final width, depth and height for the asset. Then subdivided it and with the editable poly topology tools I created a brick pattern, also used a box with the brick size to get proportions right, and that was exported to zbrush. In zbrush, after creating the bricks variations, I created and insert multimesh and after that a nanomesh brush. You will find these options in the Brush pallete. The insert multimesh is created so that all of the different brick subtools are contained within the brush and then the nanomesh brush to use it with this functionality. Then I created various polygroups selections, selected the zmodeler brush and hit spacebar to select Insert Nanomesh and on the modifier you can select either polygroup all or polygroup island to place your meshes. You can hit the letter M to select a different brick contained within your nanomesh brush and place them onto another polygroup. You can play around with settings in NanoMesh pallet to introduce variation and randomness to your assets. When you are done go to Geometry pallet and hit Convert BPR to GEO and you will have your wall as geometry ready to sculpt detail on it. To export it ouside zbrush you can decimate it or use zremesher if you need topology with quads. Take a lot at zclassroom videos about this tool and it will become way more clear than I can explain it here.
Cheers.
Gaston Suarez Pastor Thks for reply Gaston Suarez Pastor The brick is lying cross each other, and the topology of the wall is like waht i draw, can u plz show me how to do it? I very appreciate it 🙂
great tutorial, beatiful renders. My question is regarding plugging the maps into corona material. I’m new to substance and have been trying to get a good match in corona renderer. I’m using the same HDRI and have exported the maps to Corona. Should I just be able to plug the maps in in their place and that’s it or is there more to it? Would love if you could explain this to me.
bandrade1 Hi, sorry for the late reply. Basically what is the most important thing to remember is that your color maps have to be loaded in sRGB color space and all of your grayscale maps in Linear color space. What this means is that you have to override the gamma value in the bitmap node when you load the texture in 3ds max. So, for glossiness, height, bump, and normal maps you need to set up the gamma value to 1.0 and for Diffuse, AO and specular maps they can be loaded straight as exported from designer.
When dealing with dielectric materials what I usually do is capping the specular level with a corona color map within the range from 45 to 75 sRGB color on the reflect slot and control the Surface properties with the glossiness map based on the fact that all materials need to have a certain reflection amount, even matte ones. Also in Corona 1.4 (in 1.5 this will be fixed) you can control the reflection amount pluggin a corona mix map in divide mode and a color map in the bottom slot. The darker the color the stronger the reflections. Setting up the shader this way you will ensure that your dielectric materials will behave as such avoiding strong and out of range specular reflections on materials like Wood plastic, Stone, etc.
If your material is a metal the color in the corona color map should go within 155 to 255 sRGB range. Also this is where you set you metal color since materials like metals, water or glass have no diffuse contribution so difusse color have to be set to 1 (not 0 because in corona it will render completly black and you won’t have proper results)
The only situation where you will need to pluging a “mask like (whole sRGB range values)” specular map (reflection color slot) is if you are driving with the same shader a mix between a dielectric and a metallic material.
Hope this helps
Gaston Suarez Pastor bandrade1 Thanks man, that helped a lot. regards.
thanks for this, great tutorial, I’m in the process of learning substance painter but i have a question about your workflow. I understand using substance painter for small assets like furniture, but I don’t understand the advantage of using substance designer for general shading. Won’t substance designer always be limited by the fact that it only creates tilable textures? therefore there will
always be a trade between texel density and visible tiling? also using
the vray material creation you can avoid uv unwrapping at all most of the
time. Thanks again for the tutorial, Mike
MikeGibbs Hi Mike, thanks for reading. The advantage is that (when you get some experience with the software) you can create any texture you can imagine/need with a really high amount of detail really fast. Today I can say that in my everyday workflow more or less than 70% of the textures I use are procedurally generated with designer and you won’t be able to tell the difference with a photo texture. Regarding the UVs, it depends on whether you work within (or not) a studio where your work needs to go down the pipeline. I personally don’t use vray anymore but I think you are talking about world space uv (as you can make in unreal engine 4) or triplanar mapping. In this case if you work by yourself you can get away with it but if you work with other people sharing assets or need to transfer your meshes to other programs this method simply doesn’t work. Talking about texture size and texel density, if you think that most of the games where you can see massive environments, those use 4k textures (and a 4k map is considered kind of a big map), the key is about texture mixing and not texture size. You simply cannot map a landscape with a single huge texture because it is inneficient and won’t look good at all. One thing I can say is that I recommend you to watch game development tutorials, specially environment tutorials. I learnt a lot about working efficiently with any kind of scenes, about texturing and mesh optimization as well as modular scene construction. Today I rarely use a texture bigger than 4k thanks to what I’ve learnt with game development methods.
Also, don’t get used to work with world space uvs all the way, it is kind of sloppy 😉 and you loose a lot of control, but that’s just my opinion. Hope this answer your question.
Cheers
Gaston Suarez Pastor MikeGibbs Thanks for getting back to me 🙂 that all makes a lot of sense, I hadn’t thought about the importance of creating sharable assets because I am working just on my own. I’m working my way through the substance painter tutorials on Allegorithmics youtube channel, which are really great, when I’m done with that I’ll have proper look at environment scene creation tutorials, it seems like I’ve been thinking about it in the wrong way… thanks again for your advice 🙂
MikeGibbs Substance Designer can be used not only for tileable textures, it can be used same way as Painter, the only instruments you miss from Painter are manual paint and particle brushes. They both can be used at same time, SD to make custom materials and filters, SP to manually refine masks.
how u create the green wall