Making of Saint Benedict Chapel
2009 Pritzker Architecture Prize Laureate – Peter Zumthor, is among my favorite architects. I especially like his work on Thermal Bath Vals, and must admit I wasn’t so familiar with his work on Saint Benedict Chapel until Federico Spoltore showcased his 3d recreation of it on the forums… and what a recreation it is!!! I’m sure you’ll learn a new thing or two after reading this. Enjoy!
Author: Federico Spoltore
Federico Spoltore, digital artist working currently full time in archviz for 3D studios in Argentina.
Introduction
The Saint Benedict Chapel, located in Sumvitg, Switzerlad, is the work of Pritzker Prize 2009 Laureate – Architect Peter Zumthor.
I have a sane obsession for sacred buildings because I believe that this type of architecture is pure in meaning, concept and function. They are materially, the expression of what happens inside; are the thinking, the faith, the beliefs, sometimes a show of power of their creators. All this put together make a building.
I felt attracted by this chapel in many ways, because of its austere simplicity, the manner in which materials coexist and its artisan and elegant construction. The personal goal here was to try to represent the main and underlying aspects of this work of architecture.
See a short video of the place & the chapel…
Software Used
3D Studio Max, V-Ray Render Engine, Forest Pack 3dsmax Plugin, Onyx Tree and Photoshop.
Visit Federico’s Saint Benedict Chapel Forum Thread to see the render set, along side reading this article 😉
Modeling
I will only cover the main elements most unique to this project, as the modeling is rather simple in general. The first step in this type of project was to gather as much information about the building as possible sketches, plans, photos, videos, etc.
Luckily for me, there is a wealth of information about this chapel online.
I took these following drawings to help me start the modeling of the chapel
I started by creating some planes that I assigned the blueprints on. I used a DirectX Shader material (1) and a StandardFx map type (2). This way you get better texture definition in the viewport, as it will make it easy to trace them later.
I also set the ambient color to a random grey and the diffuse and specular to 100% black (3). Lastly, I set the Top Diffuse Color Enable on and browse to the blueprint map for the Top Diffuse Map slot.
As you can see below, there´s a lot of difference.
What I initially knew when I started modeling was that I would have two different models, one for the interior shots and the other for the exterior shots. So basically, I worked on just one scene up to the point it was time to split it up to two.
The general modeling was very simple, so it did not take too much time to get the main structure done. Extruded splines, poly modeling and primitives.
After the curved structure was done, I started with the first complex piece that this project has The Floor.
From the get go I realized I could not make it like a draft model to improve upon later. It had to be done perfectly from the start, with proper technic that takes into account that the planks must have it´s UV´s.
I did not want any back and forth process going on here.
The Wooden Floor
As an advice, before you start modeling the first poly, I recommend that you study very carefully the information and references you have in order to develop a way of working and technique for solving things in a more efficient, faster and proper way.
I started by tracing the outline of the wooden planks – only half of it due to the symmetry of the floor plan.
I then applied a sweep modifier on it, with a Bar profile and Gen. Mappings Coords. set to ON. After that I started offsetting the outline spline inner direction to make the other planks (I left 2mm of space between them).
When I had finished the half, I made it an Edit Poly and used a Slice Plane to remove the unnecessary geometry along the symmetry line.
Before applying the Symmetry modifier, I selected the edges and made an open Chamfer that later would cap.
Now the planks are separate elements between them.
At this point the geometry of the wooden floor is almost complete and every plank is individually UV mapped because they maintain the mappings coords. generated by the Sweep modifier, but as you will see later in the texture section, this kind of UV mapping won´t help and this is related to the material that will have to be applied.
The Beams & Carpentry
The next step was making the interior beams/supports. For this I took the same spline I did for the floor, copy it and outline it to the center of the
beams in the blueprint – deleted the inner spline.
I created a box for the beam and used the Spacing Tool for placing instances along the spline path. Although the beams have the same spacing
distance, in reality they don´t so I had to arrange them by hand, and finally attached them all as one object.
The same method was used for doing the carpentry and windows frames – vertical windows beams also were attached into one object.
The Ceiling
Now the ceiling. This could be considered as the second complex element of this model at this point. Here are some references
The structure beams were made using spline profiles and sweeps (In some cases I prefer using Sweep instead of Bevel profile because if you for some reason delete the profile you won´t loose the Sweeped geometry).
I thought of using a similar method as for the wooden floor, but for the interior ceiling after not so satisfying results, I decided to try using a texture instead of geometry. So, I basically composed a big texture in Photoshop that would be applied on a Surface mesh.
Here is the basic model with the interior equipment
(GIF Animation : Click to view the Sequence)
Below you can see how the model looks placed in the terrain exterior shots
The Wooden Shingles Cladding
Without a doubt, the most complex part of this project, not only because of the modeling but the material and how to create it.
This project was thought for an animation purpose so everything has to be there, the dirt, the leaks, the aged wood, etc. Although I made stills images, I don´t like to do matte painting in post production, I prefer to solve it in 3D if it´s possible.
The first approaches to model this, were using single shingles, converting them to V-Ray proxies and scatter them all over the surface
This did not work for many reasons. I had overlapping geometry, I needed control over the general material and wood variation and distribution, some shingles had to be placed in different forms and the problems continued…
I also tried some plugins and scripts but without any success.
Finally with a little of inspiration from the Floor Generator Script, I found a way to resolve it, and here are the steps
I started by creating a plane with some subdivisions according to the approx. measure of the shingles, then converted it into an Editable Poly Object, selected the interior edges and made an open chamfer, added a UV map and checked the face mapping option.
I Then added an Edit Poly modifier, selected by element and tessellated them twice to have little subdivisions over the faces. Next was selecting intercalated rows and move them a half of a column – just like bricks. Selected all the elements and scaled them up 210% on it´s Y axis. Rotated the faces 5º and selected the borders of all the elements to extrude them locally (this is for simulate thickness and avoid extra geometry on
the backside).
Here is an animated sequence to make it a bit more clear
(GIF Animation : Click to view the Sequence)
I added a noise modifier here but only for illustration purpose because the noise was applied when the belt of panels was created.
In this way I made several of these panels, array them horizontally as to wrap the main structure (like a belt) and then array it vertically. I used a Bend modifier for curving the panels, attached all the pieces and then put the noise.
(GIF Animation : Click to view the Sequence)
(GIF Animation : Click to view the Sequence)
At the end of the above sequence you can see that the bottom shingles had been cut. That was made with the Quick Slice Tool and a bit more of patience.
The last shot were you can see the shingles in foreground was just a piece of the entire cladding but modeled in a high poly resolution using the same process.
The Vegetation
There is not much to say about this, mainly because it does not take a major role in the scene, but for the curious – here are some details.
All the vegetation was modeled in OnyxTree, except for the grass, rocks and groundcover that were made in 3dsmax.
Here are all the species – Conifers, shrubs, flowers, groundcover, grass and rocks.
Textures and Materials
The Wooden Floor
Lets see some references first
What I tried first, with the floor material, was to create a Multi/Sub-object with one main wood material and the others would be a copy of it but with offsets on it´s diffuse maps and with these, a Material by element modifier on the geometry of the floor to assign random material to each element (planks).
These works, but was a big headache tweaking all the sub-materials for avoiding tiling.
Then I thought of using one material for the entire geometry but giving the variation with the Multi Texture Map by CG-Source. This went much better in terms of easy material handle and final result, but having a lot of multiple textures increased considerably the RAM
consumption, so once again I had to search for another method.
What finally solved the problem was creating one material with a big texture and unwrap the geometry as simple as that.
(GIF Animation : Click to view the Sequence)
And here is a decomposition of the material
(GIF Animation : Click to view the Sequence)
Ill add some words to this
I have a VRayOverrideMtl with the main base material and a GI material. The GI material is a standard gray VRay material. I do this because I want to override the color bleeding of the main material for a lighter one. Then in the base material I have a blend between the base material and two coat materials that add dirt on top of the base one using different masks.
That´s it!
Oh, almost forgot when it comes to creating materials, I try (if is possible) to avoid using many textures in one material, and with more reason when from a single texture you create others like bump, reflection maps, etc. Create them in Photoshop for example, is a straightforward process, desaturation of the image, playing with curves, brightness and contrast and you’ll have a decent map.
Of course that this is not for all the cases but I believe that is in most of them. So here you can see the above process done in Max..
(GIF Animation : Click to view the Sequence)
In these way you use less maps and consume less RAM because Max loads one texture, not multiple.
The Wooden Shingles Cladding
Lets see how they look first
The shingles cladding material took a lot of investigation on how to make them look like the real thing, with the aged wood, the leaks, drips, dry wood, etc.
If you look at the photos of the chapel (or had been) you will see that the wood degrades into a greyish tone (maybe because of the cold temperatures, humidity and sun light). This is very visible on one half of the entire chapel, the other half has a more reddish tone (the natural color of the wood) and lastly, an almost black tone is smaller obscure parts of the cladding.
For the entire geometry, the floor, beams, and window carpentry, I used just one main material (reddish wood in these case) blended with coat materials (grays and black wood). All of them are standard VRay materials.
The main Reddish Wood Material breakdown goes as follows
As you can see Im using the Multi Texture map in the diffuse slot, and here Ive loaded 84 different textures only for the red natural wood.
Here is an example of some textures used (the original size of each texture is 350% bigger):
To find good photos to derive these textures from was a real big trouble, so a big part of them had to be created from scratch in Photoshop or reconstructed from low res photos.
The Gray / Black Coat Materials
Grays
Black
These four materials were blended by using vertex paint as masks in different channels, so I painted a mask on the geometry for the gray shingles and other mask for the blacks. I also used as mask a VRayDistanceTex were I put a kind of dummy that wrapped a half of the chapel in order to cover that half more uniformly.
(GIF Animation : Click to view the Sequence)
The Window Carpentry
This was really simple, I attached all the vertical elements as one object, unwrapped it as I did the floor, applied a seven material Multi/Sub Object and a MaterialByElement on the geometry with a random distribution Nothing else!
Lighting Setup
The lighting was very simple, in both interior and exterior shots I used HDRI lighting as the main source of light. For the interiors I added also a VRaySun. I always try to imitate and reproduce the natural rules of light, so I don´t usually put fill lights in my personal projects.
Here is the used lighting setup
The Volumetric Light
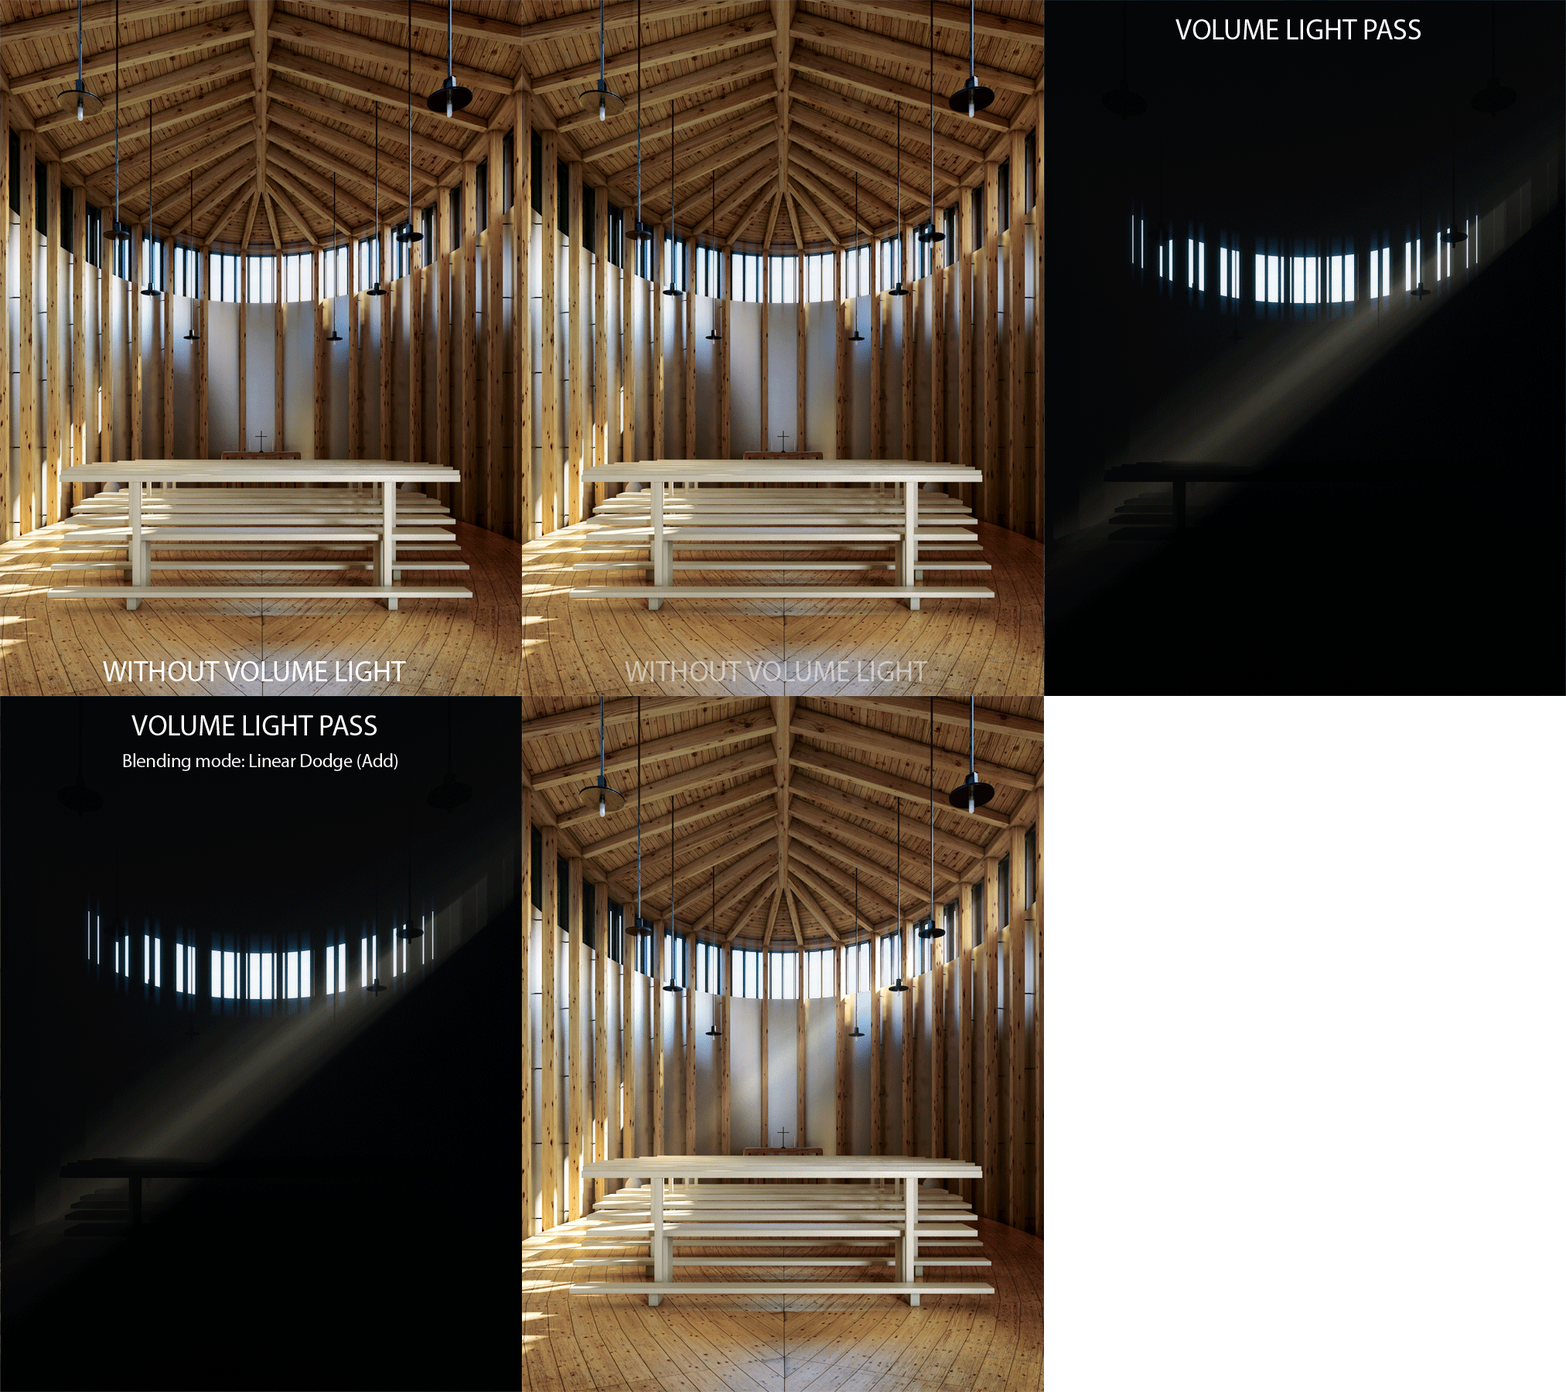
I used volumetric light only in one image, but my original intention (as this was to be an animation) was to use it in almost all the shots in a very subtle way, so I did not want the base rendering with the volume light because in these way you have no control over it when it´s rendered. I prefer to handle and have freedom over this effect in post production.
(GIF Animation : Click to view the Sequence)
What I did for having an extra pass without having it in the base render is to render this effect in a black model of the chapel for then applying it as a Screen or Linear Dodge blending mode in post production.
Ill explain the steps
First I saved the scene to a new file, because I wont have any materials or the original settings in this new scene file. Then I configured the VRayEnviromentFog to my taste and applied a 100% black VRayLight material to the entire model (here is when the materials get override).
I selected all the geometry and applied this to the VRay object Properties.
Here you can see the render setup settings. For faster results I used Adaptive Subdivision as AA but no anti-aliasing filter.
And the final result (original size of 4500px on longer side).
Doing it this way, I get much faster renders of volume light and with the possibilities and freedom that post production has to offer.
Rendering
Nothing very special about the rendering and rendering settings of the scene. Maybe just the use of bitmap proxies that you can read more about at – Global Settings and Defaults for Bitmap Proxies Dialog
This utility was very valuable for this work because I used very big textures sizes, plus a lot of grass and vegetation, these means a lot of RAM being consumed.
I don´t have a big machine, so optimization is what I do most. Luckily, I had no problems with the RAM consumption. Interiors took approx. 4GB and exteriors (with bitmap proxies) between 5GB and 8GB. Rendering times vary a lot. In the interiors they went from 1 hour to 7 hours on images from 2500px to 4500px on long side, and exteriors from 20 minutes up to 2 hours on images of the same size.
The render setup for exteriors
The render setup for interiors
Post Production
I didn’t´t want something fancy here so I went for a more naturally look in terms of aesthetic of the images but giving my self more freedom
with the moods and composition.
Here an example:
(GIF Animation : Click to view the Sequence)
Conclusion
If you reached this point, you have lots of patience!
I hope you enjoyed reading this article and find something new or interesting to add to your workflow. Id also like to thank Ronen for giving me the chance to publish this on his blog sharing it with you all!
Best regards,
Federico.


AWESOME…i only gallop through the article, but GREAT!
@ThomasGruender Great… Let me know if the GIF’s work ok for you.
@ronenbekerman @ThomasGruender yep, it works!! (by the way, i sent you a mail, because i can’t open image files in the forum, what I have to do, to get access?)
@ThomasGruender Send me that email again with your user name in it 😉
@ronenbekerman well, my username is gavberlin and as far i can see i can’t send you a private message, too. can u fix it….pleeeaaasssse!
Fantastic work! You made awsome work! Congrats!
I mean that you made awsome work with your making-of article ! 🙂
great tutorial… and lots of work put into this.. congrats for your amazing work!
One of the best tutorials I have ever seen! Congrats, magnificent work!!
Thanks.. very detailed tutorial.. U have done a great work 🙂
Thank you guys for your warm feedback and thanks Ronen for your effort and commitment! 🙂 It was a pleasure to write this article for all of you.
Excellent project and great making off! Keep going!
Thank you for the Tutorial. Great method for multi maps from one texture.
what an insanely great tutorial on your insanely great rendering of an insanely great building by an insanely grea… thank you so much for sharing your knowledge with us, federico.
Loved these renders when I first saw them. So textural but clean at the same time.
I must applaud Federico for a very in depth tutorial. Many neat tricks as the RGB and Output for Reflec and Bump.
Will be reading this in depth later. Well done. Your sharing is very much appreciated.
Very useful tutorial, learn a lot from here. Like GIF animation image, very helpful and easy to understand.
I’ve viewed your making off thoroughly and learned some interesting things. But I have some questions.
1. Why have you used vertex paint instead of the vraydirt?
2.You’ve used VrayOverrideMtl with the gray material and the furniture looks different from the view of the color.
3. Window carpentry material, you’ve used Multi/Sub-Object with the 7 different materials. Would it be easier to use the Vraymultisubtex with one texture? This would have taken less memory.
4. Just a little note) The metal panel along the wall looks unnatural. It’s strange why you haven’t given the texture of dirt and leaks. And the noise because you’ve used too little Noise thresh.
Thank you again for this informative making of ! I’d really like to know more about how you made the textures. 84 textures of high resolution is painful )
great making of…learned allot..thanks
Could you tell me, where can i download the used HDRI images? (sorry for my bad english)
.Great tutorial, Thanx!! You have awesome works!!Could you tell me, where can i download the used HDRI image? (sorry for my bad engilsh)
Could you please put a readable scale on your floor plan diagram, or tell me a website where to get it. Thanks in advance, could it be in metres or centimetres thanks
I would really appreciate a scale that we could read or, as said before, a website link for the dimensions of the chapel. Thanks you 🙂
i cant find the dimensions, someone can tell me pls ?